
It’s the third part of the Copilot Studio and F&O Extensibility Series, and we’re going to learn about client plugins!
Remember that to follow along with the steps of this post, there are some prerequisites that you can check here: What do you need?

If you missed any of the first two posts of the series, you can read them now:
- Part 1: Copilot Studio 101: Extend Dynamics 365 F&O Copilots.
- Part 2: Build an X++ AI Tool for Copilot Studio in Dynamics 365 F&O.
- Part 4: Troubleshoot Copilot Studio errors with Postman.
Table of Contents
What’s a client plugin?
With client plugins, you can take action in a specific form. This form will be the context in which the action is available, and then you can call functionality, operations, or the business logic in there.
But hey, wait! Isn’t that EXACTLY THE SAME as the AI tools we learned about last week? That’s what I said too when AI tools were released: “Heh, then I can just use AI tools for everything”.
In next week’s post, we’ll learn in detail the differences between using client plugins and AI tools.
Client plugins extend the SysCopilotChatAction class using a data contract for the input and response parameters, similar to AI tools.
Action types
For client plugins, we can define three types of actions depending on the scope.
Global actions
These are client plugins that have no specific context and can run on any form in the application.
To define a class as a global action, you must decorate it with the SysCopilotChatGlobalAction attribute.
Form actions
Only applicable on the specified form (or forms). Copilot Studio will only run your client plugin of this type if you’re on one of the forms that your class specifies.
To define the forms, you must decorate the class with the Export and ExportMetadata attributes.
To use the Export and ExportMetadata attributes you need to add a using System.ComponentModel.Composition; to your class.
For example:
[ExportMetadata(formStr(BatchGroup), identifierStr(FormName))]
[ExportMetadata(formStr(Batch), identifierStr(FormName))]
[Export(identifierStr(Microsoft.Dynamics.AX.Application.SysCopilotChatAction))]
Runtime actions
Available only where YOU define! That’s real power! I’m joking. 😛
To enable this kind of action, you must use SysCopilotChatAction::addToCopilotRuntimeActions with the following parameters:
- runTimeAction: the class name that contains your code.
- removeOnFormChange: a boolean indicating whether the action is still registered when you go to another form.
- context: an object containing the context to pass to the action.
To disable the action, just call the SysCopilotChatAction::removeFromCopilotRuntimeActions with the runtimeAction parameter.
Input and output parameters
For input parameters, we must decorate the parm method with the DataMember and SysCopilotChatActionInputParameter attributes.
The SysCopilotChatActionInputParameter one takes two parameters, like in AI tools:
- description: a description of the parameter.
- isRequired: a boolean indicating whether the parameter is mandatory.
For output parameters, decorate the parm method with the DataMember and SysCopilotChatActionOutputParameter attributes.
The SysCopilotChatActionOutputParameter only takes one parameter:
- description: a description of the parameter.
You can have as many input and output parameters as you need, not just one.
Implement the executeAction method
And finally, to implement the X++ logic, we need to do it in the void executeAction(SysCopilotChatActionDefinitionAttribute _actionDefinition, Object _context) method.
Here you can use the input parameters that you need in your logic and the output ones to return the values, which can be used later in Copilot Studio.
Creating a client plugin
Now let’s get to work and code a bit. I’m sure you’re wondering which incredible use case I’ve come up with.

This time we will be using the Copilot sidecar chat to confirm a purchase order without clicking the form button, and that only works in the PurchTable form.
Create the class
As I said earlier, we need to create a class that extends the SysCopilotChatAction class. I’ll start by showing the top of the class:
using System.ComponentModel.Composition;

[DataContract]
[ExportMetadata(formStr(PurchTable), identifierStr(FormName))]
[Export(identifierStr(Microsoft.Dynamics.AX.Application.SysCopilotChatAction))]
[
    SysCopilotChatActionDefinition(identifierStr(MS.PA.AAS.AP.AASPurchTableConfirm),
        'Confirm a purchase order',
        'Confirms an open purchase order',
        menuItemActionStr(AASPurchTableConfirmAction), MenuItemType::Action)
]

public class AASPurchTableConfirmAction extends SysCopilotChatAction
We decorate the class with the DataContract and note the using on top; otherwise, the Export and ExportMetadata attributes won’t be available.
In the ExportMetadata attribute, we pass two parameters:
- The name of the form.
- And the FormName identifier.
If you want this plugin to be called from more forms, you can add as many ExportMetadata lines here.
Then we add the Export attribute with the identifierStr(Microsoft.Dynamics.AX.Application.SysCopilotChatAction) parameter.
And for the last attribute, we add SysCopilotChatActionDefinition with the following parameters:
- The identifier of your plugin. It must start with
MS.PA.and after that you can name it however you want. - The name of your plugin.
- A description for the action it does.
- An action menu item that calls this class.
Next, we have the class members:
private PurchId purchId;
private boolean hasError;
private str errorMessage;

[
    DataMember('purchaseOrderNumber'),
    SysCopilotChatActionInputParameter('The purchase order number of the PO you want to confirm.', true)
]
public PurchId parmPurchId(PurchId _purchId = purchId)
{
    purchId = _purchId;
    return purchId;
}

[
    DataMember('hasError'),
    SysCopilotChatActionOutputParameter('Indicates whether there was an error during the confirmation process.')
]
public boolean parmHasError(boolean _hasError = hasError)
{
    hasError = _hasError;
    return hasError;
}

[
    DataMember('errorMessage'),
    SysCopilotChatActionOutputParameter('The error message if there was an error during the confirmation process.')
]
public str parmErrorMessage(str _errorMessage = errorMessage)
{
    errorMessage = _errorMessage;
    return errorMessage;
}
As I said, you can have as many input and output parameters. Just make sure you decorate them with the correct attributes.
Finally, here are the executeAction method and a helper method:
public void executeAction(SysCopilotChatActionDefinitionAttribute _actionDefinition, Object _context)
{
    super(_actionDefinition, _context);

    try
    {
        PurchTable purchTable = PurchTable::find(this.parmPurchId());

        if (purchTable.DocumentState != VersioningDocumentState::Approved)
        {
            throw error(strFmt("Purchase order %1 is not in an approved state and cannot be confirmed.", this.parmPurchId()));
        }

        PurchFormLetter purchFormLetter = PurchFormLetter::construct(DocumentStatus::PurchaseOrder);

        PurchaseOrderId purchOrderDocNum = strFmt('%1-%2', this.parmPurchId(), VendPurchOrderJour::numberOfPurchaseOrderVersions(purchTable) + 1);

        purchFormLetter.update(purchTable, purchOrderDocNum);

        FormRun formRun = _context as FormRun;

        if (formRun)
        {
            formRun.dataSource(formDataSourceStr(PurchTable, PurchTable)).research(true);
        }
    }
    catch (Exception::Error)
    {
        this.parmHasError(true);
        this.parmErrorMessage(AASPurchTableConfirmAction::getInfolog());
    }
}

private static str getInfolog()
{
    SysInfologEnumerator enumerator;
    SysInfologMessageStruct msgStruct;
    Exception exception;
    str error;

    enumerator = SysInfologEnumerator::newData(infolog.copy(1, infolog.num()));

    while(enumerator.moveNext())
    {
        msgStruct = new SysInfologMessageStruct(enumerator.currentMessage());
        exception = enumerator.currentException();
        error = strFmt("%1 %2", error, msgStruct.message());
    }

    return error;
}
This checks that the order is in the Approved status, posts the PO confirmation journal, and refreshes the form.
As a last step, create an action menu item for this class, and we’re done on the X++ side.
Create Copilot Studio topics
We now need to create two topics in Copilot Studio. If you don’t know what topics are, I recommend reading the first article in the series: Copilot Studio 101.
Trigger action topic
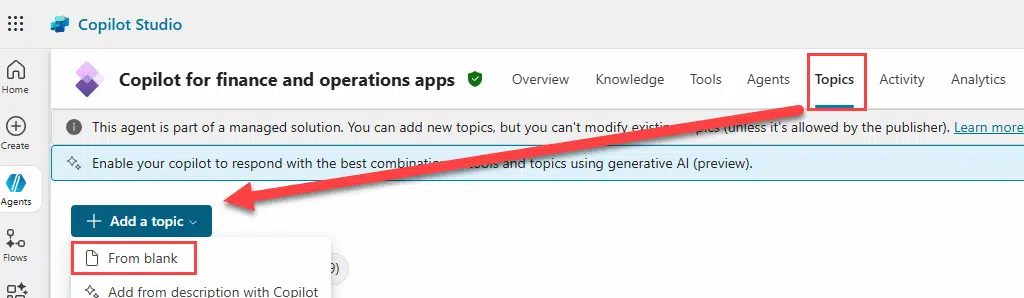
The first topic will be used to trigger your action. Go to the Topics tab and click the Add a topic button, selecting From blank:
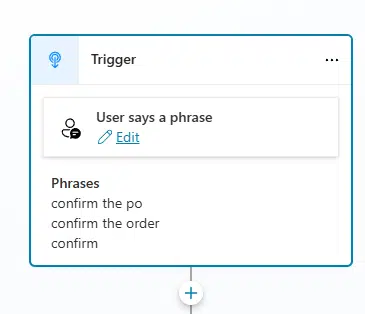
Give it a short but descriptive name. I’m following kind of a naming pattern for topics, where I have an AAS prefix, a dot, and a short name. I’ve named this one AAS.ConfirmPO.
In the trigger, add some phrases you’d like to use. Like confirm the order:
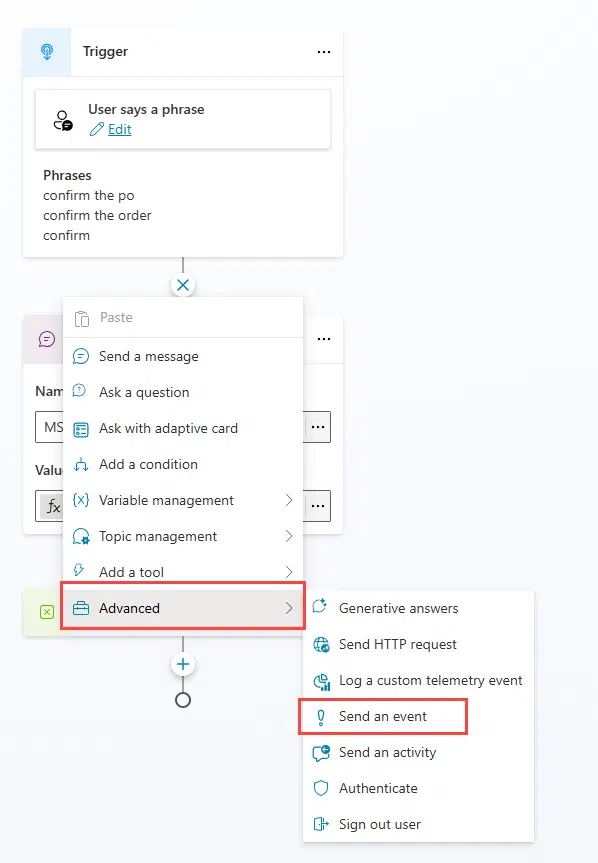
Then add an event activity type action from the Advanced menu:
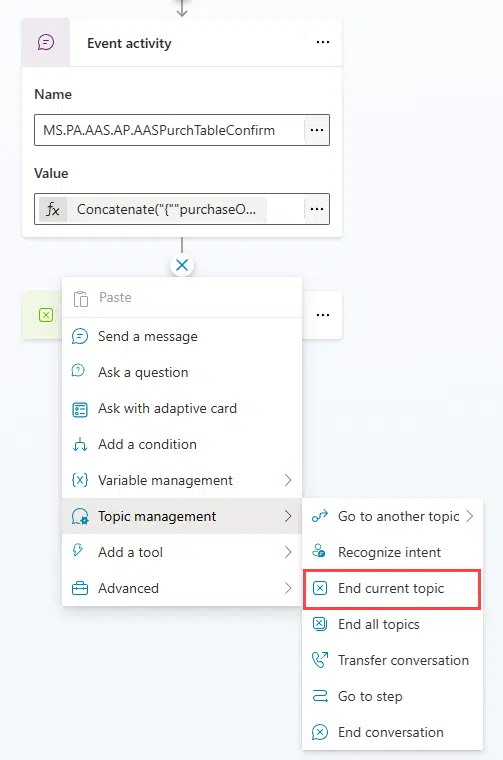
Set the Name field to the same value as the first parameter of the SysCopilotChatActionDefinition attribute in the class. Mine was MS.PA.AAS.AP.AASPurchTableConfirm.
In the Value field, add this expression:
Concatenate("{""purchaseOrderNumber"": """,Global.PA_Copilot_ServerForm_PageContext.titleField1Value, """}")Here we’re creating a JSON variable with our purchaseOrderNumber input parameter, and as its value, I’m using the first title field of the PurchTable table with the variable Global.PA_Copilot_ServerForm_PageContext.titleField1Value.
If the table doesn’t have a title field, you can use the Global.PA_Copilot_ServerForm_PageContext.rootTableRecId variable and replace the input parameter for a RecId referencing the PurchTable record.
Finally, add an End current topic action from the Topic management menu:
Save it, and our trigger topic is ready.
Response topic
Now we need a topic to process the response. I’ve named this one AAS.ConfirmPOResponse.
Change the trigger to the type A custom client event occurs. Set its Event name property to MS.PA.AAS.AP.AASPurchTableConfirm.
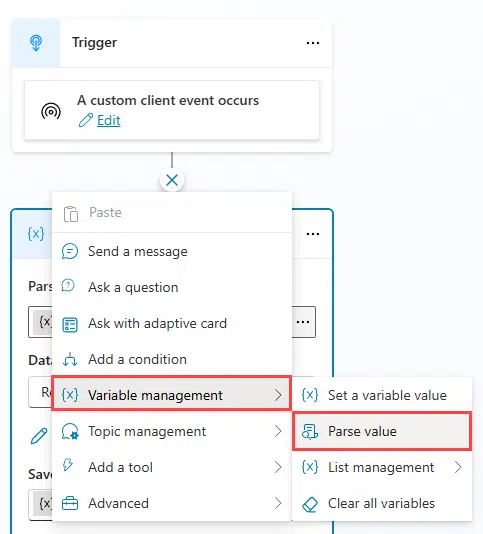
Now we need to add a Parse value action from the Variable management menu:
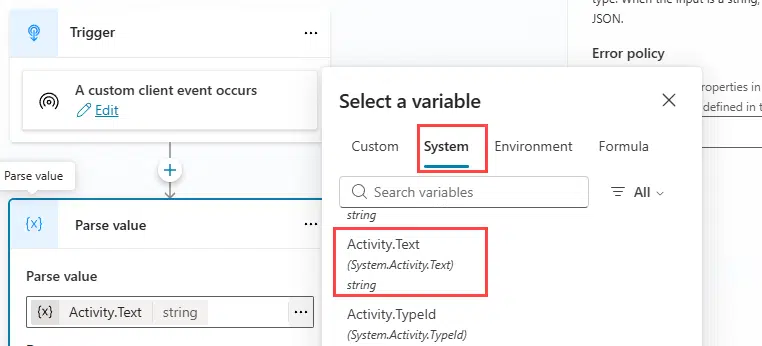
Here we will parse the response from our class. Set the Parse value field to the System.Activity.Text variable (in the System tab):
Then in the Data type field, select From sample data and click the Get schema from sample JSON button. Paste this sample:
{
    "isResponse": true,
    "purchaseOrderNumber": "PO-00001",
    "hasError": true,
    "errorMessage": "Oh, no! An error"
}
This is similar to parsing JSON on Power Automate. You’ll now have these four JSON fields available individually.
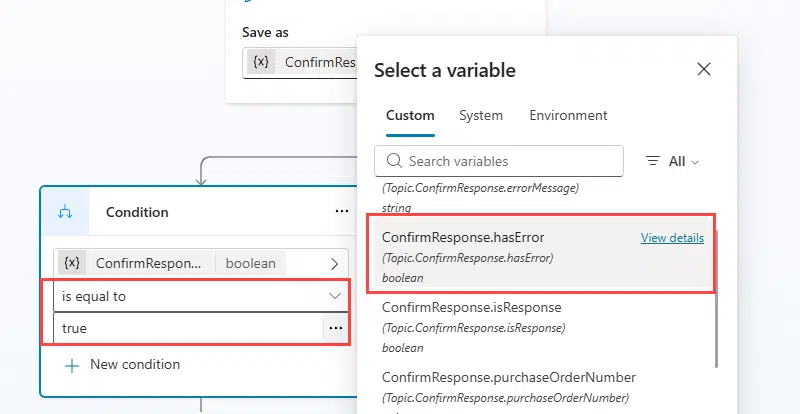
Now add an Add a condition control. We’ll show the user a different message depending on the outcome of the confirm operation.
On the left condition, we’ll manage errors. Select the ConfirmResponse.hasError variable and check if it’s true:
Then add a Send a message action, with the following:
- Text: “The purchase order “
- Variable: ConfirmResponse.purchaseOrderNumber
- Text: ” couldn’t be confirmed, an error occurred. “
- Variable: ConfirmResponse.errorMessage
So it becomes human-readable when it’s displayed.
In the other branch and add a Send a message action with the following:
- Text: “Purchase order “
- Variable: ConfirmResponse.purchaseOrderNumber
- Text: ” confirmed!”
Save your topic, and now click the Publish button so it’s available on F&O’s sidecar chat.
Hey! What about the DataAreaId!?
Before testing the plugin, let me answer this question.
If you remember from the previous post about the AI tools, we had to explicitly specify the company in which the code was running; otherwise, it would take the default company.
With client plugins, the company that the code will run in is the active one. That’s also another benefit of the context!
Test it!
Now go to the purchase order form and select one that’s not confirmed. Open the sidecar chat and tell Copilot, “Confirm the order”. The process will run and…
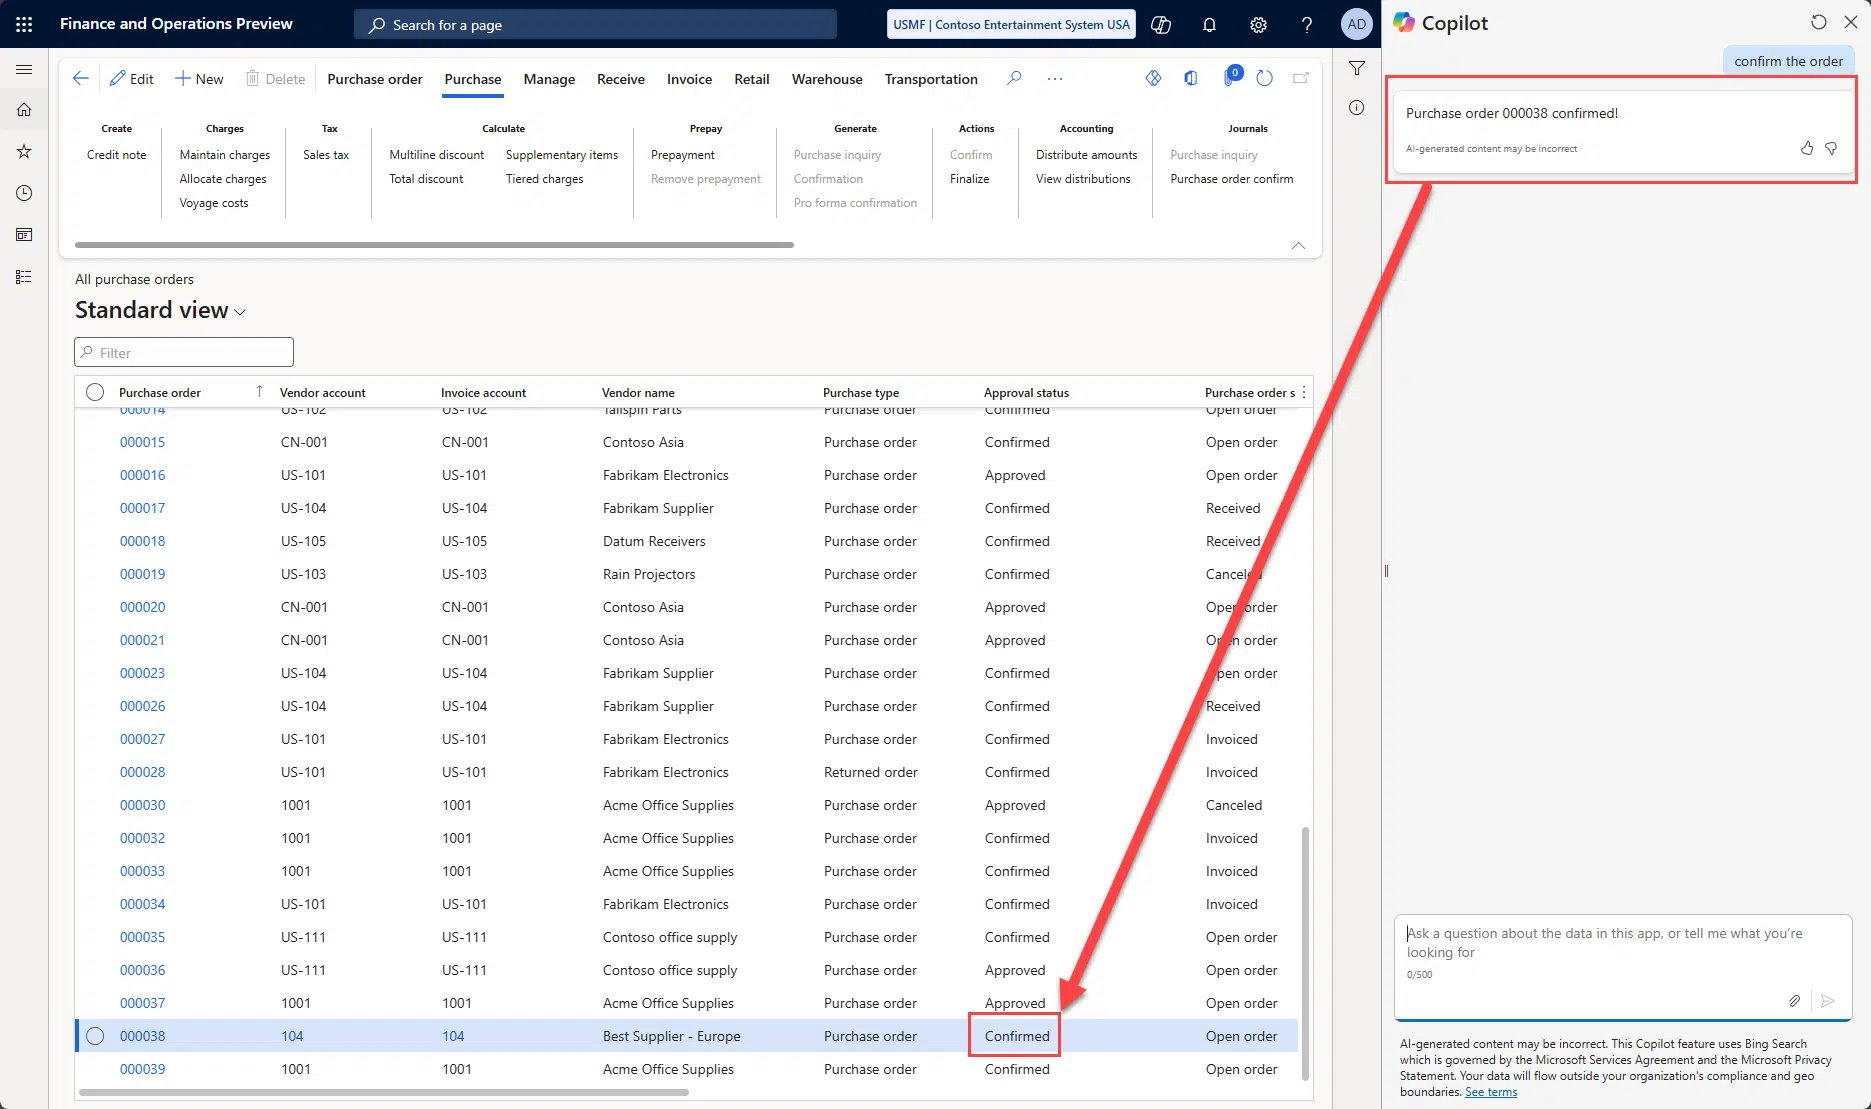
We have confirmed the order! Well, not we, but Copilot Studio.
Now let’s try to run the other conditional branch, the one where we get an error. Just try confirming an order that is already confirmed.
That works too! We get the error message in the sidecar chat!
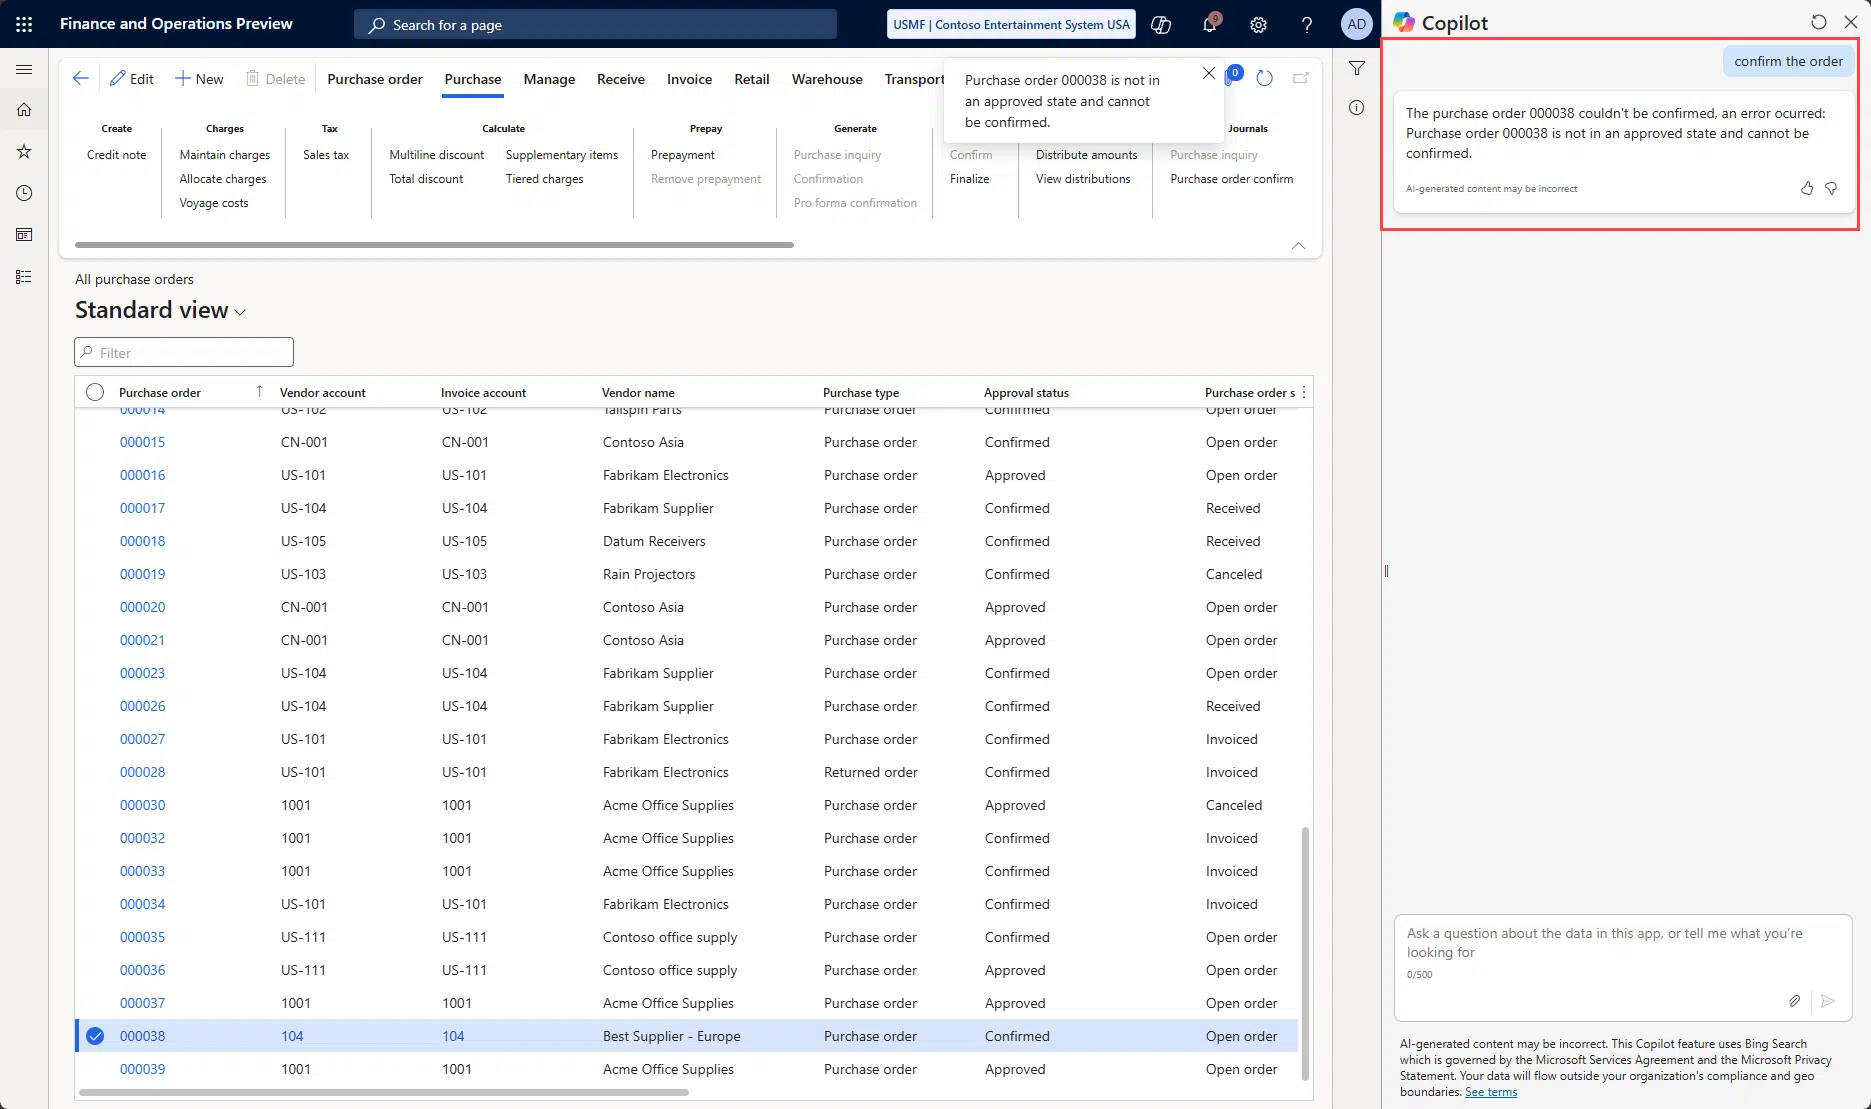
As expected, we get the message from our throw error in the function.
Conclusions
Client plugins give Copilot superpowers inside the form you’re on—perfect when you need context or guardrails.
We’ve learned the essentials:
- Define the scope (Global, Form, Runtime).
- Decorate the class (
DataContract,Export/ExportMetadata,SysCopilotChatActionDefinition). - Create inputs and outputs.
- Implement
executeAction(). - Create the trigger and response topics.
Reach for client plugins when the action must respect the current form/session and feel like a menu action; keep AI tools in mind for broader, cross-form logic.
In the next post, we’ll put them head-to-head so you know exactly when to use each.
See you in part 4!


3 Comments
Pingback: Build an X++ AI Tool for Copilot Studio in Dynamics 365 F&O - ariste.info
If i want to confirm multiple PO how can i do it ?
I haven’t tried passing a list of POs. If you want that, you can try changing the example to use multiple values. This means changing the types in the DataContract class and in the topic.
An alternative would be to use the MCP server in the agent, and that would make the client plugin not necessary.