We’ve been working with the F&O development VMs for a long time, specially Microsoft partners that need to be able to quickly and easily change between different customer environments, and using the VHD is a bit more complicated in that scenario.
And of course, we use Remote Desktop Protocol to connect to these VMs. RDP is insecure due to its weak encryption, widespread use, and the lack of security features built-in to the protocol. So hackers often target RDP to gain unauthorized access to systems. You can learn more about securing your VMs in Best practices for defending Azure Virtual Machines.

Today, we will walk through the steps of configuring Azure Bastion for Dynamics 365 Finance and Operations development VMs.
Azure Bastion
Azure Bastion is a service in Azure that enables you to remotely access your Azure Virtual Machines (VMs) directly from the Azure Portal. This eliminates the need to configure and maintain Remote Desktop (RDP) or Secure Shell (SSH) connections separately.
It is one solution to fix the RDP vulnerabilities, but if you’re using Microsoft Defender for Cloud, you could also use JIT access. As always, deciding between one or another is a matter of your or your customer’s preferences.
If you’re working at a partner, and you need to configure this in one of your customers, you’ll need access to their Azure subscription, and once it’s configured the people that need to access the VMs will need the following roles in Azure:
- Reader role on the virtual machine.
- Reader role on the NIC with private IP of the virtual machine.
- Reader role on the Azure Bastion resource.
- Reader role on the virtual network of the target virtual machine, if the Bastion deployment is in a peered virtual network, which we’ll see what it is later.
Let’s configure it
We will create all the resources in the Azure Portal, make sure you can do that before starting.
VMs Virtual networks and peering
This section is long, but it’s also important because it gives a bit of basic details of virtual networks that must be taken into account when configuring Bastion.
Azure Bastion provides access via RDP to virtual machines within a virtual network. Of course, there’s something called virtual network peering in Azure that lets us connect two different virtual networks and share the resources in the networks.
BUT, because there is one big BUT, you can only configure peering between networks with different network addresses. This means that if VNet A has the address space 10.1.0.0/16, and you want to peer it to VNet B, VNet B must have a different address space.
Let me ask Drake to explain it better:
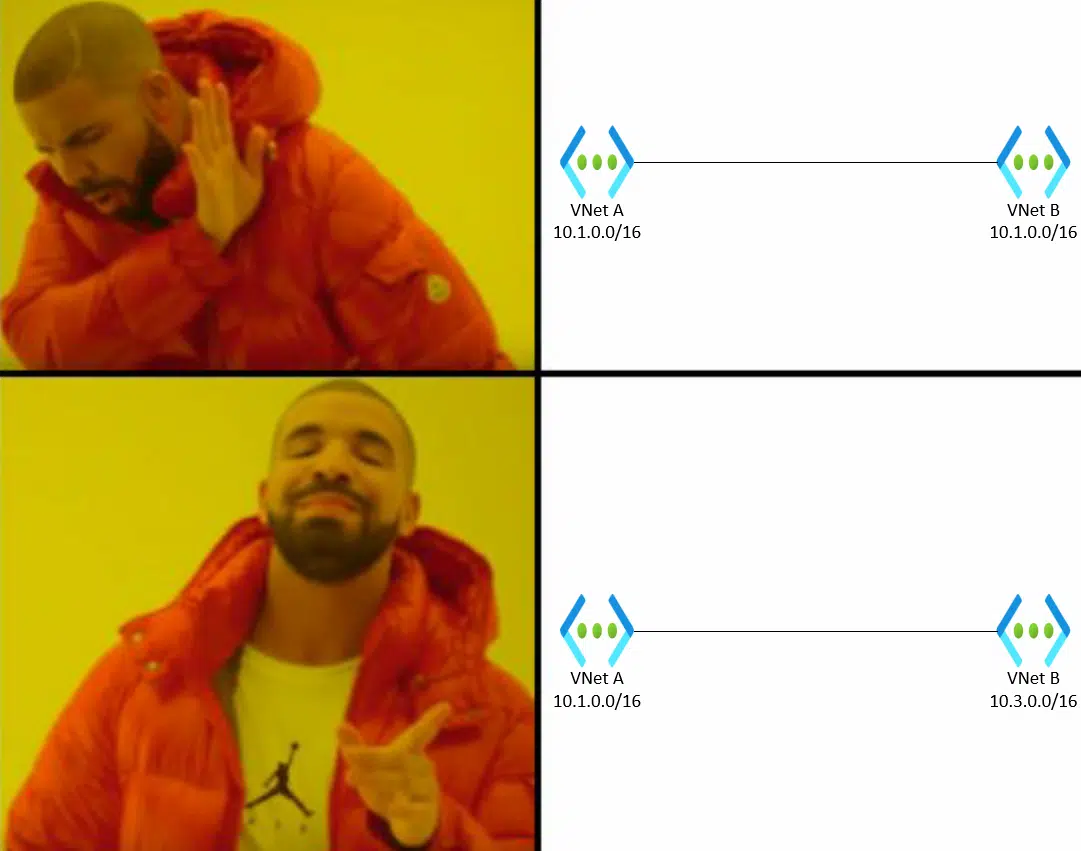
And something else: imagine we have VNet A with the address space 10.1.0.0/16, and VNet B with the addressing 10.3.0.0/16, and we configure peering for both. If we wanted to peer a third VNet C with VNet A, it should have a different address space than VNet A and VNet B.
Or as Drake would say…

This may seem obvious, but I want to remark this before starting with Bastion because the defaults of a Dynamics 365 F&O development VM from LCS will always create the VM address space as 10.1.0.0/16.
Fortunately, we can change that in the advanced settings option while deploying a new CHE, and assign the VM VNet to an already existing virtual network.
What would I suggest? I would suggest planning things, if you can. This means creating a virtual network in Azure first, and deploying the VMs that need Bastion inside that VNet. If you do this, you can forget about peering.
If you have your VMs in different virtual networks, there’s a high probability that they have all the same address space. In that case, you can either deploy a bastion for each VM (more expensive) or redeploy the VMs in a single VNet (more time-consuming). It’s up to you.
If the VNets of the virtual machines are different, we’ll see how to set peering up later.
Resources location
Another important thing to remember: your NSG, virtual network and Bastion instance must be in the same region. If you’ll be using different virtual networks for Bastion and your VMs, the Bastion VNet can be in a different region than that of your VMs, but it will be the same as the one of the NSG and Bastion.
Network security group
After this long remark, we can take the first step: create a new Network Security Group (NSG). This NSG will be used in the virtual network of the Bastion we’ll create later.
This step is mandatory and is described in Working with NSG access and Azure Bastion.
You need to create the following security rules in the NSG.
Inbound
| Port | Protocol | Source | Destination |
| 443 | TCP | Internet | Any |
| 443 | TCP | GatewayManager | Any |
| 8080, 5701 | Any | VirtualNetwork | VirtualNetwork |
| 443 | TCP | AzureLoadBalancer | Any |
Outbound
| Port | Protocol | Source | Destination |
| 22, 3389 | Any | Any | VirtualNetwork |
| 443 | TCP | Any | AzureCloud |
| 8080, 5701 | Any | VirtualNetwork | VirtualNetwork |
| 80 | Any | Any | Internet |
To get the VirtualNetwork, AzureCloud, Internet, GatewayManager and AzureLoadBalancer values in the source or destination, you need to select “Service tag” in the Source field when creating a new rule.
Important: even if you’re not using the SSH port (22) you must add it to the outbound rule, otherwise when you apply the NSG to the virtual network you’ll get an error. Believe me, I lost some time until I discovered that…
Optional: Create a virtual network
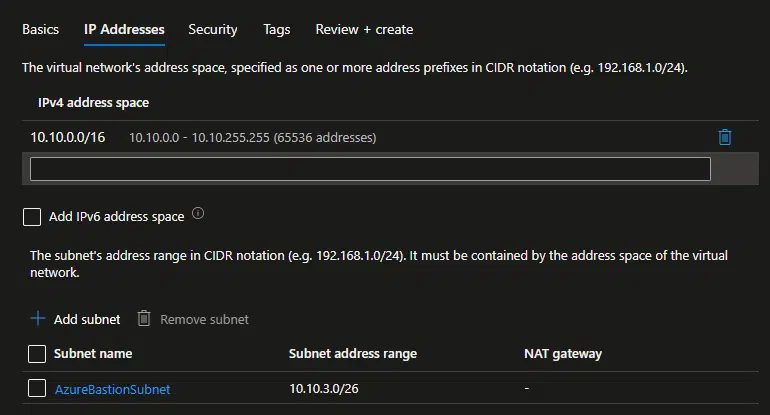
If you want, you can create a separate virtual network for Bastion. If you choose to do this, remember to create it with a different address space than the existing virtual network where your VMs are.
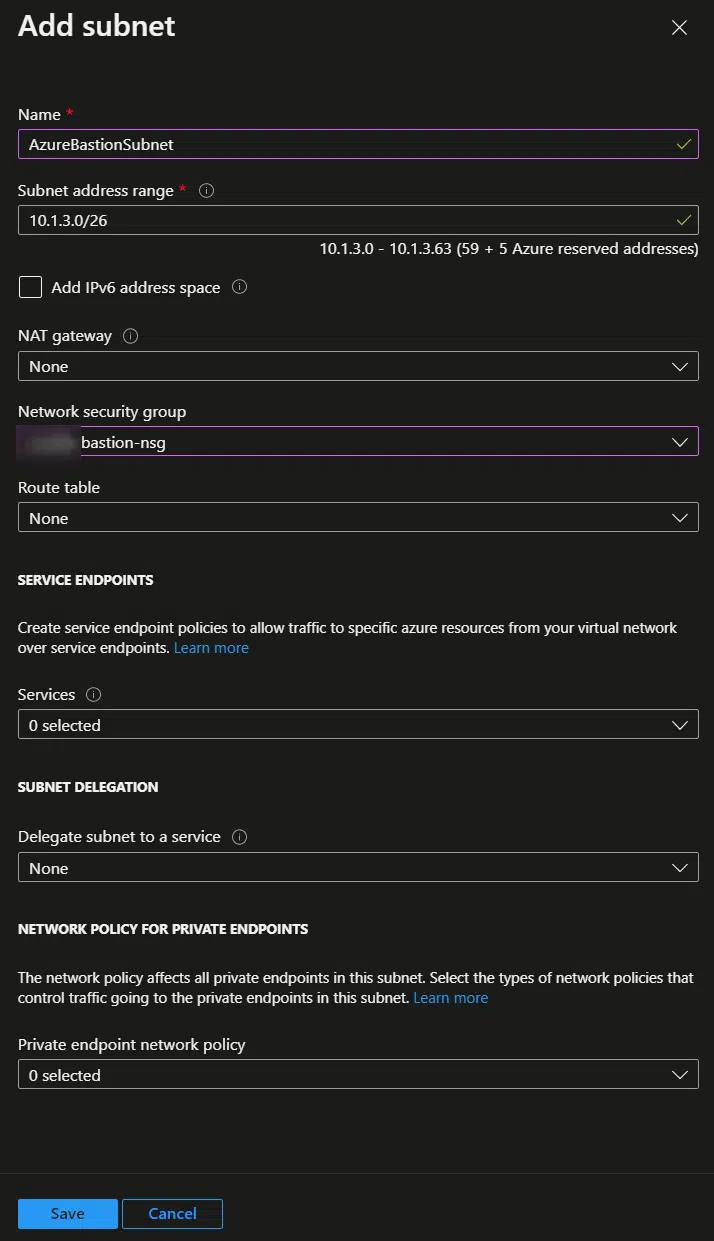
For example, create a new VNet with the 10.10.0.0/16 address space. And, this is important, you must create a subnet named AzureBastionSubnet and with an address range size of at least 26. The minimum subnet size is 26, but it can be something larger, like 25 or 24.
Virtual network peering
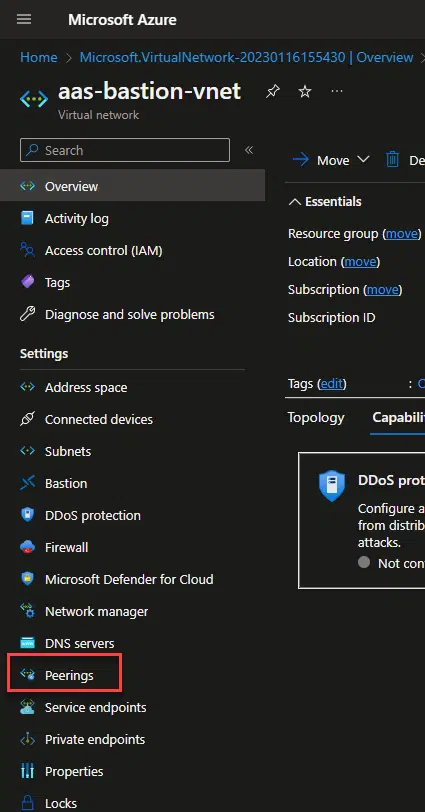
And if you create a different virtual network, for Bastion, we need to create a peering with the one of your VMs. Go to your Bastion VNet, and go to the Peerings section:
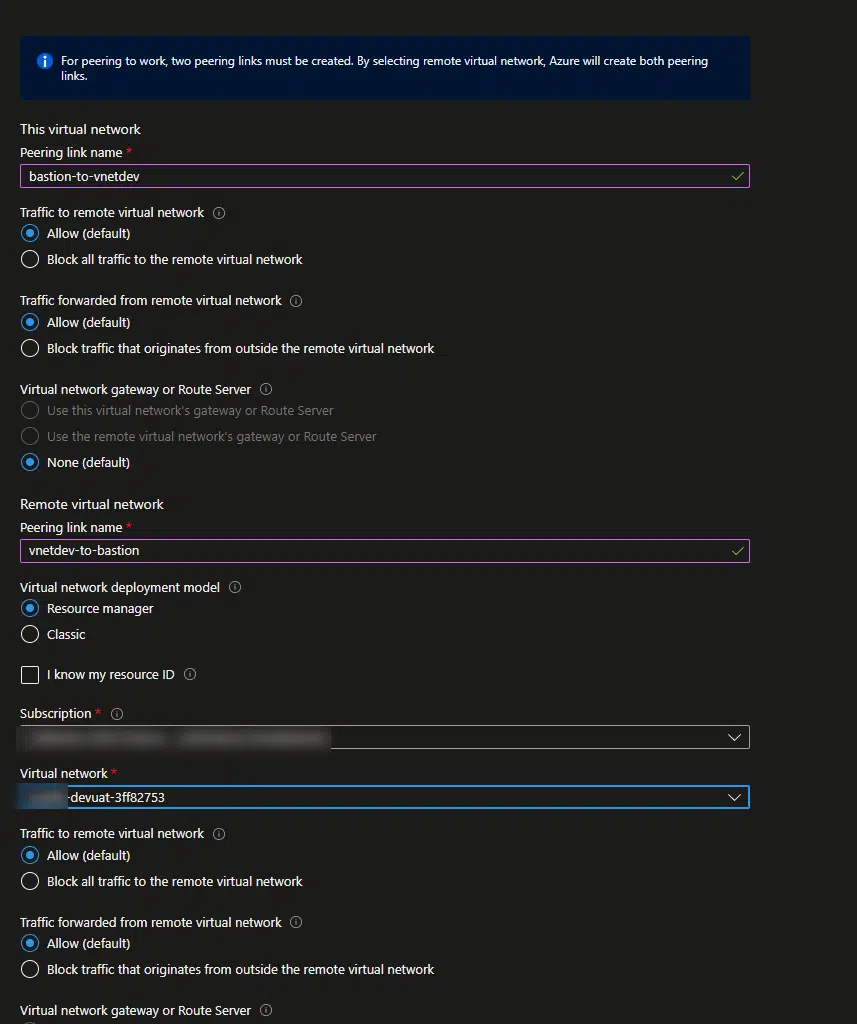
In the setup screen, name your links and select the target virtual network:
Deploy Bastion
Now we can deploy the Bastion instance. Firstly, we need to decide with tier we’ll be using. Bastion offers a Basic and a Standard tier, and other than the price they have some differences.
The Basic tier only allows two instances of Bastion, and you can only connect to the Bastion instance through the browser.
The Standard tier lets you decide how many instances it has, plus it also allows you to connect to Bastion using your RDP client in your PC, plus other features.
Depending on how many VMs you need to connect to, and if you want to use your local RDP client you will go with one or another.
Price-wise, it’s a bit cheaper to deploy 1 standard Bastion instance to access more than 2 VMs, than creating multiple Basic Bastion instances. So if you have 8 VMs, you can create 4 Basic instances or 1 Standard instance, and the Standard one will be a bit less expensive than the Basic ones.
So go to the portal and create a new instance of Bastion, remember the /26 subnet thing? If the virtual network you choose doesn’t have it, you will get a warning:
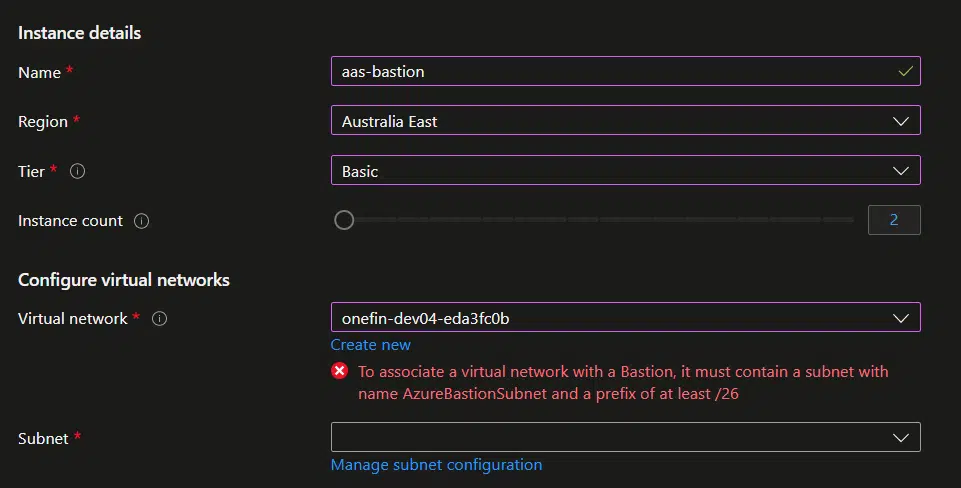
You can create it clicking on the “Manage subnet configuration” link, add a new Subnet named AzureBastionSubnet, we already talked about this, and select the NSG we created before here:
Go back to the Create a Bastion screen and click on the Review + create button, and Create. It will take like 10 minutes to be ready.
Access the VM
Now in your VM in Azure, go to Bastion under the Operations section and you’ll see this:
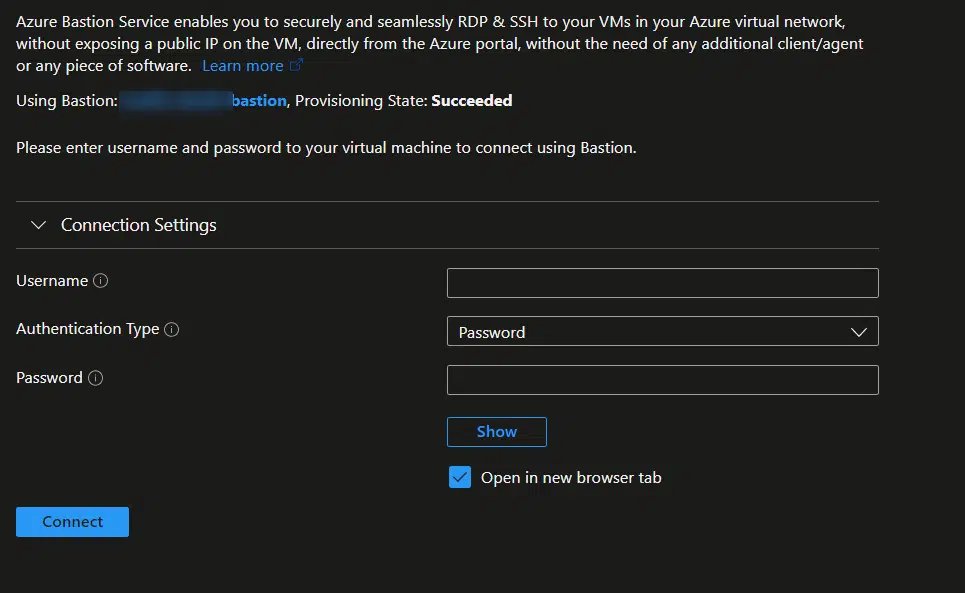
Now you just need to enter the RDP credentials you find in LCS, the username without the “builtin\” part, and click Connect.
A new browser tab will open, and you’ll see the desktop of your VM. Done!
Conclusion
In conclusion, Azure Bastion is a powerful service that allows you to access your Azure VMs directly from the Azure Portal. By following the steps outlined in this article, you can configure Azure Bastion for your Dynamics 365 F&O VMs and enjoy the convenience and security of this service.
You will need to give each developer access to the Azure subscription of the dev VMs with the roles we’ve seen before, but it’s a way to avoid using RDP if you have to and secure your workflow.