Dynamics 365 for Finance & Operations and Azure DevOps (part I)
This post was written in February 2019 and last updated in September 2023. Dynamics 365 and Azure change quickly, so some steps, screenshots or links may be out of date.

Note
You can read my complete guide on Microsoft Dynamics 365 for Finance & Operations and Azure DevOps.
One of the major changes we got with Dynamics 365 has been the mandatory use of a source control system. In older versions, we had MorphX VCS for AX 2009 and the option to use TFS in AX 2009 and AX 2012, but it wasn’t mandatory. Actually, always from my experience, I think most of the projects used no source control other than comments in the code.

Azure DevOps in MsDyn365FOLink to section: Azure DevOps in MsDyn365FO
In Microsoft Dynamics 365 for Finance and Operations the source control tool Azure DevOps offers, is not just a source control tool but a THE tool that will be our One Ring for our projects (I hope that not for binding us in darkness). From project management to the functional team, everybody can be involved in using Azure DevOps to manage the project and team.
BPM synchronization and task creation, team planning, source control, automated builds and releases, are some of the tools it offers. All these changes will need some learning from the team, but in the short-term all of this will help the team to better manage the project.
As I said it looks like the technical team is the most affected for the addition on source control to Visual Studio, but it’s the most benefited too…
First stepsLink to section: First steps
The first thing we need to do when starting a new implementation project, is linking LCS to the DevOps project we’ll be using. Everything is really well documented.
Once done we’ll have to deploy the build server. This is usually done in the dev box on Microsoft’s subscription. When this VM gets deployed the basic source tree will be created in the DevOps project:

(Ignore the CSProjects folder, it’s from the comic performance on last year’s 365 Saturday with my colleague Juanan)
With the source tree now available, we can map the development machines and start working. The Main folder you see in the image is a regular folder, but we can convert it into a branch if we need it.

In the image above, you can see the icon for Main changes when it’s converted in a branch. Branches allow us to perform some actions that aren’t available to folders. Some differences can be seen in the context menu:


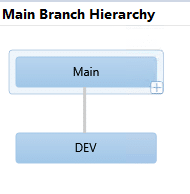
For instance, branches can display the hierarchy of all the project branches (in this case it’s only Main and Dev so it’s quite simple :P).
Properties dialogs are different too. The folder one:

And the branch one, where we can see the different relationships between the other branches created from Main:

This might be not that interesting or useful, but one of the things converting a folder into a branch is seeing where has a changeset been merge into. We’ll see this in part 2.
Some adviceLink to section: Some advice
I strongly recommend moving the Projects folder out of the Main branch into the root of the project, at the same level as BuildProcessTemplates and Trunk. If you don’t, and end up working in Main and Dev branches, Visual Studio’s solutions and projects will still be checked-in in the Main branch. It will spare you of small heart attacks when you receive the build email with the changeset summary, thinking something went into production 🙂