
Welcome to article 2 in the Copilot Studio series! Want Copilot Studio to run real F&O business logic? Build a simple X++ AI tool and wire it in.
If you missed other articles in the series, read:
- Part 1: Copilot Studio 101: Extend Dynamics 365 F&O Copilots.
- Part 3: Create X++ Client Plugins for Copilot Studio in Dynamics 365 F&O.
- Part 4: Troubleshoot Copilot Studio errors with Postman.
Here’s the idea: Copilot Studio gets truly useful when it can run your real F&O business logic on demand. The fastest way to do that today is with an X++ AI tool: a small data contract class exposed as a custom API in Dataverse that can be called from Copilot Studio.

In this walkthrough, we’ll build a minimal example (look up a customer’s name by account number) to show the pattern end-to-end. You’ll see how to create the class and attributes, set up the right security (menu item, privilege, role), deploy to Dataverse, and configure the tool in Copilot Studio.
Table of Contents
What’s an X++ AI tool?
X++ AI tools are used to extend the capabilities of agents in Copilot Studio.
These AI tools are quite useful… if you have a good use case 😉. Right now this is the hardest part for me. I understand and see their value, but finding a good use case is not easy.
In X++, an AI tool is simply a data contract class! Alright, let’s learn how to create one.
Prerequisites
To follow the steps described in this article, I suggest using a UDE (Unified Developer Experience) environment. You won’t be able to test this on a local VHD-based VM.
Your Dataverse environment needs the following solutions:
- Finance and Operations Virtual Entity
- Copilot for finance and operations apps
- Copilot in Microsoft Dynamics 365 Finance or Copilot in Microsoft Dynamics 365 Supply Chain Management
In your Dynamics 365 F&O environment, you must enable the Custom API Generation feature if it’s not enabled by default.
As of August 2025, the documentation on Microsoft Learn is outdated, and you don’t need to take any manual steps after creating the AI tool. You can ignore everything in the section Create the Dataverse custom API.
Create the AI tool
For this example, I’ll be creating a class that runs a stupid functionality: return the customer’s name based on their customer account number. I know it’s not the craziest example of using cutting-edge AI technology.
I just want to show you the basics of creating an AI tool in X++, and then you can use it with your scenario!
Create a class
So first create a class. I’ll name mine AASCustomerNameCustomAPI. This class needs to implement the ICustomAPI interface.
We also must decorate it with these attributes:
- CustomAPI: this sets the name and description shown in Copilot Studio. Mine is
[CustomAPI('Get the customer name', 'Returns the name of the customer based on their customer account number')]. - AIPluginOperation: nothing special, just use
[AIPluginOperation]. - DataContract: and also nothing special, use
[DataContract].
Next: input and output parameters. When we ask Copilot for something, it usually needs input data. In our case it’s the customer account number. So I’ll create a custAccount variable:
private CustAccount custAccount;And then we expect a response from the bot. That’s our output parameter, and because for this example it’s the name, I’ll create a custName variable:
private Name custName;Great! We need one more thing: a CompanyId variable! Why? As in many Dataverse/Power Platform integrations, the default company from your user info is used. Fortunately, we can get the current company where the request is being done from Copilot Studio, but we need a variable to then change the company if it’s not the same as the default one you have.
That’s why I also create a companyId member:
private CompanyId companyId;As you may already be thinking, if the class is a data contract, these are our data members. And what do data members need? Their parm methods!
And because they’re AI tool data members, we need to decorate them with the CustomAPIRequestParameter for the request and CustomAPIResponseProperty for the response. They’ll look like this:
[
    CustomAPIRequestParameter('The company of the customer', true),
    DataMember("companyId")
]
public CompanyId parmCompanyId(CompanyId _companyId = companyId)
{
    companyId = _companyId;
    return companyId;
}

[
    CustomAPIRequestParameter('The customer account number', false),
    DataMember("custAccount")
]
public CustAccount parmCustAccount(CustAccount _custAccount = custAccount)
{
    custAccount = _custAccount;
    return custAccount;
}

[
    CustomAPIResponseProperty('The customer name'),
    DataMember("custName")
]
public Name parmCustName(Name _custName = custName)
{
    custName = _custName;
    return custName;
}
The CustomAPIRequestParameter attribute expects two parameters: the description of the field and a boolean indicating if the field is optional. You can see I’ve set the one for the companyId as true, meaning optional.
If we don’t provide a companyId value, the process will fail, but we’ll make sure that doesn’t happen when using the tool in Copilot Studio.
The CustomAPIResponseProperty attribute only expects one parameter: a description.
Now override the run() method that comes from the interface. This method contains the business logic that’s being triggered. Getting a customer name, that’s easy, right?
[Hookable(false)]
public void run(Args _args)
{
    changecompany(this.parmCompanyId())
    {
        CustTable custTable = CustTable::find(this.parmCustAccount());

        if (custTable)
        {
            this.parmCustName(custTable.name());
        }
    }
}
Build the class, and it’s ready. But there’s more to do!
Create the security objects
For X++ AI tools to work properly, we also need:
- An action menu item
- A security privilege
- A role for the privilege (and a duty if you prefer to use that). We must assign this role to the user chatting to the agent; otherwise, they won’t be able to access it.
Create the action menu item, set its Object Type property to Class, and the Object property to the name of the class we created before.
Create a new security privilege; I’ve called mine AASCustomerNameAPIAccess. Add the action menu item to the Entry Points node, and set its Access Level property to Create.
Finally, I’m creating a new role, also named AASCustomerNameAPIAccess, that has the AASCustomerNameAPIAccess security privilege in the Privileges node.
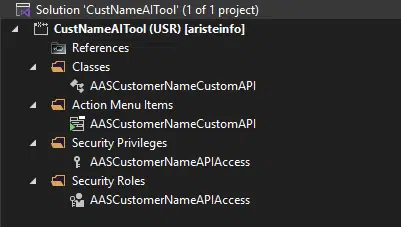
Your VS project should look like this:
Deploy the model to Dataverse
And because I’m in a UDE environment, I’m going to deploy the code to Dataverse.
Once the deployment completes, you can go to F&O, System administration > Setup > Synchronize Dataverse Custom APIs, and look for your API:
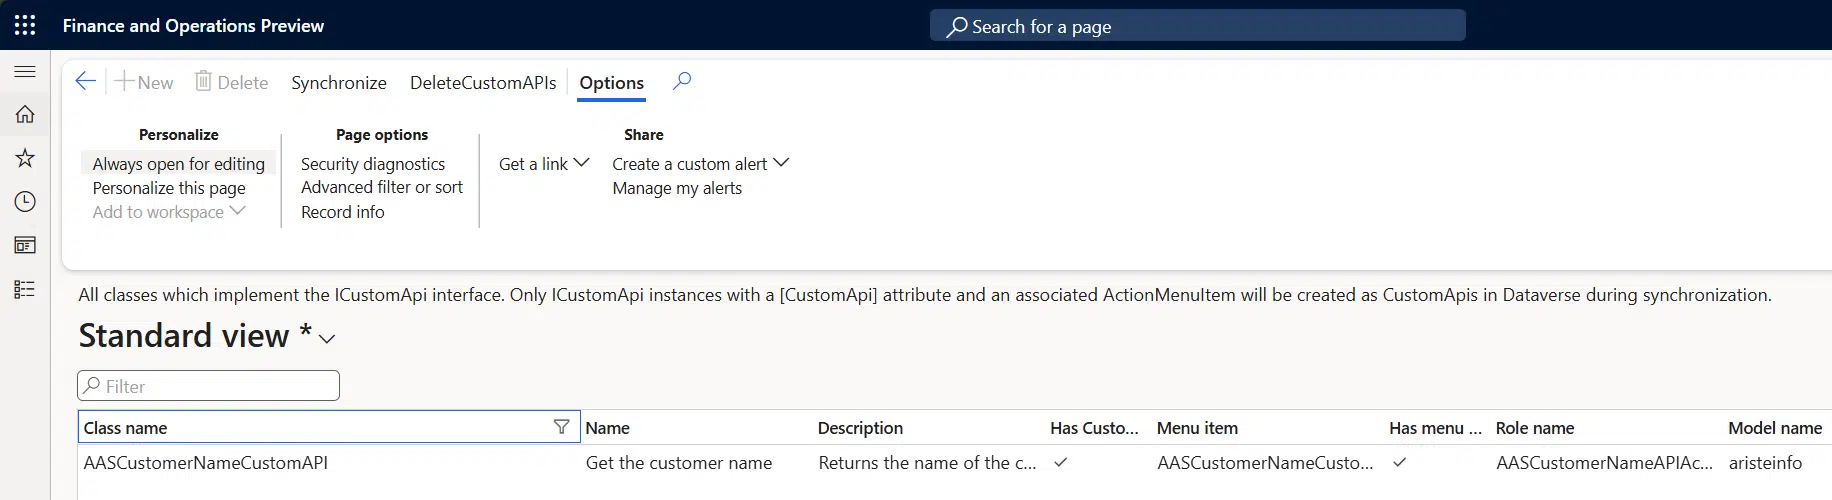
If it’s there, you’re all set. If it isn’t, please verify that you’ve created and configured the menu item, privilege, and role or duty correctly. Also check that you haven’t missed adding any attribute in the data contract class or members!
Create the Dataverse API
Once we have deployed the code, we must create a Custom API and parameters in Dataverse.
This step wasn’t needed until recent updates of 10.0.44 and 10.0.45. It’s been enforced to have better ALM when moving these between environments.
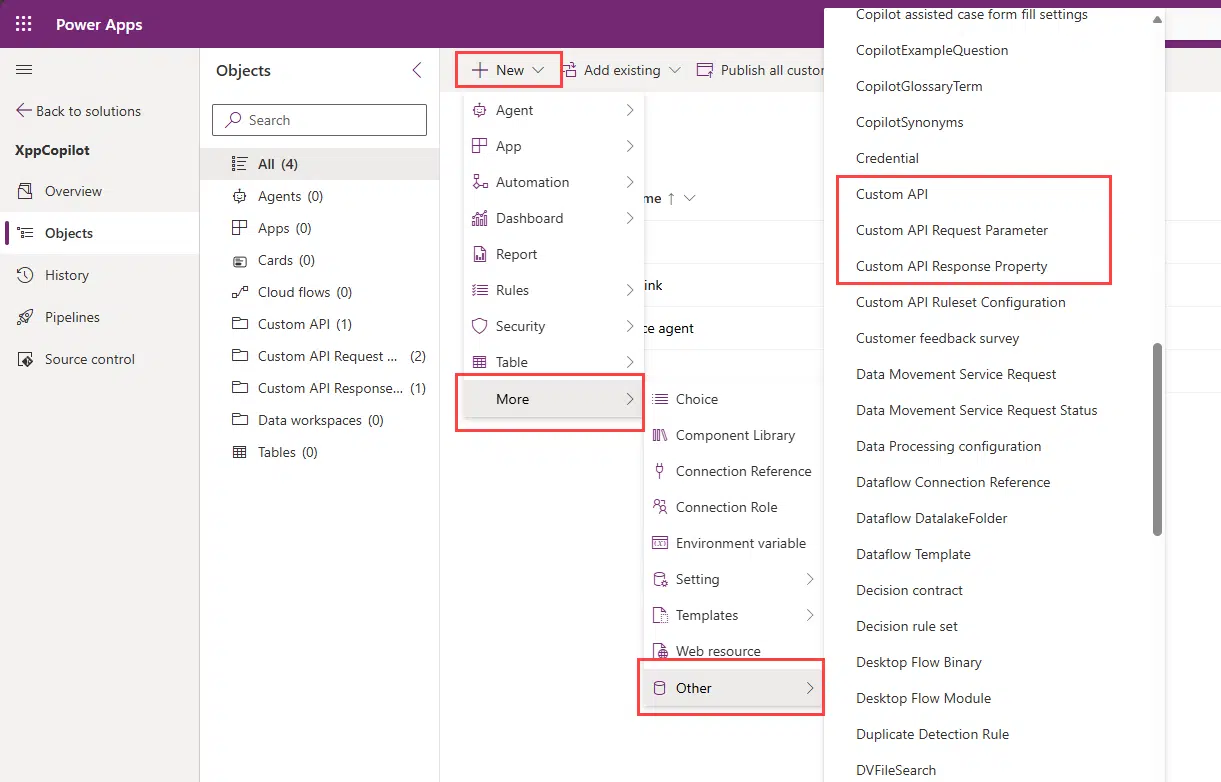
Go to the Power Apps maker portal, and create a new solution.
First, click New > More > Other > Custom API:
In the new window, enter the following parameters:
- Unique Name: aas_AASCustomerNameCustomAPI (that’s your prefix + class name).
- Name: Customer name agent.
- Display Name: Customer name agent.
- Description: Returns the customer name based on their customer account number.
- Binding Type: Global.
- Plugin Type: Microsoft.Dynamics.Fno.Copilot.Plugins.InvokeFnoCustomAPI.
Click Save & Close.
Then we must create a Custom API Request Parameter for the parm methods decorated with the CustomAPIRequestParameter attribute.
You must do this for each input parameter you have! I’ll show this for the companyId parameter.
Click New > More > Other > Custom API Request Parameter and set these values:
- Custom API: Customer name agent (this is the name you gave the Custom API in the previous step).
- Unique Name: aas_AASCustomerNameCustomAPI_companyId (this is your publisher prefix + class name + parameter name).
- Name: companyId.
- Display Name: companyId.
- Description: the company in which to find the customer’s name.
- Type: String.
- IsOptional: No.
Click Save & Close.
Do the same for the custAccount member of the class.
And finally, create the parameter for the parm methods decorated with the CustomAPIResponseProperty attribute.
Click New > More > Other > Custom API Response Parameter and set these values:
- Custom API: Customer name agent (this is the name you gave the Custom API in the previous step).
- Unique Name: aas_AASCustomerNameCustomAPI_custName (this is your publisher prefix + class name + parameter name).
- Name: custName.
- Display Name: custName.
- Description: the name of the customer.
- Type: String.
Click Save & Close.
Using the AI tool in Copilot Studio
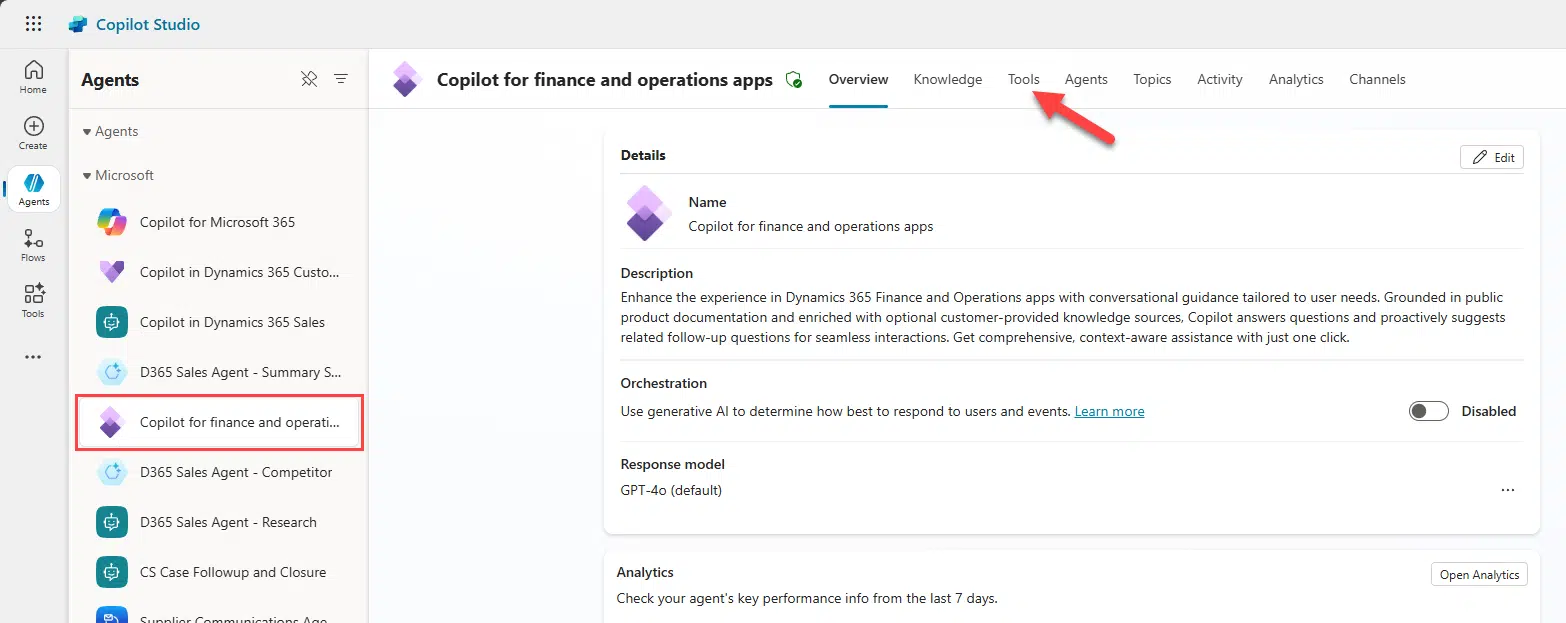
Once the tool is ready, go to Copilot Studio to add it to our Copilot for finance and operations apps agent.
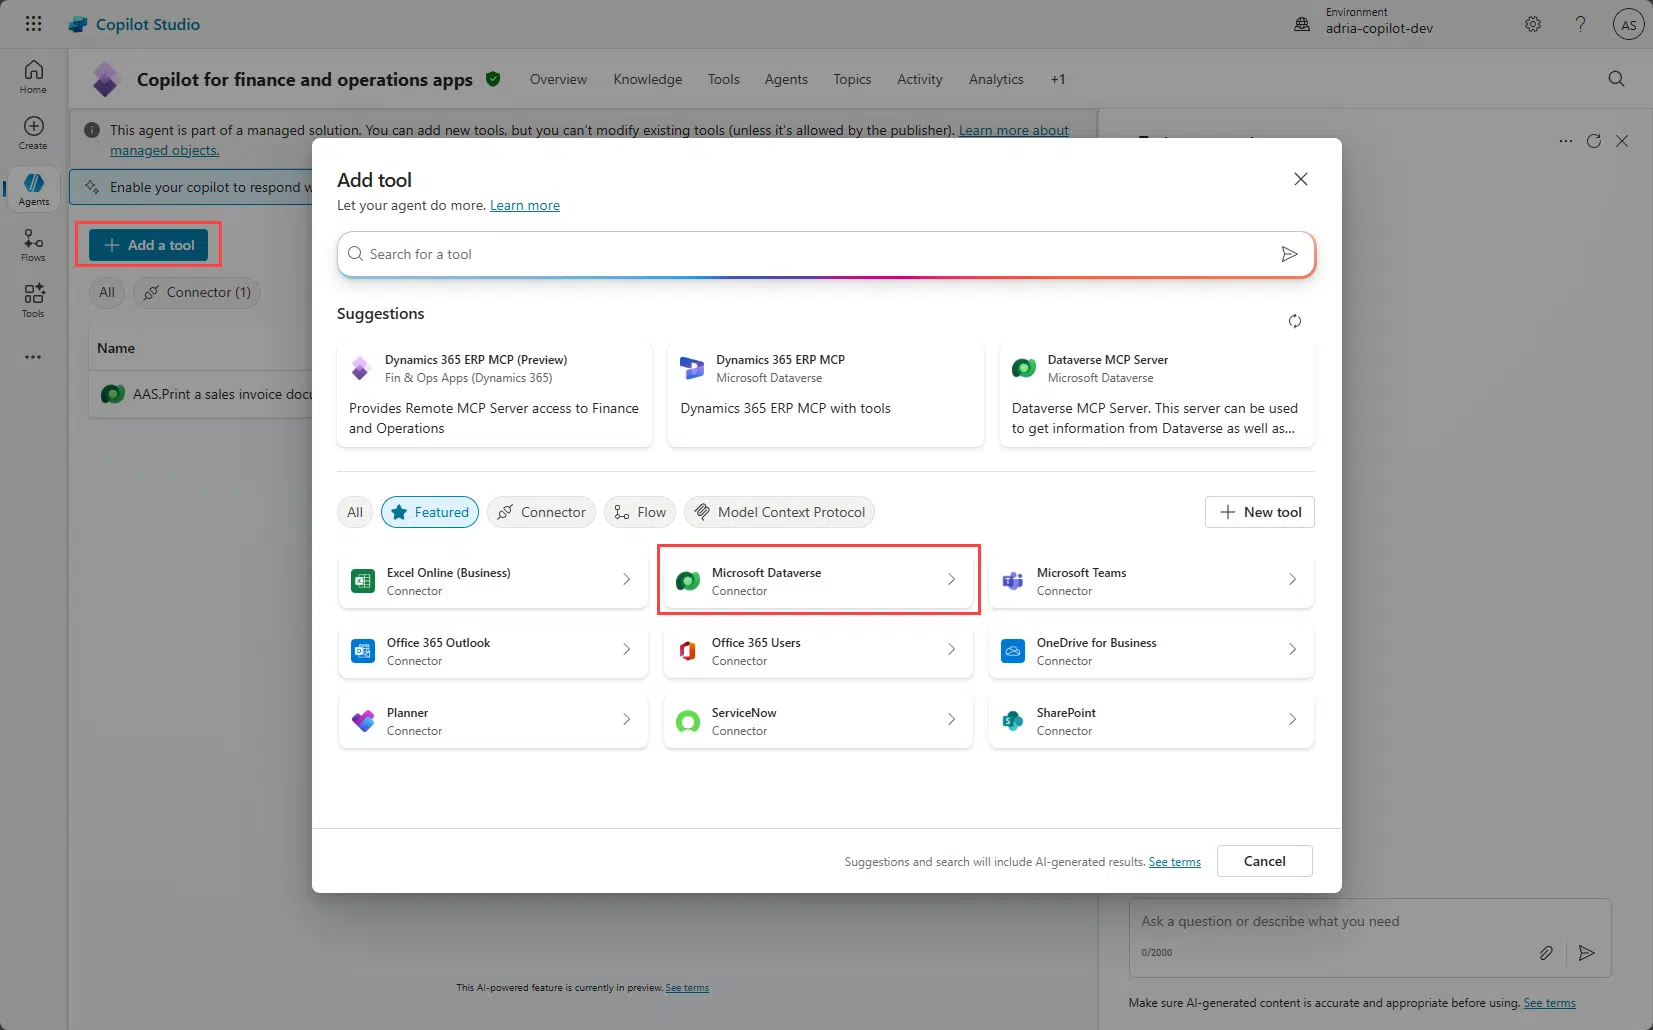
Make sure you select the correct environment, open the agent, and go to the Tools tab:
Click the Add a tool button, then select Microsoft Dataverse:
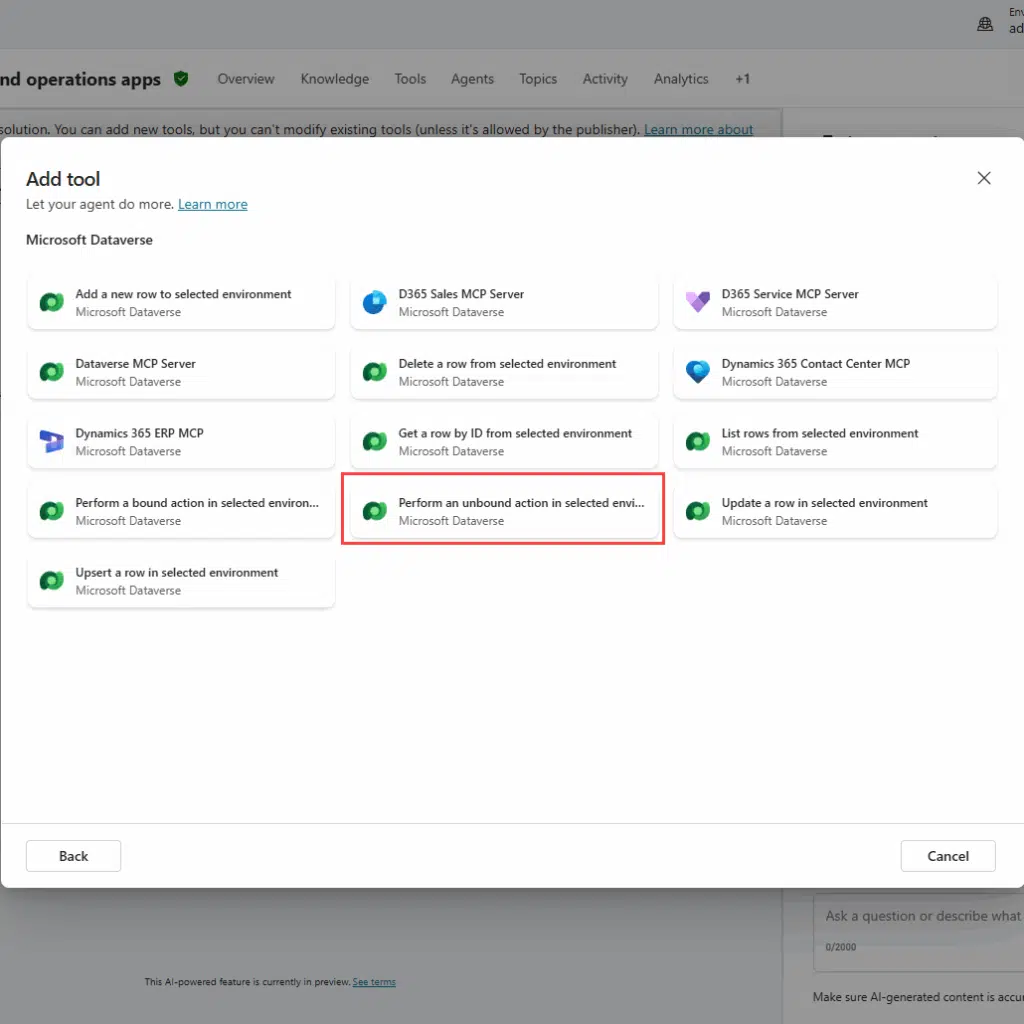
In the next screen, select Perform an unbound action in selected environment:
Create a connection, either using Oauth with your account or a Service Principal with an Entra ID App registration, up to you which one to use.
Click the Add and configure button.
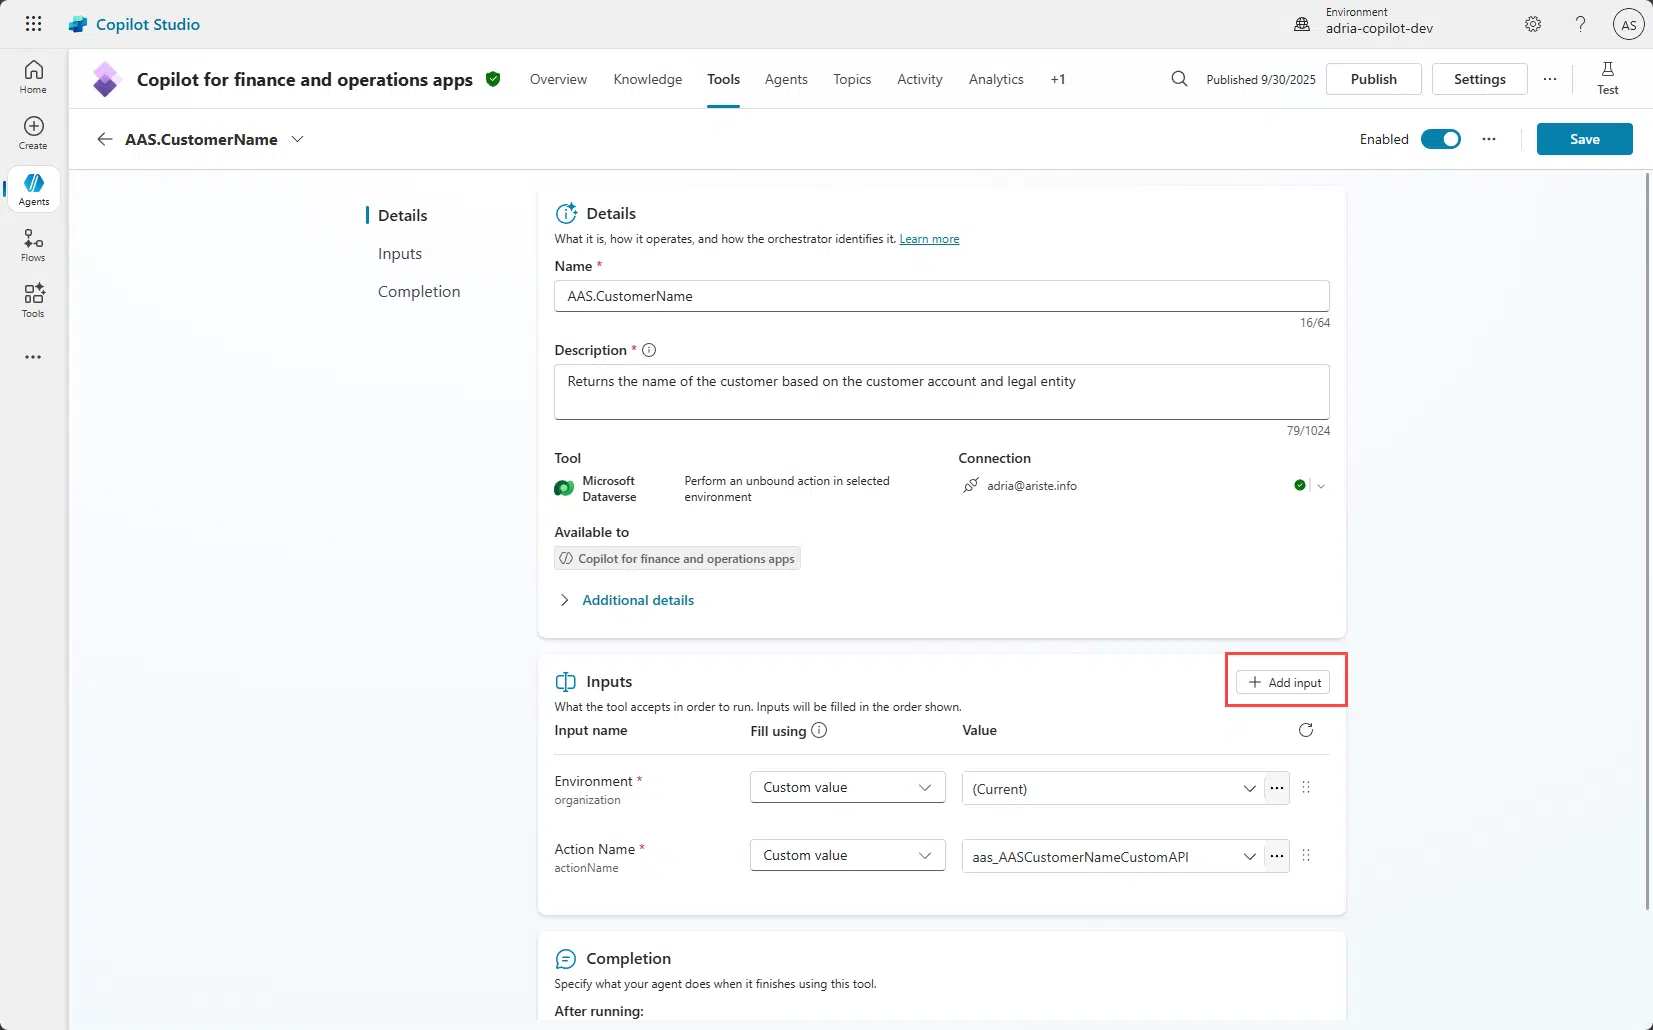
Change the Name and Description fields. I’ve used “AAS.Get the customer name” as the Name and “Returns the name of the customer based on the customer account and legal entity” as Description.
Configure inputs
In the Inputs section change the Environment input to “Custom value”, and as the value select “(Current)”.
Then for the Action Name input, change it to custom too, and in the value enter the name of the Custom API we’ve created. It should be in the lookup.
Next, click the Add input button:
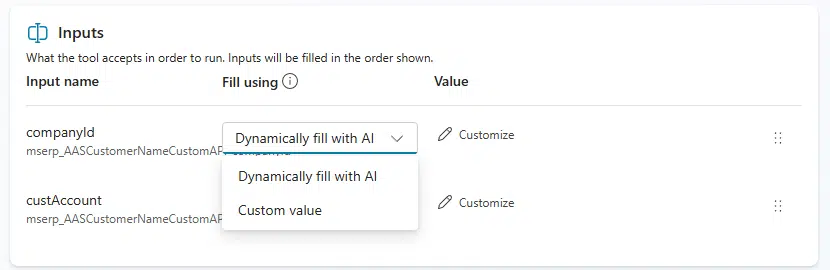
Select both parameters, one at a time.
By default, inputs are set to Dynamically fill with AI, which means that the agent will decide which values go there. We can also select Custom value:
Let’s do this for the companyId field. Remember I said that it takes the default company on user info? We’re going to change this and select the company in which the user was talking to the bot.
Click the three dots in the value field, and look for dataAreaId in the Custom tab. You should find only one result: PA_Copilot_ServerForm_UserContext.dataAreaId.
This variable contains the company in which the user was when they asked the agent.
If you would like to learn more about how this is populated, open the SysCopilotChatUserContext class in Visual Studio.
Leave the custAccount parameter to Dynamically fill with AI.
Don’t forget to click the Save button before leaving this page!
Create a topic
Now the action is there, and we need the agent to be able to know when to use it. That’s what topics are used for.
Copilot Studio includes a Generative AI Orchestration option.
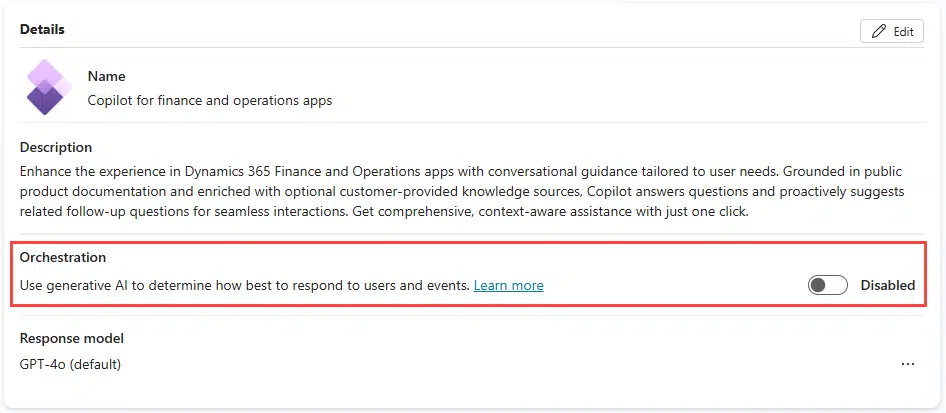
If this is enabled and supported for your F&O agent, the agent can decide when to invoke the tool automatically, and you don’t need to create a manual topic trigger.
As of September 2025, this orchestration isn’t supported for the F&O built-in Copilot agent, so create a topic manually.
Add a new topic
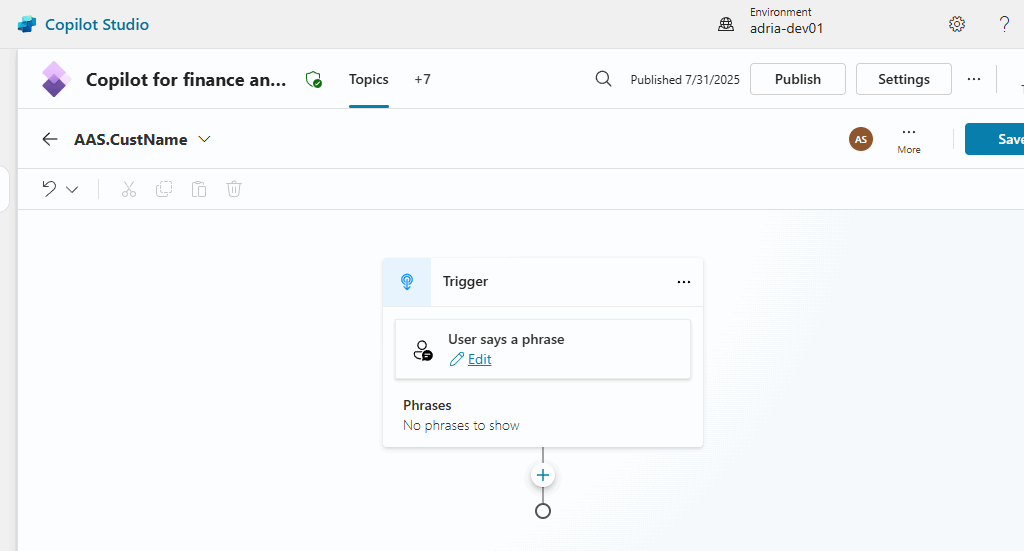
Go to the Topics tab and click the Add a topic button, selecting the From blank option. Give the new topic a name.
You can see the topic designer looks a bit like the Power Automate one, and it also starts with a trigger:
Here we need to introduce the phrases that will start our AI tool action. For example, “What’s the name of the customer”, and plenty of variations.
How can you get most of them? With AI! What I do is just ask ChatGPT for variations of one or two examples and use those, and then ask it to put the variations in a file with no quotes. Then I paste it all in Copilot Studio.
Then click the + button below the trigger, go to Add a tool, select the Tool tab and choose yours:
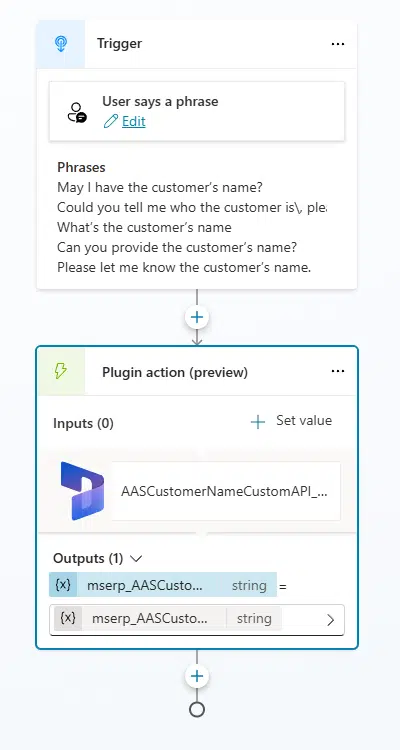
Done! Don’t forget to click Save.
Publish the agent
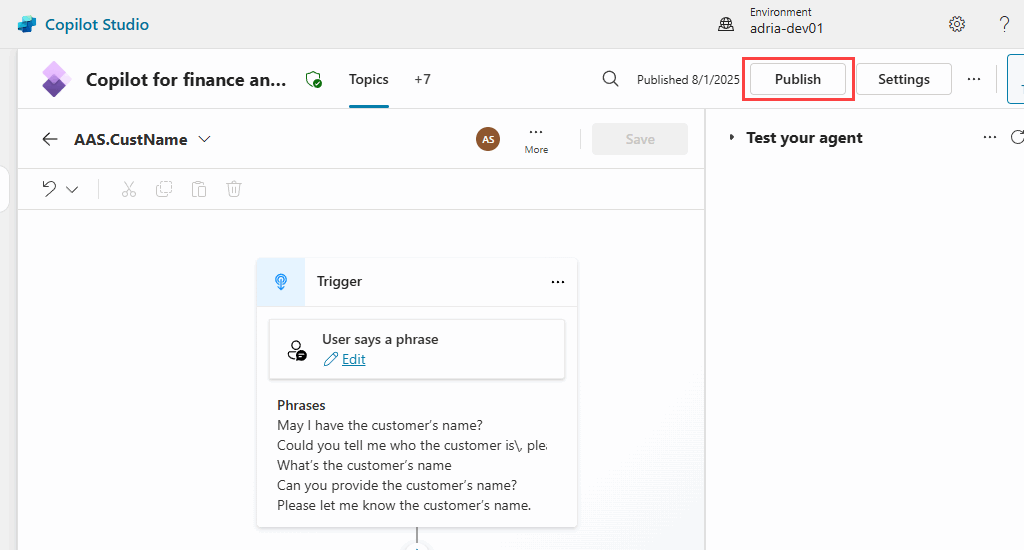
Even if we clicked Save a thousand times in Copilot Studio, if we go to the F&O sidecar chat and try to run our tool, it will run nothing.
To apply the changes, we need to click the Publish button in the top right area, near the Test one:
Testing the agent
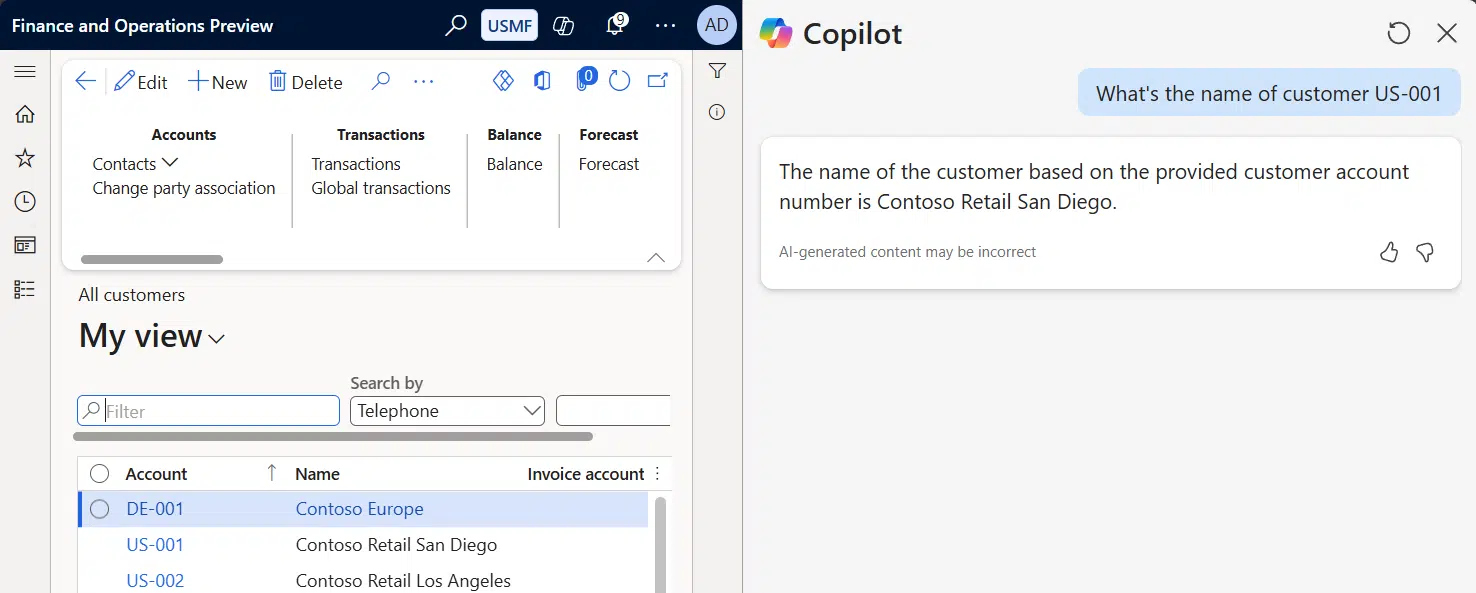
Everything is ready! Now click the Test button in the top right corner. A new pane will open. Here we’ll test the bot, asking, “What’s the name of customer US-001?” and we’ll get it!
Sure? Well, no. Remember we set that the company field would come from the user context in F&O? This is what happens:

It gets an empty companyId, and when it calls the X++ code, the changecompany method is called with an empty value, and it fails. Also because I added no try-catch block, but that’s a different story.
Copilot Studio’s test panel doesn’t include F&O user context. Test context-dependent tools in the F&O side panel or temporarily use custom values while testing in Studio.
Go to F&O, and ask the same question in the sidecar chat:
But wait, every time I want to test something that uses the context, I have to publish the agent and go to F&O? Well, what you can do is set all the inputs in the tool to use a dynamically filled value while testing it inside Copilot Studio and change it before publishing.
Conclusion
And we’re done! We’ve seen how to create and deploy an X++ AI tool from scratch, configure its inputs, set up security, and integrate it into Copilot Studio.
My example was intentionally simple, but I wanted to show all the fundamental steps needed to build more advanced AI integrations.
Finding the perfect use case will be the trickiest part of the process, but now you’ve got the basics down, and I’m sure you’ll discover many valuable scenarios to use this.
You can read part 3 now: Create X++ Client Plugins for Copilot Studio in Dynamics 365 F&O.


4 Comments
Pingback: Copilot Studio 101: Extend Dynamics 365 F&O Copilots
Thank you so much for sharing this great info. Really valueable.
Can you please explain how can I publish the Ai agent to d365 FO sidecar chat?
You need to deploy the code to the UDE environment, then in Copilot Studio, check that the tool appears under “Tools” and is enabled, and create a new topic that will use it. As described in the article.
Pingback: Create X++ Client Plugins for Copilot Studio in Dynamics 365 F&O - ariste.info