After a long, long, long, long, long time waiting for it, the Dynamics 365 F&O local development feature is finally here… in public preview. It’s a bit different since the first time we heard about this at the MBAS in 2019… but it opens up a new scenario for developers.
I won’t go into much detail about the new unified developer experience, which is its name now, but if you want to know what you need to use it and how to configure it, you can read this blog post from Aurélien Clere: Dynamics 365 FinOps Unified developer experience.
Today I’ll explain what Microsoft Dev Box is and how we can use it with the Dynamics 365 F&O local development tools. We will also learn about the cost, and in which scenarios we could benefit from Microsoft Dev Box as our development environment. You know, the best of both worlds, or the worst… 🤣

But first…
What is Microsoft Dev Box?
Microsoft Dev Box is an Azure service that we can use to deploy ready to use virtual machines for development. For X++ development? No, it’s targeted to… well to anything that Visual Studio has out-of-the-box like .NET, Azure development, Python, etc. But that doesn’t mean we can’t use it for X++ development! We’ll see that later.
What can we do with Microsoft Dev Box?
- Seamless Setup and Configuration: Microsoft Dev Box allows teams to quickly set up development environments that are pre-configured with the necessary tools, libraries, and settings. This reduces the time spent on environment setup and troubleshooting, allowing developers to focus more on coding.
- Collaboration and Consistency: Since Microsoft Dev Boxes are cloud-based, teams across different locations can work on a consistent environment. This ensures that everyone is working with the same set of tools and configurations, reducing the “it works on my machine” problem.
- Powerful and Scalable Resources: Microsoft Dev Box provides access to scalable cloud resources, which means developers can leverage high-performance computing power as needed. This is particularly useful for resource-intensive tasks like compiling large codebases, running tests, or using machine learning algorithms.
- Enhanced Security: Being a cloud-based solution, Dev Box benefits from Microsoft’s robust security protocols. This means your code and development environment are protected with industry-leading security measures.
- Integration with Existing Tools: Dev Box integrates seamlessly with other Microsoft services and many third-party tools, offering a comprehensive development experience. Whether you’re using GitHub, Azure, or other CI/CD tools, Dev Box fits into your existing workflow.
- Flexibility and Customization: Teams can customize their Dev Boxes to match their specific project needs. Whether you’re developing a mobile app, a web service, or a machine learning model, you can tailor your environment accordingly.
- Efficient Resource Management: With Dev Box, organizations can manage resources more efficiently. Development environments can be spun up or down as needed, ensuring that you only pay for what you use.
And speaking of costs… how much does Microsoft Dev Box cost? As everything in Azure it depends on the SKU of the resources used. We can choose between three CPU and RAM setups:
- 8 vCPU and 32 GB RAM
- 16 vCPU and 64 GB RAM
- 32 vCPU and 128 GB RAM
And we can deploy each of these sizes with 256, 512, 1024 or 2048 GB of storage.
So, for example, a 8 vCPU with 32 GB of RAM and 256 GB of SSD storage costs, deployed in West Europe:
- Storage: 18.69€/20.52$ per month
- Compute: 1.47€/1.61$ per hour
- Maximum monthly price: 135.93€/149.26$ per month
Source: Microsoft Dev Box pricing.
It’s not that expensive, if we use a dev VM for 8 hours each day, and 20 days per month that’s 20*8*1.47 + 18.69, which is 253.89€ per month. Is it? No it isn’t! You can see we have a maximum monthly price, and when the usage of an instance goes over that maximum price, that’s all you will pay that month! The compute cost is capped at 80 hours.
Licenses everywhere
Before continuing, let me tell you something about licenses. Because it’s always licensing! And let me quote Microsoft on this:
To use Microsoft Dev Box, each user must be licensed for Windows 11 Enterprise or Windows 10 Enterprise, Microsoft Endpoint Manager, and Azure Active Directory P1.
https://azure.microsoft.com/en-us/pricing/details/dev-box/
In addition to being available independently, these licenses are included in Microsoft 365 F3, Microsoft 365 E3, Microsoft 365 E5, Microsoft 365 A3, Microsoft 365 A5, Microsoft 365 Business Premium, and Microsoft 365 Education Student Use Benefit subscriptions.
It’s not that bad, right? Most of us working at partners, or customers implementing Dynamics 365, have a Microsoft E3 or E5 license assigned, which would fulfill the base requirements. Just keep that in mind.
Enough licensing, now let’s get back to dev boxes and pricing!
Having a maximum monthly price means that if you use a Microsoft Dev Box just for some hours a month, you will pay its hourly price, but if you use it a lot, when you go over the max price it will switch to the max monthly price automatically!
That’s regarding compute, which only counts while the dev box is running (not shut down or hibernated). But what about storage? Well, as like many other Azure services, you pay for storage as long as the storage resource exists, so if you kept a Microsoft Dev Box turned off for a whole month you’d only pay its storage costs.
This looks cheaper than a Cloud-hosted environment VM to me… of course we can’t compare both because if we need to enable the Power Platform integration and have a Dataverse environment linked to your F&O dev instance we have to deploy it as a CHE. Do we?
Well, here’s where the new unified development experience takes the spotlight!
One Dynamics One Platform
As you may know, we’re on a trip to have a unified admin and developer experience for Dynamics 365 F&O and Dataverse.
The new developer experience starts when we deploy a sandbox environment in Power Platform admin center instead of LCS. And this means that we no longer have to manually configure the Power Platform integration, it will be on by default.
So we don’t really need a CHE if we want to build things that use both F&O and Dataverse. Let me show you something, this is how a unified development environment looks like on PPAC.

Do you notice something different? It has a Dataverse environment URL and… a Finance and Operations URL too! This is not something new and exclusive about the unified development experience, we’ve actually had it for some time, but it was a bit different. Let me explain.
When we configured the Power Platform integration from LCS, a Dataverse environment was deployed and showed the F&O URL too. But in this case we’re deploying a Dataverse environment from PPAC with F&O installed as a Dynamics 365 app!
If this sounds a bit confusing, I’d recommend you to get familiar with PPAC and the new unified admin experience in PPAC.
And this is why I think that in some scenarios we can replace our CHE for a Microsoft Dev Box with the local dev tools.
Unified developer experience and Microsoft Dev Box
Let me make something clear first: this is not a blueprint, a one-size-fits-all solution. Depending on your team, your processes, your customer’s requirements and other factors, you may still benefit from using cloud hosted environments. It’s up to you to find that out!
You might be thinking, “but weren’t the local dev tools meant to be used locally?”. Yes, you can install them on your local laptop and start working!
But what if your current laptop doesn’t meet the requirements? What if because of company policies, you can’t install all the required components? What if you just don’t want to install anything on your laptop? What if, what if…?
So whatever is your reason, I will show you an alternative to use the local dev tools!
Deploying a dev center
The first thing we need to do is create a Dev center in our Azure subscription:

Select the region which is the nearest to you or your development team, in my case I go with West Europe. If you have a distributed team of developers, you can create several dev centers for the different regions your team is.
Next we need to create a project inside the dev center:

We just need to select the dev center and give the project a name:

Now we will go back to the dev center and will create a dev box definition:

Complete the required fields with your selected VM and storage sizes:

I recommend giving it a meaningful name, which hints at the both the size of the VM, storage and Visual Studio and Windows versions.
Now go inside the project we created earlier, and create a new dev box pool:

And now we will complete all the fields:
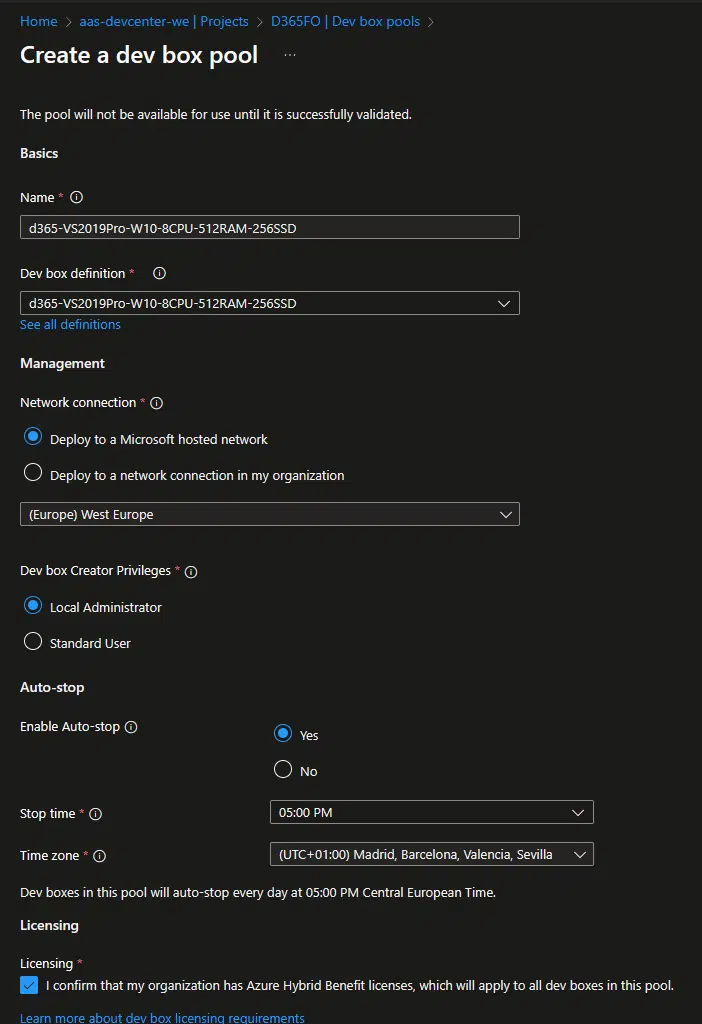
I’d also use the same name as in the definition, just out of convenience. Complete all other fields as per your requirements and select the licensing checkbox.
Finally, in the project, we need to assign the role DevCenter Dev Box User to the users that will create and use the dev boxes. You have to do this even if you’re the owner of the Azure resources!
We’re done with the dev center, now it’s time to access the dev boxes…
Accessing the Microsoft dev box
In order to create and access these dev boxes, we need to go to Microsoft developer portal at https://devportal.microsoft.com/.
If you get this screen:

This means that either the Azure resources are not deployed yet or that you’re missing the DevCenter Dev Box User role! Once that is fixed you should see this:

So just click the “New dev box” button:

In case you had several dev box pools, for example for different Visual Studio versions, you would get a dropdown in the “Dev box pool” field, and you’d be able to select in which pool you’re deploying the dev box.
Finally, click the create button and wait around 25 minutes.

Configuring the dev box for F&O
Once the Microsoft dev box is ready you will receive an email and be able to connect to it using the RDP client or your browser like Bastion does.

Choose your preferred method and log into the dev box using your Azure ADMicrosoft Entra ID credentials!
The VM has everything needed to work with the F&O local dev tools, including LocalDB.
Once you’ve logged in you basically have to follow Aurelién’s post linked at the beginning of the post. I’ll configure everything quickly without going into much detail and I’ll just focus on the issues I’ve found.
The first step is running Visual Studio and logging into your account. Then we will install the Power Platform tools extension.

Close Visual Studio and the extension will install. Once done open Visual Studio again and connect to your F&O development environment in Dataverse. We do that in the Tools menu:

Enter your credentials, and select your environment in the list and select the solution. The a dialog will appear asking if we want to download the F&O assets:
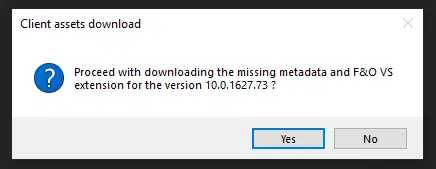
This will download several things to the C:\Users\YOUR_USER_NAME\AppData\Local\Microsoft\Dynamics365\10.0.1627.73 folder:
- F&O visual studio extension
- Cross-references database BAK
- PackagesLocalDirectory ZIP file.
The first thing we will do is unzip the ZIP file. The documentation suggests to use 7-Zip to do that, and I do too because using the Windows extraction tool it took over an hour for me to unzip the file, while when using 7-Zip it took less than 10 minutes. You can uncompress the AOT objects wherever you want. For example, I do it at C:\AOSService\PackagesLocalDirectory because… I’m used to that.
While the ZIP file is uncompressed install the VS extension for F&O. And one thing: don’t move the BAK file from there! When we configure the environment it expects the BAK file to be there, if we delete it, cut it somewhere else or whatever, we won’t be able to configure the local development tools!
When the ZIP file has finished being extracted and the extension is installed we can continue.
Open Visual Studio again, go to Extensions, hover on the Dynamics 365 menu item and… a dialog will appear!
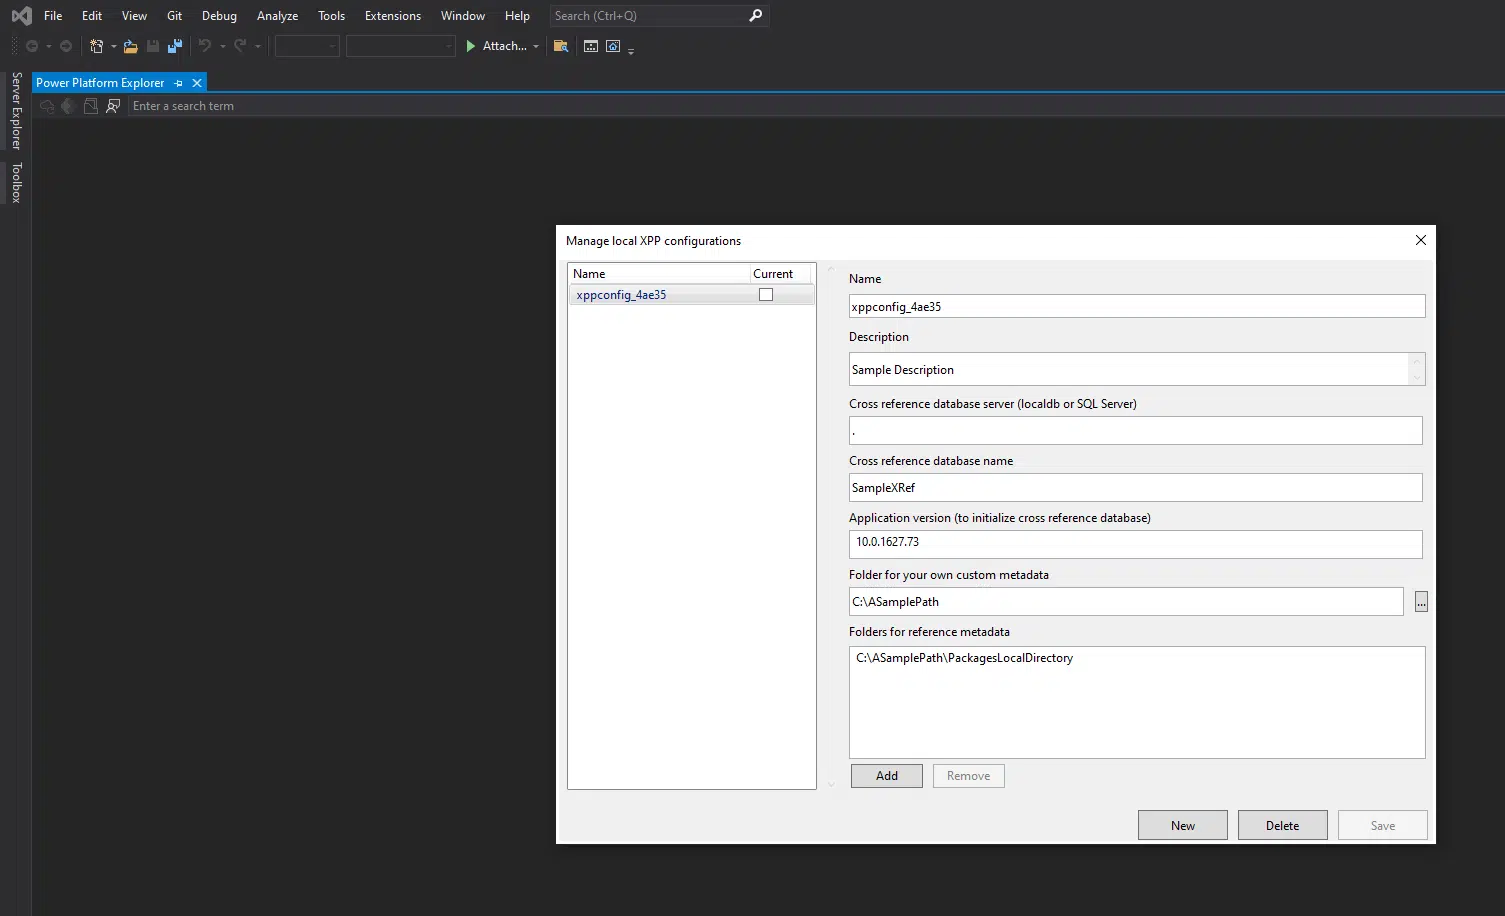
We need to complete all the fields. Give it a name and description as you like, as the xRef database server use (localdb)\., and a name for the xRef DB that will be restored using the BAK file.
IMPORTANT: click on the version number. I went nuts until I noticed you had to actually click and select it, it’s not automatically selected!
Finally, change the paths to your AOSService folders and click Save. It will fail, because we have to select the configuration as active by enabling the “Current” check next to the configuration name on the list. Now click Save and it will start restoring the xRef DB, you will see a message on the dialog.
If you have a database server error you might have to start the localdb instance. You can do that opening a command prompt and running this command:
sqllocaldb start mssqllocaldbNow create a runnable class with a hello world, deploy the model to the environment, run it and…
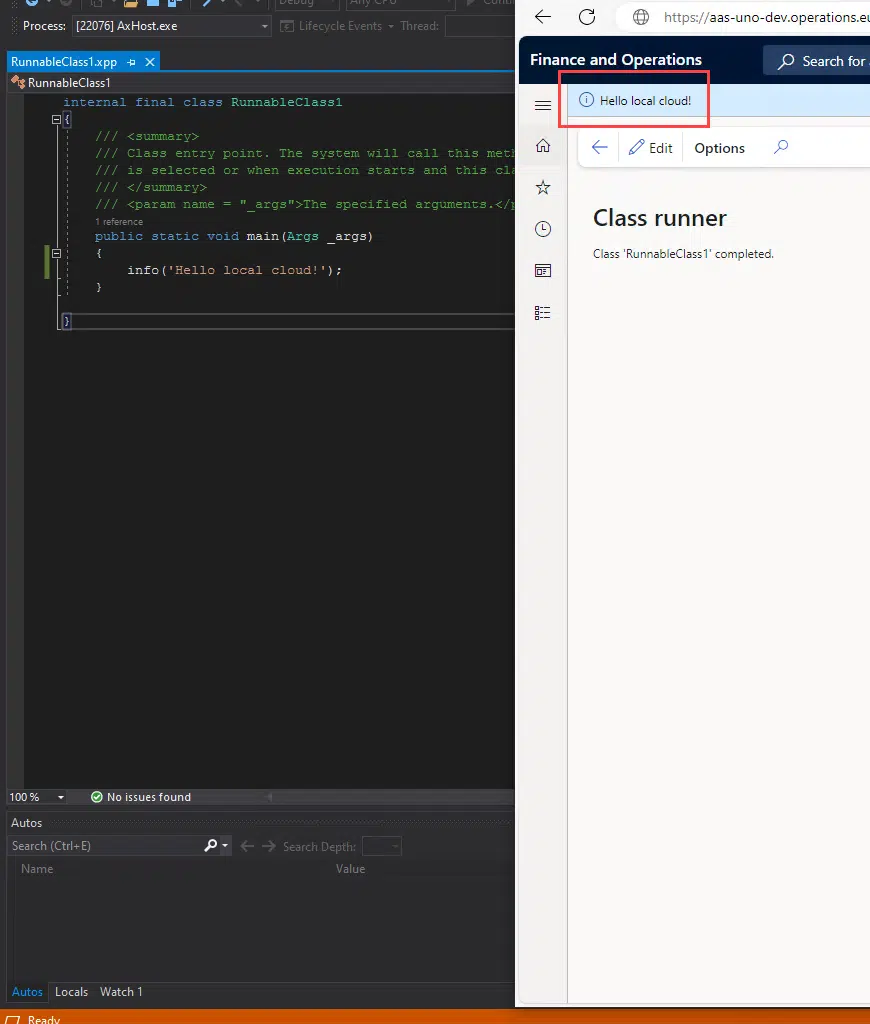
It works!
Once you’re done for the day, you can head back to the developer portal and choose several options:
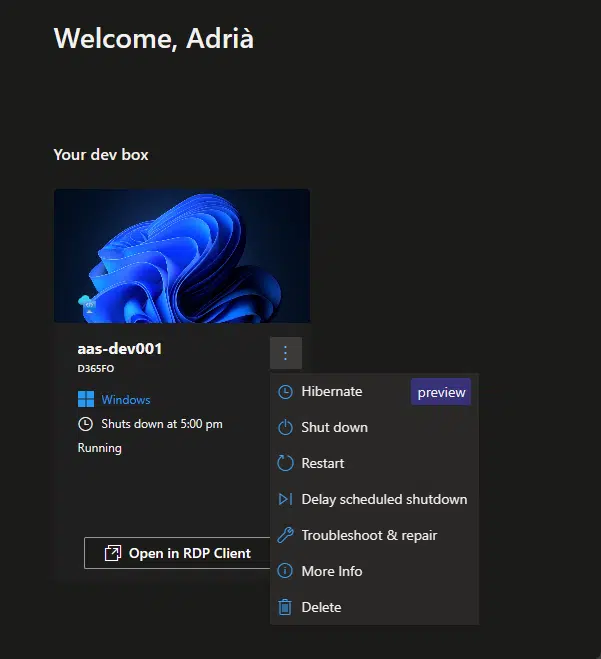
You can hibernate or shut down the box, which will stop the computing costs (but not the storage ones). We can also restart it, or delay the scheduled shutdown if it’s configured. And of course, we can also delete it.
What about performance?
Probably performance is one of the things we all thought about when the local developer experience was released.
And how is performance of the local tools on a cloud box? Well, it’s the same as in my laptop. I think the bottleneck for performance here are the actual F&O development tools and not hardware, local or in the cloud.
You still get some VS freezes and the warnings of the extension, but it’s definitely not worse than working on your own PC.
What about Visual Studio 2022?
If you want to use a Microsoft dev box with Visual Studio 2022 or Windows 11, go ahead! Since version 10.0.36 the Visual Studio extension for the F&O tools are included in the deployable packages used for the version upgrades!
Final thoughts
This is a small proof of concept, and while I think most people will use the local development tools on their local PC, there’s some cases where we could benefit from Microsoft Dev Box.
From a cost perspective we see that Microsoft Dev Box can cost much less than a classic LCS-deployed virtual machine.
I wouldn’t use this if I wanted to deploy and delete the dev box daily, because configuring the dev tools every day would be quite a loss of time. However it’s possible to use custom images to create dev boxes. Something I haven’t tried but maybe could be explored to have an image pre-configured.
Finally, this is something that may work for me, but not for others, and as always we need to evaluate what’s the best solution for us: the local VHD, cloud-hosted environments or local development.
But hey, I enjoyed trying this!
Further reading
- Dynamics 365 FinOps Unified developer experience
- The Public Preview for the Unified Experience is live
- Unified admin experience for finance and operations apps
- Tutorial: Provision a new environment with an ERP-based template
- Unified developer experiece for finance and operations apps
- The Public Preview for the Unified Experience is live!
- The Visual Studio 2022 add-in is now available for Dynamics 365 for Financials and Operations


