Behold #XppGroupies! The day we’ve been waiting for has come! The Azure-hosted builds are in public preview with PU35!! We can now stop asking Joris when will this be available because it already is! Check the docs!
I’ve been able to write this because I’ve been testing it for a few months with access to the private preview. And of course thanks to Joris for inviting us to the preview!

What does this mean? We no longer need a VM to run the build pipelines! Nah, we still need it! If you’re running tests or synchronizing the DB as a part of your build pipeline you still need the VM. But we can move CI builds to the Azure-hosted agent!
You can also read my full guide on MSDyn365FO & Azure DevOps ALM.
Remember this is a public preview. If you want to join the preview you first need to be part of the Dynamics 365 Insider Program where you can join the “Dynamics 365 for Finance and Operations Insider Community“. Once invited you should see a new LCS project called PEAP Assets, and inside its Asset Library, you’ll find the nugets in the Nuget package section.
Azure agents
With the capacity to run an extra Azure-hosted build we get another agent to run a pipeline and can run multiple pipelines at the same time. But it still won’t be parallel pipelines, because we only get one VM-less agent. This means we can run a self-hosted and azure hosted pipeline at the same time, but we cannot run two of the same type in parallel. If we want that we need to purchase extra agents.
With a private Azure DevOps project we get 2GB of Artifacts space (we’ll see that later) and one self-hosted and one Microsoft hosted agent with 1800 free minutes:

We’ll still keep the build VM, so it’s difficult to tell a customer we need to pay extra money without getting rid of its cost. Plus we’ve been doing everything with one agent until now and it’s been fine, right? So take this like extra capacity, we can divide the build between both agents and leave the MS hosted one for short builds to squeeze the 1800 free minutes as much as possible.
How does it work?
There’s really no magic in this. We move from a self-hosted agent in the build VM to a Microsoft-hosted agent.
The Azure-hosted build relies on NuGet packages to compile our X++ code. The contents of the PackagesLocalDirectory folder, platform, and the compiler tools have basically been put into nugets and what we have in the build VM is now on 3 nugets.
When the build runs it downloads & installs the nugets and uses them to compile our code on the Azure-hosted build along with the standard packages.
What do I need?
To configure the Azure hosted build we need:
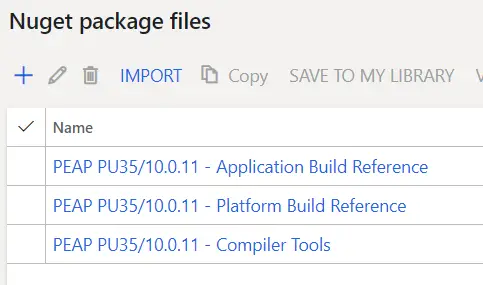
- The 3 nuget packages from LCS: Compiler tools, Platform X++ and Application X++.
- A user with rights at the organization level to upload the nugets to Azure DevOps.
- Some patience to get everything running 🙂
So the first step is going to the PEAP LCS’ Asset Library and downloading the 3 nuget packages:
Azure DevOps artifact
All of this can be done on your PC or in a dev VM, but you’ll need to add some files and a VS project to your source control so you need to use the developer box for sure.
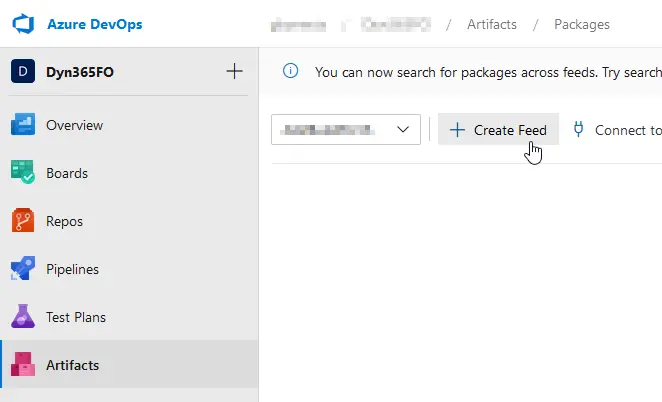
Head to your Azure DevOps project and go to the Artifacts section. Here we’ll create a new feed and give it a name:
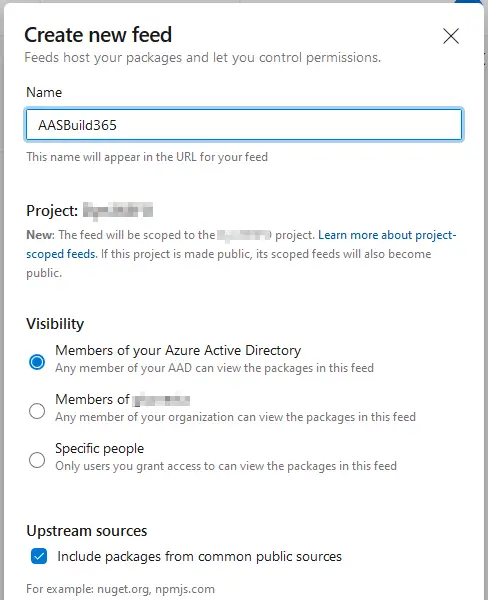
You get 2GB for artifacts, the 3 nuget packages’ size is around 500MB, you should have no issues with space unless you have other artifacts in your project.
Now press the “Connect to feed” button and select nuget.exe. You’ll find the instructions to continue there but I’ll explain it anyway.
Then you need to download nuget.exe and put it in the Windows PATH. You can also get the nugets and nuget.exe in the same folder and forget about the PATH. Up to you. Finally, install the credential provider: download this Powershell script and run it. Edit: if the script keeps asking for your credentials and fails try adding -AddNetfx as a parameter. Thanks to Erik Norell for finding this and sharing it in the comments!
Create a new file called nuget.config in the same folder where you’ve downloaded the nugets. It will have the content you can see in the “Connect to feed” page, something like this:
<?xml version="1.0" encoding="utf-8"?>
<configuration>
  <packageSources>
    <clear />
    <add key="AASBuild" value="https://pkgs.dev.azure.com/aariste/aariste365FO/_packaging/AASBuild/nuget/v3/index.json" />
  </packageSources>
</configuration>
This file’s content has to be exactly the same as what’s displayed in your “Connect to feed” page.
And finally, we’ll push (upload) the nugets to our artifacts feed. We have to do this for each one of the 3 nugets we’ve downloaded:
nuget.exe push -Source "AASBuild" -ApiKey az <packagePath>You’ll get prompted to enter the user. Remember it needs to have enough rights on the project.
Of course, you need to change “AASBuild” for your artifact feed name. And we’re done with the artifacts.
Prepare Azure DevOps
This new agent needs a solution to build our packages. This means we have to create an empty solution in Visual Studio and set the package of the project to our main package. Like this:
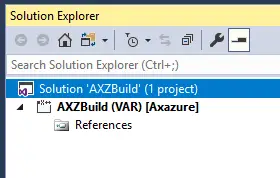
If you have more than one package or model, you need to add a project to this solution for each separate model you have.
We have to create another file called packages.config with the following content:
<?xml version="1.0" encoding="utf-8"?>
<packages>
  <package id="Microsoft.Dynamics.AX.Platform.DevALM.BuildXpp" version="7.0.5644.16778" targetFramework="net40" />
  <package id="Microsoft.Dynamics.AX.Application.DevALM.BuildXpp" version="10.0.464.13" targetFramework="net40" />
  <package id="Microsoft.Dynamics.AX.Platform.CompilerPackage" version="7.0.5644.16778" targetFramework="net40" />
</packages>
The version tag will depend on when you’re reading this, but the one above is the correct one for PU35. We’ll need to update this file each time a new version of the nugets is published.
If you’re configuring the pipeline for version 10.0.18 or higher, read this.
And, to end with this part, we need to add the solution, the nuget.config, and the packages.config files to TFVC. This is what I’ve done:
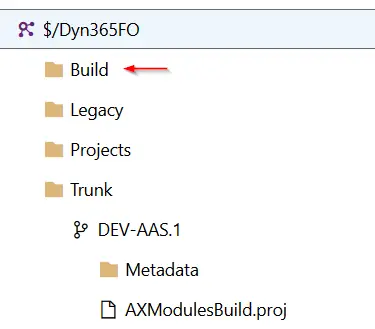
You can see I’ve created a Build folder at the root of my DevOps project. That’s only my preference, but I like to only have code in my branches, even the projects are outside of the branches, I only want the code to move between merges and branches. Place the files and solution inside the Build folder (or wherever you decide).
Configure pipeline
Now we need to create a new pipeline, you can just import this template from the newly created X++ (Dynamics 365) Samples and Tools Github project. After importing the template we’ll modify it a bit. Initially, it will look like this:
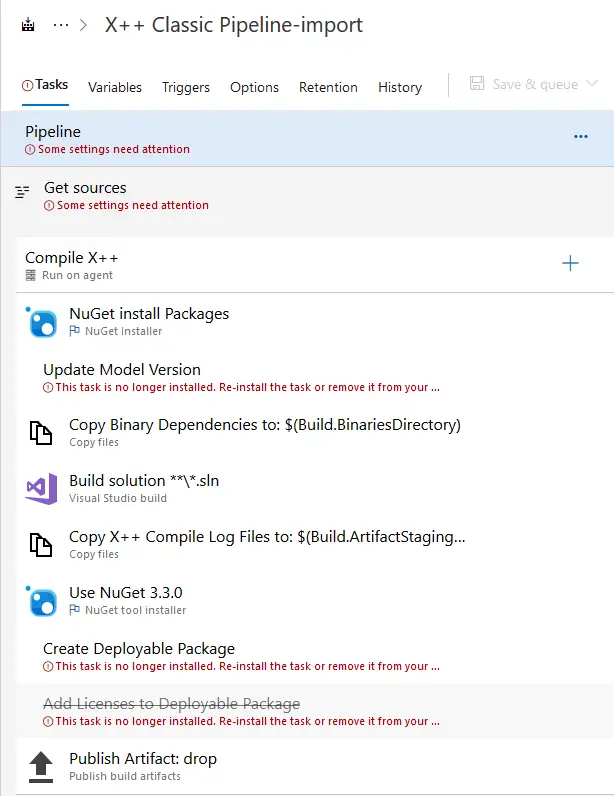
As you can see the pipeline has all the steps needed to generate the DP, but some of them, the ones contained in the Dynamics 365 tasks, won’t load correctly after the import. You just need to add those steps to your pipeline manually and complete its setup.
Pipeline root
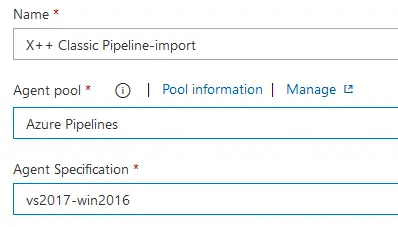
You need to select the Hosted Azure Pipelines for the Agent pool, and vs2017-win2016 as Agent Specification.
Get sources
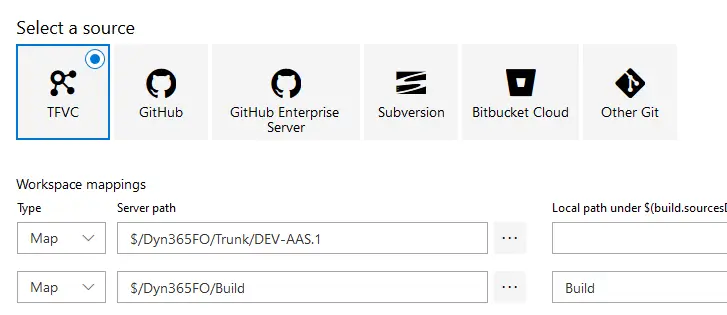
I’ve mapped 2 things here: our codebase in the first mapping and the Build folder where I’ve added the solution and config files. If you’ve placed these files inside your Metadata folder you don’t need the extra mapping.
NuGet install Packages
This step gets the nugets from our artifacts feeds and the installs to be used in each pipeline execution.
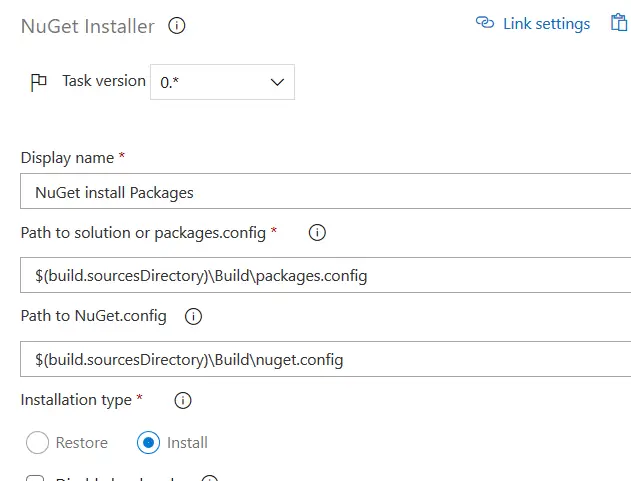
The command uses the config files we have uploaded to the Build folder, and as you can see it’s fetching the files from the $(build.sourcesDirectory)\Build directory we’ve configured in the Get sources step. If you’ve placed those files in a different place you need to change the paths as needed.
Update Model Version
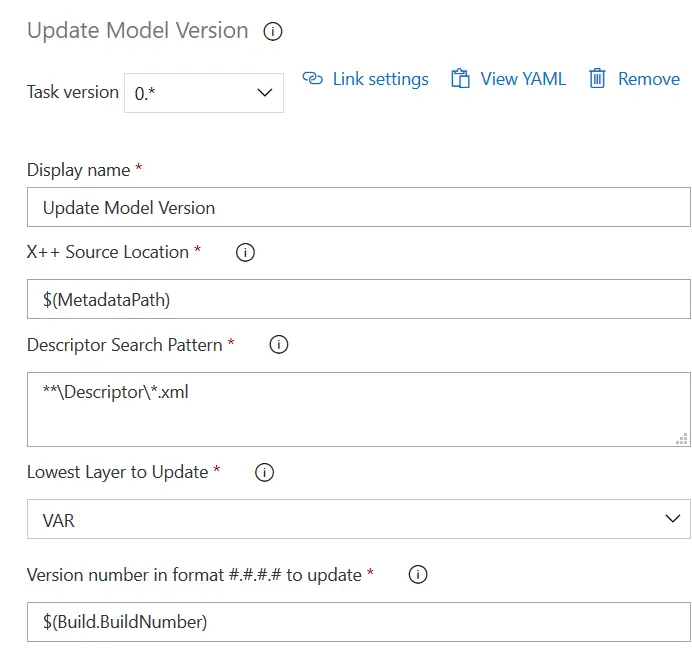
This is one of the steps that are displaying issues even though I got the Dynamics 365 tools installed from the Azure DevOps marketplace. If you got it right you probably don’t need to change anything. If you have the same issue as me, just add a new step and select the “Update Model Version” task and change the fields so it looks like this:
Build solution
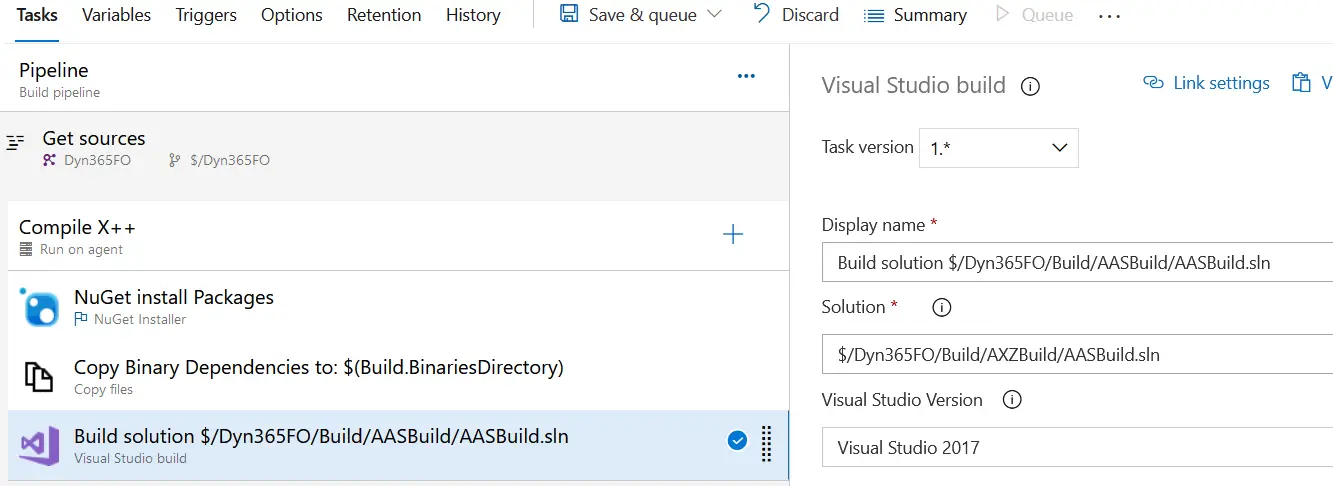
In the build solution step, you have a wildcard in the solution field: **\\*.sln. If you leave this wildcard it will build all the projects you have in the repo and, depending on the number of projects you have, the build could time out.
I solve this by selecting a solution, that contains all the models I have, that I have placed in the Build folder in my repo, and update that solution if you add or remove any model.
Thanks to Ievgen Miroshnikov for pointing this out!
There could be an additional issue with the rnrproj files as Josh Williams points out in a comment. If your project was created pre-PU27 try creating a new solution to avoid problems.
Create Deployable Package
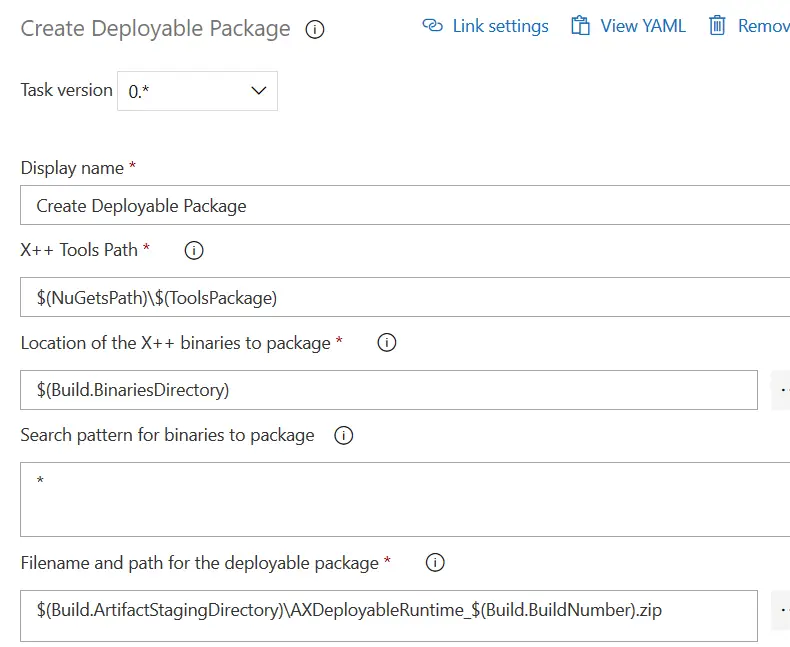
This is another one of the steps that are not loading correctly for me. Again, add it and change as needed:
Add Licenses to Deployable Package
Another step with issues. Do the same as with the others:
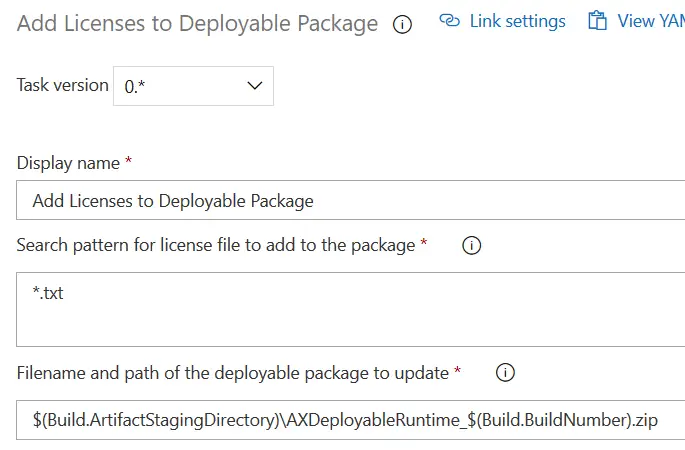
And that’s all. You can queue the build to test if it’s working. For the first runs, you can disable the steps after the “Build solution” one to see if the nugets are downloaded correctly and your code built. After that try generating the DP and publishing the artifact.
You’ve configured your Azure-hosted build, now it’s your turn to decide in which cases will you use the self-hosted or the azure hosted build.
Update for version 10.0.18
Since version 10.0.18 we’ll be getting 4 NuGet packages instead of 3 because of the Microsoft.Dynamics.AX.Application.DevALM.BuildXpp NuGet size is getting near or over the max size which is 500MB and will come as 2 NuGet packages from now on.
You can read about this in the docs.
There just 2 small changes we need to do to the pipeline if we’re already using it, one to the packages.config file and another one to the pipeline.
packages.config
The packages.config file will have an additional line for the Application Suite NuGet.
<?xml version="1.0" encoding="utf-8"?>
<packages>
    <package id="Microsoft.Dynamics.AX.Platform.DevALM.BuildXpp" version="7.0.5968.16973" targetFramework="net40" />
    <package id="Microsoft.Dynamics.AX.Application.DevALM.BuildXpp" version="10.0.793.16" targetFramework="net40" />
    <package id="Microsoft.Dynamics.AX.ApplicationSuite.DevALM.BuildXpp" version="10.0.793.16" targetFramework="net40" />
    <package id="Microsoft.Dynamics.AX.Platform.CompilerPackage" version="7.0.5968.16973" targetFramework="net40" />
</packages>
Pipeline
We need to add a new variable to the pipeline variables called AppSuitePackage with the value Microsoft.Dynamics.AX.ApplicationSuite.DevALM.BuildXpp.
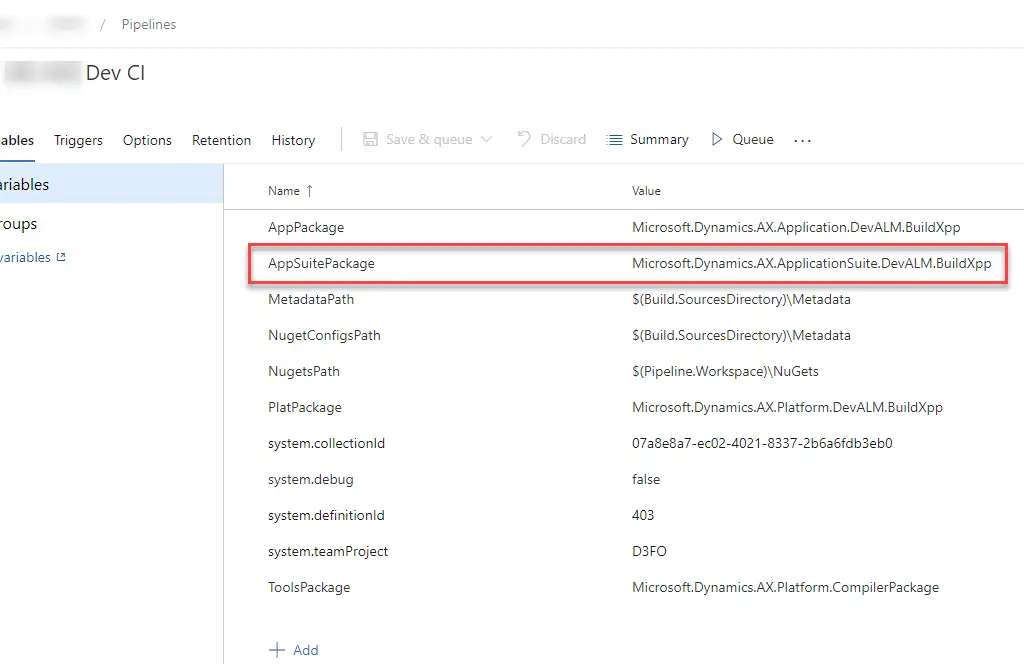
And then use it in the build step and change it to:
/p:BuildTasksDirectory="$(NugetsPath)\$(ToolsPackage)\DevAlm" /p:MetadataDirectory="$(MetadataPath)" /p:FrameworkDirectory="$(NuGetsPath)\$(ToolsPackage)" /p:ReferenceFolder="$(NuGetsPath)\$(PlatPackage)\ref\net40;$(NuGetsPath)\$(AppPackage)\ref\net40;$(MetadataPath);$(Build.BinariesDirectory);$(NuGetsPath)\$(AppSuitePackage)\ref\net40" /p:ReferencePath="$(NuGetsPath)\$(ToolsPackage)" /p:OutputDirectory="$(Build.BinariesDirectory)"




110 Comments
Great writeup! Thanks for doing this.
Thank you Tommy! I’m really enjoying this AX10 trip…
Is the nuget packages missing some assemblies used for building reports? We get this error:
Error: AxReport/xxxxxx – “An unhandled exception was thrown while validating xxxxxx with callstack System.IO.FileNotFoundException: Business Logic assembly not found at location d:\a\45\NuGets\Microsoft.Dynamics.AX.Platform.CompilerPackage\Microsoft.Dynamics.ApplicationSuite.Reporting.BusinessLogic.dll
During the private preview there was an issue with reports and there was a workaround but I haven’t found it with the new nuget packages, our reports are being compiled. You should ask in the Dev ALM group in the feedback program Yammer.
When installing the CredentialsProvider I had to run the following: .\installcredprovider.ps1 -AddNetfx
Otherwise I would just get asked over and over again to provide username/password to connect to the feed when pushing the packages.
I haven’t found this issue in any of the customers I’ve set up, but it’s good to know.
Thanks!
I should have given a little more context/source: Check https://github.com/microsoft/artifacts-credprovider#azure-artifacts-credential-provider
It states that “Dotnet needs the netcore version to be installed. NuGet and MSBuild need the netfx version to be installed.”
And then instead of saying “download this script” you can just run this from PowerShell without downloading anything
iex “& { $(irm https://aka.ms/install-artifacts-credprovider.ps1) } -AddNetfx”
Hi,
i am getting an error regarding the Build task directory
can you share what did you put on the extract the NuGet packages location ?
i used this -ExcludeVersion -OutputDirectory “$(Pipeline.Workspace)\NuGets”
and this parameter on the build task
/p:BuildTasksDirectory=”$(Pipeline.Workspace)\NuGets\Microsoft.Dynamics.AX.Platform.CompilerPackage\DevAlm”
the error is
Error MSB4226: The imported project “C:\Program Files (x86)\Microsoft Visual Studio\2017\Enterprise\MSBuild\Microsoft\Dynamics\AX\Microsoft.Dynamics.Framework.Tools.BuildTasks.targets” was not found.
I don’t have access to an Azure-hosted pipeline right now, but check if the path $(Pipeline.Workspace) is where the nugets have been installed or you’re using a different location for them and that’s why the build fails.
@Adria @Gill if it isn’t the nuget path, it’s also possible you have an .rnrproj that was generated pre-PU27. Open it in a notepad and double check the line
exists. If the import line for BuildTasks.targets is prefixed with “$(MSBuildExtensionsPath32)\Microsoft\Dynamics\AX\Microsoft…” then you are probably on an outdated rnrproj file. Try generating a new one from a recently deployed VM – that helped me recently.
Thanks, Josh, I’ve updated the DevOps page and the post with your remarks.
Hi
I´m running this to “push” a nuget package:
PS C:\nuget> ./nuget.exe push -Source “Build” -ApiKey az microsoft.dynamics.ax.platform.compilerpackage.7.0.5746.35600.nupkg
MSBuild auto-detection: using msbuild version ‘4.0’ from ‘C:\Windows\Microsoft.NET\Framework64\v4.0.30319’.
Please provide credentials for: https://MYSTUFF.pkgs.visualstudio.com/MYCODE/_packaging/Build/nuget/v3/index.json
But nothing happens!? I supposed a login prompt would show…
SPC
Yes, for the first nuget upload you should get an upload prompt. Could an antivirus be blocking it or that the login window stayed behind the active one?
Oops “-AddNetfx” was the solution to my question
Ahhh, then the issue was on the credential provider install! Glad you could fix it.
The VS solution: should that just contain projects referring to each module to build?
So just an empty project with no elements?
Yes, that’s correct. You need a solution and a project inside it, one project for each of the models you want the build process to compile. The in Azure DevOps, in the build step, you select that solution from source control and it’ll build the models of those projects.
Great. Thanks..
Good work you have done here…
Thanks! Glad it helps 🙂
Maybe not the right forum, but where can I get the log file generated here? :
D:\a\14\NuGets\Microsoft.Dynamics.AX.Platform.CompilerPackage\LabelC.exe -metadata=D:\a\14\s\Metadata -modelmodule=MYSTUFF -output=D:\a\14\b\MYSTUFF\Resources\ -outlog=D:\a\14\s\Project\Costing\Dynamics.AX.MYSTUFF.labelc.log -errlog=D:\a\14\s\Project\Costing\Dynamics.AX.MYSTUFF.labelc.err -compilerpath=C:\Windows\Microsoft.NET\Framework\v4.0.30319\
Label compilation did not succeed.
Review the output and error logs for more details from ResGen.exe, Csc.exe or Al.exe.
Returning result: -1
The LabelC issue happened during the preview days and shouldn’t be happening now, but I’ve also seen some people having this same issue on the Dev ALM Yammer group. Try adding a PowerShell script task before compiling with this:
$netfxPath = (Get-ItemProperty -Path “HKLM:\SOFTWARE\WOW6432Node\Microsoft\Microsoft SDKs\NETFXSDK\4.6.1\WinSDK-NetFx40Tools”).InstallationFolder
$frameworkPath = (Get-ItemProperty -Path “HKLM:\SOFTWARE\WOW6432Node\Microsoft\NET Framework Setup\NDP\v4\Full”).InstallPath
Write-Host “##vso[task.setvariable variable=PATH;]$($env:Path);$netfxPath;$frameworkPath”
But as I said it shouldn’t be happening and maybe you could report it on Yammer.
Same error here.
The error log in the drop folder says:
Unable to run command: Run command with arguments
Error: System.ComponentModel.Win32Exception (0x80004005): The system cannot find the file specified
at System.Diagnostics.Process.StartWithCreateProcess(ProcessStartInfo startInfo)
at Microsoft.Dynamics.AX.Framework.Xlnt.Labels.ProcessTaskRunner.StartAndWait()
but I really can’t figure out what is this.
Have you tried adding the PowerShell step I mention?
I did add a Powershell inline script but it fails:
Get-ItemProperty : Cannot find path ‘HKLM:\SOFTWARE\WOW6432Node\Microsoft\Microsoft SDKs\NETFXSDK\4.6.1\WinSDK-NetFx40Tools’ because it does not exist.
Then I’d try reaching out support or commenting in the insider Yammer forums because this is totally out of my knowledge, sorry.
Ok, thank you anyway!
Hi Ariste,
Thanks for your helpful documentation.
I have an issue on “Update Model Version” step. The error is following “Container path not found: ‘D:\a\8\s\Metadata’ “
Have you changed any of the path mappings? This step runs fine if nothing is changed.
Finally I found the cause of my issue. You should put a empty value on “Local path under $(build.sourcesDirectory” field on mapping for your branch on Get Sources step.
Hey Adrià, Simply awesome! Thanks a lot!
Thank you! 🙂
Hi Adrià, how do I add a project in the solution for an ISV model which does not show up in the list (locked)?
I haven’t tried this case. Have you tried adding a PowerShell step that will copy the binaries to your output directory. You should be able to get the path for the ISV binaries in your repo and copy all its contents before the build step is run.
thanks Adrià, copying ISV binaries from MetadataPath to Build.BinariesDirectory just before the build task worked!
By the way great post, I finally got it to work now 🙂
Hi
How did you make this copy ? Could you share script and screen shot of the setup ?
In the step “Copy Binary Dependencies to: $(Build.BinariesDirectory)” from the build pipeline in the Contents section, instead of **/bin/** use:
**/bin/**
**/Reports/**
**/Resources/**
**/WebContent/**
to copy all the binary objects from the ISV models to BinariesDirectory. The “Create Deployable Package” step wil take care of the rest.
Hi Adrià,
thank you for this awesome post!
I have an issue in the Build solution step:
” ##[error]Trunk\Development\Projects\DLX_Build\DEVCommon\DEVCommon.rnrproj(36,3): Error MSB4019: The imported project “D:\a\9\NuGets\Microsoft.Dynamics.AX.Platform.CompilerPackage\DevAlm\Microsoft.Dynamics.Framework.Tools.BuildTasks.targets” was not found. Confirm that the path in the declaration is correct, and that the file exists on disk.”
I have a solution with one project for each custom module I have.
I also checked that I have the right version of nuget packages (PU36).
Thank you!!
Do you see any error during the nuget install step? If it takes like 8-10 seconds (or under 3 minutes) you might see the errors in that step.
nuget install step takes 3minutes and 50 sec…
and I found no error but 2 warning.
##[warning]Can\’t find loc string for key: Info_ResolvedToolFromCache
Info_ResolvedToolFromCache 3.3.0
##[warning]Can\’t find loc string for key: Info_UsingVersion
And all 3 nuget packages have been uploaded to the artifacts and are being referenced in the packages.config file, right?
Right!
I have uploaded the following:
– Microsoft.Dynamics.AX.Application.DevALM.BuildXpp 10.0.507.10008
– Microsoft.Dynamics.AX.Platform.CompilerPackage 7.0.5688.35573
– Microsoft.Dynamics.AX.Platform.DevALM.BuildXpp 7.0.5688.35573
The project I specified has the following definition:
It seams that in the BuildTasksDirectory [/p:BuildTasksDirectory=”$(Pipeline.Workspace)\NuGets\Microsoft.Dynamics.AX.Platform.CompilerPackage\DevAlm”] there isn’t the file [Microsoft.Dynamics.Framework.Tools.BuildTasks.targets]
Hi Adrià,
Brilliant blog 🙂
I was getting an error which was something like this:
Error: AxFormExtension/DocuParameters.MyExtension/Controls/FormExtensionControl41jm1jgc1/PreviousSibling – For form extension control ‘FormExtensionControl41jm1jgc1’, its previous sibling ‘TST_Security’ was not found as a child control of ‘Design’.
TST_Security is a Control in another extension (which was also added to the build project).
To fix this, i had to change the Id for description file to be in sequence. i.e. the model that has the control TST_Security should be lesser than the model “MyExtension”
Thanks Shashi! Yes, this is a known issue but I don’t know if it’s documented. Thanks for sharing it!
You can try to use project dependencies on your model on your solution properties. I got same issues and I solved it with projects (models) dependencies on AXBuild Solution.
Hi,
are there side effects related to the model id change?
There shouldn’t be any as long as it’s a unique ID.
Hi Adrià,
How do you manage artifact when you prepare the update to the next version ?
I mean currently you are in 10.0.14 and you have you hosted build running on this version. You will prepare the update to 10.0.15 and you need both to manage TNR on Acceptance during the update and support to Production with two hosted builds on differents PU.
Do you create two artifacts and two build solutions to manage that ?
Yes, I’d have another artifact library for the preview and builds that would use it.
If you have different artifact library for different branch (dev, test, prod), then the build projet (containing the package.config and nuget.config) should be in each branch and promoted like the code? That differs from your suggestion of having the Build project outside the code. Let me know if I’m missing something. And btw thanks for that doc, it’s priceless!
I guess you could just have different packages.config files, pointing to different versions in the Build folder, but I haven’t tried it. And yes, you can have different projects too, if you have models that haven’t been released to prod yet, and manage the solutions as if they were code.
For me the putting everything inside the Build folder, outside the branches is a convenience thing, I like having only the Metadata folder in the branches and everything else outside, but that’s just the way I do it. If you prefer another way and that works for you, do it. The good thing about DevOps is that there’s multiple ways of doing the same thing.
Thanks for reading!!
Hi Adria,
Thanks for the content really helpful.
1) I have created a new artifacts and downloaded Nuget.exe file and installed credential provider successfully.
2) I have created a new Nuget.config file with respect to the artifacts defined(AASBuild365).
but while pushing the package using powershell i am getting the below msg. Please let me know your suggestion . It will be very helpful
PS C:\Users\Usercfbb8e486e6\.nuget> .\nuget.exe push -Source “AASBuild365” -ApiKey az microsoft.dynamics.ax.application.devalm.buildxpp.10.0.605.10014.nupkg;
The specified source ‘AASBuild365’ is invalid. Provide a valid source.
Hi Veera,
check the content of the nuget.config file and see that the artifact line points to a valid URL. Also make sure your artifact library is called AASBuild365.
Hi,
We have 3 model, I did not get the step where you have created a project. Do I need to create 3 project in that solution. Do i need to checkin that projects as well?
Do we need to add extra lines project.config file to include 3 custom models?
Yes, you need to add a project inside that solution for each of your models. You don’t need to edit project.config, just add a new project inside the solution.
Hi Adrià,
I’m trying to use the build service functionality as described at the docs https://docs.microsoft.com/en-us/dynamics365/fin-ops-core/dev-itpro/dev-tools/hosted-build-automation from Microsoft and with this blog.
I followed these step by step, but I get an error at running the pipeline at the step “Build solution”:
“D:\a\9\NuGets\Microsoft.Dynamics.AX.Platform.CompilerPackage\DevAlm\Microsoft.Dynamics.Framework.Tools.BuildTasks.targets(19,5): Error : No descriptors could be found for model ‘XYZ_Extensions’ in metadata directory ‘D:\a\9\s'”
But at the execution of steps “Checkout” and “Update model version” I see, that this model had been found and involved.
Do you know what I’m possibly missed in the setup?
Finally I’ve got it working! I changed the workspace mappings for the map to the metadata from “$/XYZ_ D365FO/Trunk/Test” to “$/XYZ_D365FO/Trunk/Test/Metadata”.
Good to hear! That’s strange because I’ve always mapped the root branch folder, not the Metadata one. Maybe it’s caused by a different folder structure than the one I use.
Hi Ariste,
I have published my Nuget package in Dev cloud and i can see the published package in Artifacts section.
Can you please give me more information on Prepare azure devops section.
I have to create a new solution and add packages. config file? please help me on this section.
You need to create a new solution that contains a project for each of your models/packages you want to compile. And then you need to create the packages.config file with the data from the nugets and upload it to Azure DevOps as described in the post.
Hi Ariste,
How did you import a pipeline for the Azure-hosted build? I used a JSON file from “X++ (Dynamics 365) Samples and Tools” Github project and getting the following error: “The exported JSON is not valid or is not compatible with the current product version. Try exporting and importing again.”
I’ve seen this happen to someone once and downloading the JSON file with a different browser solved it.
Thanks, after I downloaded the ZIP file with all project code, the pipeline imported without any error. Before that, I downloaded just one specific JSON file.
Hi Adrià,
I recently added use of the class PurchTableSkipBusinessLogicContext to my code. This is in Application Suite. When running build it fails with this error:
‘PurchTableSkipBusinessLogicContext’ does not denote a class, a table, or an extended data type
I have a model reference to Application Suite and we are using other Application Suite elements. When running build using a build server I am not getting the error.
We are on 10.0.15 and we are using the Quality Update PU39/10.0.15 Nuget package files. Have you had this error?
Hi Morten,
no, never had this error. Have you tried building with a nuget in a higher/lower version?
Hello
Brilliant Blog, thanks for sharing it. I have been running into the below error while trying to Publish the nugets. Can you please share your thoughts on where I could be going wrong?
Below is the command I used
nuget push -Source “Feed_Name” -ApiKey az “C:\VSTS\Nugets\Microsoft.Dynamics.AX.Application.DevALM.BuildXpp.10.0.644.10015.nupkg”
Error Received:
Pushing Microsoft.Dynamics.AX.Application.DevALM.BuildXpp.10.0.644.10015.nupkg to ‘C:\VSTS\Nugets\D365\_packaging\CWI_Feed\nuget\v3\index.json’…
Could not find a part of the path ‘C:\VSTS\Nugets\D365\_packaging\Feed_Name\nuget\v3\index.json\Microsoft.Dynamics.AX.Application.DevALM.BuildXpp.10.0.644.10015.nupkg’.
Thanks,
Arundhati
Thanks Arundhati. Check the content of the nuget.config file, you should see an URL there, if you don’t check on DevOps for the content of the file, sometimes it takes a bit until it’s generated and shown correctly.
My Hello Arundhati – Seems like I am running into the same error, which you had encountered and fixed 🙂 . Could you please help to figure out thee issue?
My nuget.config value looks like below and as per Adria’s blog the value is starting with “”https://pkgs.dev.azure.com/aariste/aariste365FO/_packaging/AASBuild/nuget/v3/index.json”. Is this an issue?
PS C:\nuget> ./nuget.exe push -Source “MSHABuild” -ApiKey az Microsoft.Dynamics.AX.Platform.CompilerPackage.7.0.5816.35651.nupkg
Pushing Microsoft.Dynamics.AX.Platform.CompilerPackage.7.0.5816.35651.nupkg to ‘C:\nuget\D365\_packaging\MSHABuild\nuget\v3\index.json’..
.
Could not find a part of the path ‘C:\nuget\D365\_packaging\MSHABuild\nuget\v3\index.json\Microsoft.Dynamics.AX.Platform.CompilerPackage.
7.0.5816.35651.nupkg’.
Hello
Can you confirm if Accounts enabled with Multi factor Autorization ( MFA) can be entered while Publishing the nuget packages?
Thanks,
Arundhati
I’m not sure about the nuget push, buit I’m 100% sure you can’t use a MFA-enabled account to configure the connection to LCS, so maybe the nugets too.
Hey Adrià
I have set up the Build pipeline but using the defined process however, the actual Build process is failing with the below Errors. Please note that all the packages are getting added to the generated package, but none of the Models are getting Built. A Few of these models is dependent on one another. Can you please confirm if any additional objects need to be added to the Empty projects to address the below Errors?
##[error]D:\a\8\NuGets\Microsoft.Dynamics.AX.Platform.CompilerPackage\DevAlm\Microsoft.Dynamics.Framework.Tools.BuildTasks.targets(46,5): Error MSB6006: “Xppc.exe” exited with code 2.
D:\a\8\NuGets\Microsoft.Dynamics.AX.Platform.CompilerPackage\DevAlm\Microsoft.Dynamics.Framework.Tools.BuildTasks.targets(46,5): error : Fatal: The assembly ‘Dynamics.AX.DocentricAX, Version=0.0.0.0, Culture=neutral, PublicKeyToken=null’ failed to load due to the module ‘Dynamics.AX.DocentricAX.Queries.0.netmodule’ not being present. Please perform a full build of the module that produced this dll. [D:\a\8\s\Build\SSSProjects\DocentricAX\DocentricAX.rnrproj]
Log contains 1 error messages (Showing 1):
##[error]D:\a\8\NuGets\Microsoft.Dynamics.AX.Platform.CompilerPackage\DevAlm\Microsoft.Dynamics.Framework.Tools.BuildTasks.targets(46,5): Error : Error: CroweMetalsAccelerator(0,0) – No assembly matching referenced module ‘CroweMetalsAccelerator’ is found.
Thanks,
Arundhati
It looks like you’re missing the binaries for some ISVs (like Docentric) and that’s why it fails.
Hi Adrià,
I have the same issue with Docentric ISV module. With hosted vm, i could compile without errors. What i’m missing?
thanks
Check this blog post from Joris de Gruyter, maybe it’ll help: https://www.codecrib.com/2021/01/including-isv-binaries-in-your-package.html
Hi Adria,
I have configured my pipeline while running the pipeline i am getting the below error. Please let me know your thoughts.
##[error]Error: The process ‘C:\hostedtoolcache\windows\NuGet\4.0.0\x64\nuget.exe’ failed with exit code 1
##[error]Packages failed to install
Hi Veera,
sorry but with only these details I don’t know what’s failing.
Hi Adria,
Great post.
Two queries though:
1) Can DB Sync and report deployment be included in the Azure pipeline for this hosted build without build server?
2) And if not why it is not supported and are there any plans for future to be included or?
Thanks,
Riste
Hi Riste,
1) no, it’s one of the limitations of the Azure-hosted pipeline. If you need to sync the DB or deploy reports you need a build VM.
2) I think it’s not planned to support it. To synchronize or deploy reports there’s other components needed which aren’t included in the hosted VM.
Thanks for reading!
Hi Adria,
I am able to successfully create the package and its a valid package which is shown under LCS asset library. When we are trying to apply the package on UAT env, we are not able to see the uploaded package.
Do you see any reason why it fails to appear in the list.
Hi Lalit,
if the deployable package is in the Asset Library and appears marked as valid it should be shown in the list when updating an environment. If it’s not I’d open a support request.
Hi Adria,
I have successfully build the pipeline. Thanks for the blog.
Only issue i am facing is I am unable to find my Model file in the extracted packages. I am gettting the below warning message but i have my project file in my Repo and i have given the path exactly.
MSB4046: Error reading project file “OmniITPipeline\OmniITPipeline.rnrproj”: Could not find a part of the path ‘D:\a\10\s\Build\Packages\OmniITPipeline\OmniITPipeline.rnrproj’.
Hi,
After updating the configuration to 10.0.18, i am getting below error. please help me resolve this error.
##[error]UGBuild\LTApplicationSuite\LTApplicationSuiteProject.rnrproj(33,3): Error MSB4019: The imported project “D:\a\8\NuGets\Microsoft.Dynamics.AX.Platform.CompilerPackage\DevAlm\Microsoft.Dynamics.Framework.Tools.BuildTasks.targets” was not found. Confirm that the path in the declaration is correct, and that the file exists on disk.
i have push packages to artifacts, update the package.config , and replace the build solution MSBuild Arguments.
Since 10.0.18 there’s a new nuget package and the popeline and the packages.config need to be updated.
Check this: https://docs.microsoft.com/en-us/dynamics365/fin-ops-core/dev-itpro/dev-tools/pipeline-nuget-split
Hi Adria,
I have followed your steps .I have downloaded all 3 nuget file from the lcs and then I have saved 3 files under a c\package drive folder. After that I have created a new feed. After that I clicked the connect feed button and chose the nuget exe. Then download the nuget exe latest version to my machine and save under C\package drive folder. And also copy the nuget.config file xml from the connect feed page and save the config file under the same c\package folder. Now I am trying to push the 3 downloaded nuget package to the connect feed. I am getting the below error
Nuget.config does not contained the expected root element configuration-path c\package\nuget.config.
Let me how to push the nuget package. Let me know which steps I am missing. Thanks in advance.
This article helped me especially -AddnetFx option helped to solve the issue.
When I am trying to add the downloaded (From LCS) packages to Azure DevOps Artifacts -> feed, it was asking the user credentials no.of times and nothing was happening, after some time seeing time out error…..
Then copied the entire text from the following URL
https://raw.githubusercontent.com/microsoft/artifacts-credprovider/master/helpers/installcredprovider.ps1
Pasted into a notepad and saved as installCredentials.ps1 in C:\Temp folder
Opened Windows PowerShell and executed the following command,
C:\Temp\installCredentials.ps1 -AddNetfx
with this User Credential package successfully added to user profiles folder and at the necessary places like AppData\Local
After this tired added the packages, for the first package it has asked the credentials to enter, provided my credentials (Make sure for your account, have the access to Azure – Feed)
other packages also added successfully.
Then executed the Pipeline, but still seeing the error like,
Error MSB4019: The imported project “D:\a\8\NuGets\Microsoft.Dynamics.AX.Platform.CompilerPackage\DevAlm\Microsoft.Dynamics.Framework.Tools.BuildTasks.targets” was not found. Confirm that the path in the declaration is correct, and that the file exists on disk
Issue here is , the copied package.config version numbers from Microsoft Docs for 10.0.18 and downloaded (from LCS) package versions are different.
updated the packages.config with the correct version of LCS downloaded ones.
With these steps our build has run successfully.
Thank you so much ….. 🙂
Glad it helped!
Hi I’m working on Pipeline build, but there is an error on Build task
Here are error log, how can I fied it or get more error, thank in advance.
2021-11-19T08:05:48.6080076Z ##[section]Starting: Build solution $/PKD365Dev/Trunk/Main/Projects/AzureDevOpsPipelineBuild/AzureDevOpsPipelineBuild.sln
2021-11-19T08:05:48.6403933Z ==============================================================================
2021-11-19T08:05:48.6404357Z Task : Visual Studio build
2021-11-19T08:05:48.6404663Z Description : Build with MSBuild and set the Visual Studio version property
2021-11-19T08:05:48.6404938Z Version : 1.192.3
2021-11-19T08:05:48.6405204Z Author : Microsoft Corporation
2021-11-19T08:05:48.6406839Z Help : https://docs.microsoft.com/azure/devops/pipelines/tasks/build/visual-studio-build
2021-11-19T08:05:48.6408671Z ==============================================================================
2021-11-19T08:05:57.6245773Z ##[command]”D:\a\_tasks\VSBuild_71a9a2d3-a98a-4caa-96ab-affca411ecda\1.192.3\ps_modules\MSBuildHelpers\vswhere.exe” -version [17.0,18.0) -latest -format json
2021-11-19T08:05:57.8538710Z ##[command]”D:\a\_tasks\VSBuild_71a9a2d3-a98a-4caa-96ab-affca411ecda\1.192.3\ps_modules\MSBuildHelpers\vswhere.exe” -version [17.0,18.0) -products Microsoft.VisualStudio.Product.BuildTools -latest -format json
2021-11-19T08:05:57.9274185Z ##[command]”D:\a\_tasks\VSBuild_71a9a2d3-a98a-4caa-96ab-affca411ecda\1.192.3\ps_modules\MSBuildHelpers\vswhere.exe” -version [16.0,17.0) -latest -format json
2021-11-19T08:05:57.9938403Z ##[command]”D:\a\_tasks\VSBuild_71a9a2d3-a98a-4caa-96ab-affca411ecda\1.192.3\ps_modules\MSBuildHelpers\vswhere.exe” -version [16.0,17.0) -products Microsoft.VisualStudio.Product.BuildTools -latest -format json
2021-11-19T08:05:58.0520661Z ##[command]”D:\a\_tasks\VSBuild_71a9a2d3-a98a-4caa-96ab-affca411ecda\1.192.3\ps_modules\MSBuildHelpers\vswhere.exe” -version [15.0,16.0) -latest -format json
2021-11-19T08:05:58.9800477Z ##[command]”C:\Program Files (x86)\Microsoft Visual Studio\2017\Enterprise\MSBuild\15.0\Bin\msbuild.exe” “D:\a\9\s\Projects\AzureDevOpsPipelineBuild\AzureDevOpsPipelineBuild.sln” /nologo /nr:false /fl /flp:”logfile=D:\a\9\s\Projects\AzureDevOpsPipelineBuild\AzureDevOpsPipelineBuild.sln.log;verbosity=normal” /dl:CentralLogger,”D:\a\_tasks\VSBuild_71a9a2d3-a98a-4caa-96ab-affca411ecda\1.192.3\ps_modules\MSBuildHelpers\Microsoft.TeamFoundation.DistributedTask.MSBuild.Logger.dll”;”RootDetailId=70dc3d41-fc9e-4df6-8835-fadeaca95bdf|SolutionDir=D:\a\9\s\Projects\AzureDevOpsPipelineBuild”*ForwardingLogger,”D:\a\_tasks\VSBuild_71a9a2d3-a98a-4caa-96ab-affca411ecda\1.192.3\ps_modules\MSBuildHelpers\Microsoft.TeamFoundation.DistributedTask.MSBuild.Logger.dll” /p:BuildTasksDirectory=”D:\a\9\NuGets\Microsoft.Dynamics.AX.Platform.CompilerPackage\DevAlm” /p:MetadataDirectory=”D:\a\9\s\Metadata” /p:FrameworkDirectory=”D:\a\9\NuGets\Microsoft.Dynamics.AX.Platform.CompilerPackage” /p:ReferenceFolder=”D:\a\9\NuGets\Microsoft.Dynamics.AX.Platform.DevALM.BuildXpp\ref\net40;D:\a\9\NuGets\Microsoft.Dynamics.AX.Application.DevALM.BuildXpp\ref\net40;D:\a\9\NuGets\Microsoft.Dynamics.AX.ApplicationSuite.DevALM.BuildXpp\ref\net40;D:\a\9\s\Metadata;D:\a\9\b” /p:ReferencePath=”D:\a\9\NuGets\Microsoft.Dynamics.AX.Platform.CompilerPackage” /p:OutputDirectory=”D:\a\9\b” /p:VisualStudioVersion=”15.0″ /p:_MSDeployUserAgent=”VSTS_01a5077d-4e20-4aac-831d-72f8148b9932_build_4_0″
2021-11-19T08:05:59.4498562Z Building the projects in this solution one at a time. To enable parallel build, please add the “/m” switch.
2021-11-19T08:06:00.1419268Z Build started 11/19/2021 8:06:00 AM.
2021-11-19T08:06:01.8668521Z Project “D:\a\9\s\Projects\AzureDevOpsPipelineBuild\AzureDevOpsPipelineBuild.sln” on node 1 (default targets).
2021-11-19T08:06:01.8702058Z ValidateSolutionConfiguration:
2021-11-19T08:06:01.8702771Z Building solution configuration “Debug|Any CPU”.
2021-11-19T08:06:03.2805163Z Project “D:\a\9\s\Projects\AzureDevOpsPipelineBuild\AzureDevOpsPipelineBuild.sln” (1) is building “D:\a\9\s\Projects\AzureDevOpsPipelineBuild\ECP1\ECP1.rnrproj” (2) on node 1 (default targets).
2021-11-19T08:06:03.2805965Z ResolveModels:
2021-11-19T08:06:03.2806350Z SolutionFileParser Execute method
2021-11-19T08:06:03.2810314Z Found 4 projects in the solution file
2021-11-19T08:06:03.3090888Z Done Building Project “D:\a\9\s\Projects\AzureDevOpsPipelineBuild\ECP1\ECP1.rnrproj” (default targets) — FAILED.
2021-11-19T08:06:03.3368540Z Done Building Project “D:\a\9\s\Projects\AzureDevOpsPipelineBuild\AzureDevOpsPipelineBuild.sln” (default targets) — FAILED.
2021-11-19T08:06:03.3626175Z
2021-11-19T08:06:03.3627180Z Build FAILED.
2021-11-19T08:06:03.3630487Z 0 Warning(s)
2021-11-19T08:06:03.3631402Z 0 Error(s)
2021-11-19T08:06:03.3757539Z
2021-11-19T08:06:03.3780572Z Time Elapsed 00:00:03.23
2021-11-19T08:06:03.5507462Z ##[error]Process ‘msbuild.exe’ exited with code ‘1’.
2021-11-19T08:06:03.6345121Z ##[section]Finishing: Build solution $/PKD365Dev/Trunk/Main/Projects/AzureDevOpsPipelineBuild/AzureDevOpsPipelineBuild.sln
Problem has been solved by adjust some Service path
but now I got a new error I’m not sure Is this customization way support to build via Pipeline
Scenario
Customization Package 1
– Extend Form X from Application suite and Add Control_1
Customization Package 2 (Reference Customization Package 1)
– Extend Form X from Application suite and Modify Control_1
It no build error on VM but via Pipeline there is error “A control modification’s name must be a control in the base form”
##[error]D:\a\12\NuGets\Microsoft.Dynamics.AX.Platform.CompilerPackage\DevAlm\Microsoft.Dynamics.Framework.Tools.BuildTasks.targets(19,5): Error : No descriptors could be found for model ‘XXX’ in metadata directory ‘D:\a\12\s\Metadata’
##[error]D:\a\12\NuGets\Microsoft.Dynamics.AX.Platform.CompilerPackage\DevAlm\Microsoft.Dynamics.Framework.Tools.BuildTasks.targets(19,5): Error : No descriptors could be found for model ‘HCLHousingSol’ in metadata directory ‘D:\a\12\s\Metadata’
Hi, Do you have any video recording for this ? if Yes, please share it. I stuck on the following step.
Then you need to download nuget.exe and put it in the Windows PATH. You can also get the nugets and nuget.exe in the same folder and forget about the PATH. Up to you. Finally, install the credential provider: download this Powershell script and run it. Edit: if the script keeps asking for your credentials and fails try adding -AddNetfx as a parameter. Thanks to Erik Norell for finding this and sharing it in the comments!
By “Windows PATH” you mean any folder? let say on C drive etc ? Similarly I am also not clear how to install the credential provider
https://github.com/microsoft/artifacts-credprovider#azure-artifacts-credential-provider
Manual installation on Windows
Download the latest release of Microsoft.NuGet.CredentialProvider.zip
I am not clear about step 3.
Hi Tasheen,
you can skip adding nuget to your Windows PATH and just execute it in the folder it is. The script is ran by calling it in a PowerShell command line, using “\.installcredprovider.ps1” (without the quotes). If the computer doesn’t have netcore installed you need to call it like this: “\.installcredprovider.ps1” -AddNetFx (without the quotes also).
Please mention the command for this one
Finally, install the credential provider: download this Powershell script and run it. Edit: if the script keeps asking for your credentials and fails try adding -AddNetfx as a parameter. Thanks to Erik Norell for finding this and sharing it in the comments!
I am not sure why cannot I see the existing comments on this post.
You should use “\.installcredprovider.ps1 -AddNetFx” (without the quotes) in a PowerShell terminal.
HI thanks for your replies.
Do I need to update the value of targerFramework? if Yes from where i can find it ?
No, just the version.
Hi,
Thanks for your continuous replies. I have reached to the point where I imported the sample pipeline but need help in configuring it and also need some help to understand which is best place to save the empty solution ? we have 2 custom models and 5 ISVs (2 models from do centric and 3 from partner. we get it as packages.) At the moment I am using Cloud hosted Build VM (that creates the pipeline automictically) to create packages and release packages. But as we know it will no longer available after sometime . so wants to switch it to azure pipeline as soon as possible.
Is it possible to have zoom meeting for 10 to 15 minutes ? or any other way to have call with screen sharing ? whatever time suits you. I will manage it accordingly.
Hi,
I have a ISV package along with its license model. I am in the process of creating a deployable package with few ISV models, using Azure hosted pipelines.
For the step on creating an blank solution with one project for each model, I am unable to reference a ISV model. How can this be achieved?
You need to add the ISVs to your Azure DevOps repo by installing them in a dev VM and then checking them in to the repo. If you have the axmodel files install them, if you have just the binaries do as described here: https://www.codecrib.com/2021/01/including-isv-binaries-in-your-package.html
I have the binaries and have already added them to the source control. Now, following the steps from this blog to create a Azure hosted build pipeline. I was on the step where I created a blank visual studio solution and trying to add 1 project per ISV model. But running into a roadblock as I cannot reference the ISV model while associating it to the project. I don’t see the ISV models in the dropdown in the Project properties window.
Ah I got it. You shouldn’t need a solution if you don’t have code. The binaries are added in one of the steps of the pipeline. If you take a look at Joris’ post I linked in my previous comment you should be able to generate the deployable package.
Hi ,
Thanks for the great blog post. I am having a confusing around the build pipeline setup. Can you please help ?
Regarding NuGet install Packages step : Path to package.config field : should I navigate here to the exact folder path where I have kept the config files or keep it as it is?
Regarding Update Model Version step : I have to remove and reinstall this step. How so I reinstall this? Is there any add option or installation option here?
Kindly help.
Hi Ssm,
For the NuGets, you need to add all the path up to the .config file.
Update Model Version: add a new task and look for it, it should be there.
HI Adrià Ariste Santacreu,
Thanks for the great blog post.
I followed all the steps as per the blog. I am getting error at the Build solution step. The error is as follows:
##[error]Build\Pwc\Pwc.rnrproj(36,3): Error MSB4019: The imported project “D:\a\8\NuGets\Microsoft.Dynamics.AX.Platform.CompilerPackage\DevAlm\Microsoft.Dynamics.Framework.Tools.BuildTasks.targets” was not found. Confirm that the expression in the Import declaration “D:\a\8\NuGets\Microsoft.Dynamics.AX.Platform.CompilerPackage\DevAlm\Microsoft.Dynamics.Framework.Tools.BuildTasks.targets” is correct, and that the file exists on disk.
Kindly Help.
Hi Vishal,
make sure the path to the solution used for the build is correct. Also check which VS version was used to create the build solution, and if it’s VS2022 download the latest nuget packages that include the targets for both versions.
As of 2025, you have to download 5 nuget packages from LCS and not 3 as the article suggests: Application Suite Build Reference, Compiler Tools, Platform Build Reference, Application 1 Build Reference, Application 2 Build Reference. Do not push Application Build Reference to dev ops. It has been split into two files since it is too large
Yes, that’s correct, I will cover that in the new ALM guide. The next part I’m writing is the one related to pipelines (build & release), and it’ll be there.
I am getting this error and I cannot figure out why. AFT is the model.
ResolveModels:
SolutionFileParser Execute method
Found 1 projects in the solution file
##[error]D:\a\10\NuGets\Microsoft.Dynamics.AX.Platform.CompilerPackage\DevAlm\Microsoft.Dynamics.Framework.Tools.BuildTasks.17.0.targets(55,5): Error MSB4181: The “FindModuleFromDescriptor” task returned false but did not log an error.
D:\a\10\NuGets\Microsoft.Dynamics.AX.Platform.CompilerPackage\DevAlm\Microsoft.Dynamics.Framework.Tools.BuildTasks.17.0.targets(55,5): error MSB4181: The “FindModuleFromDescriptor” task returned false but did not log an error. [D:\a\10\s\Build\D365Build\AFT\AFT.rnrproj]
Done Building Project “D:\a\10\s\Build\D365Build\AFT\AFT.rnrproj” (default targets) — FAILED.
Done Building Project “D:\a\10\s\Build\D365Build\D365Build.sln” (default targets) — FAILED.
Hi Aco,
It’s hard to tell, but it looks like it can’t find the model file? Doed the dolution that you’re using fof the build contain a project that has AFT as the model?
Hi Adria,
yes. Do the solution and the .rnrproj file have to be in the same folder? Because I have a separate folder for the project within the solution folder.
D365Build.sln (D365Build\D365Build.sln) and the project for the model (D365Build\AFT\AFT.rnrproj).