You can read my complete guide on Microsoft Dynamics 365 for Finance & Operations and Azure DevOps.
In the first part of this post I wrote about Azure DevOps value and how to set it up in MSDyn365FO.
I want to start this second part with a little rant. As I said in the first part, those who have been working with AX for several years were used to not using version-control systems. MSDyn365FO has taken us to uncharted territory, so it is not uncommon for different teams to work in different ways, depending on their experience and what they’ve found in the path. There’s an obvious interest factor here, each team will need to invest some time to discover what’s better for them regarding code, branching and methodologies. Many times this will be based on experimentation and test-error, and with the pace of some projects this turns out bad. And here’s where I’ve been missing some guidance from Microsoft (but maybe I’ve just not found it).
Regardless of this rant, the journey and all I’ve learnt has been, and I think will be, pretty fun 😉
Branching strategies
I want to make it clear in advance that I’m not an expert in managing code nor Azure DevOps, at all. All that I’ve written here is product of experiences (also bad ones) of almost 3 years working with MSDyn365FO. In this article on branching strategies from the docs there’s more information regarding branching and links to articles of the DevOps team. And there’s even MORE info in the DevOps Rangers’ Library of tooling and guidance solutions!
The truth is that I’d love a FastTrack session about this and, I think, it doesn’t exist. EDIT: it looks like I did definitely overlooked it and there is a FastTrack session called Developer ALM which talks a bit about all this. Thanks to Dag Calafell (twitter) for pointing this out!
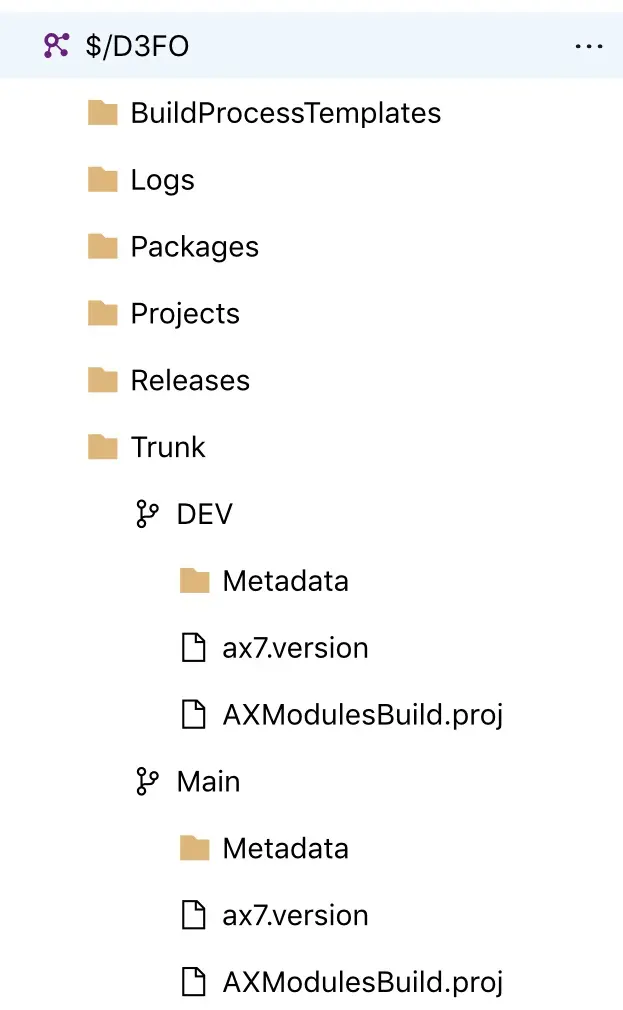
In the first part we learnt that the Main folder is created when deploying the Build VM. The usual is that in an implementation project all development will be done on that branch until the Go Live, and just before that a new dev branch will be created. The code tree will look like this:

From this moment on, the development VMs need to be mapped to this new development branch. This will allow us to keep developing on the Dev branch and decided when the changes are promoted to the Main one.
This branching strategy is really simple and will keep us mostly worries-free. In my previous job, we went on with a 3 branches strategy, Main, Test and Dev, merging from Dev to Test and from Test to Main. A terrible mistake. Having to mantain 2 sets of changesets is harder and with version ugrades, dozens of pending changeset waiting to be merged and an ISV partner taht sometimes would not help much, everything was kind of funny (“funny”). But I learnt a lot!
Anyway, just some advice: try to avoid having pending changesets to be merged for long. The amount of merge conflicts that will appear is directly proportional to the time the changeset has been waiting to be merged.
At this point, I cannot emphasize enough what I mean by normal. As I say, I wrote all of this based on my experience. It’s obviously not the same working for an ISV than for an implementation partner. An ISV has different needs, it has to mantain different code versions to support all their customers and they don’t need to work in a Dev-Main manner. They could have one (or more) branch for each version. However, since the end of overlayering this is not necessary :). More ideas about this can be found in the article linked at the beggining of this post.
Builds
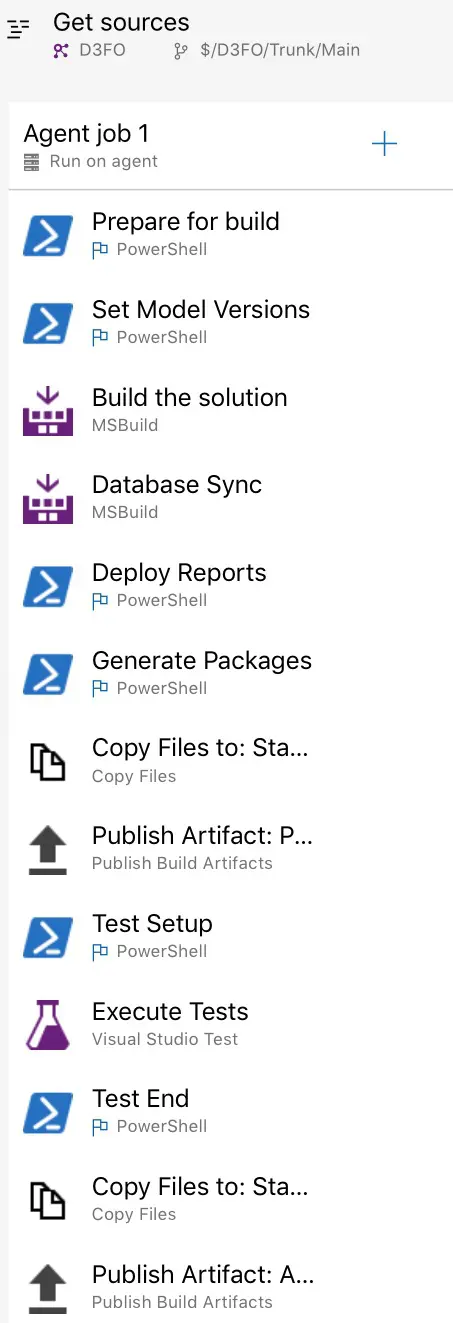
In the first part and an older post (Unresponsive builds in Azure DevOps) I explained a bit about builds, and we saw the default build definition generated when deploying the build machine:

This build definition has all the default steps active. We can disable (or remove) all the steps we’re not going to use. For example, the testing steps can be removed if we have no unit testing. Or the DB sync and report deployment too.
We can also create new build definitions from scratch, however it’s easier to clone the default one and modify it to other branches or needs.
Since 8.1 all the X++ hotfixes are gone, the updates are applied in a deployable package (binaries!). This implies that the Metadatada folder will only contain our custom packages and models, no standard packages anymore. Up until 8.0, having a build definition compiling and generating a DP only with our models was a good idea. In this way we could have a deployable package ready in less time than having to compile standard packages with hotfixes plus ours. Should we need to apply a hotfix we’d just queue the default build pointing to the Main root, otherwise we’d just generate our packages. Using this strategy, we reduced the DP generation time from 1h15m to 9m in one of our customer’s project.
But that was in the past, and all this is outdated information. Right now I hope everybody is as close to 8.1 as possible because One Version is coming in April!
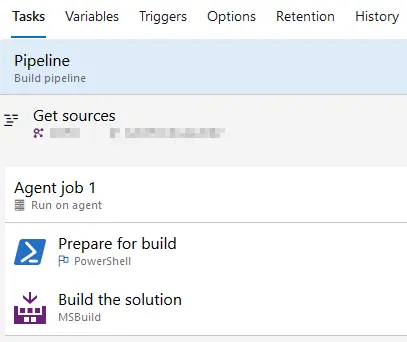
Another useful option is having a build definition that will only compile the code:

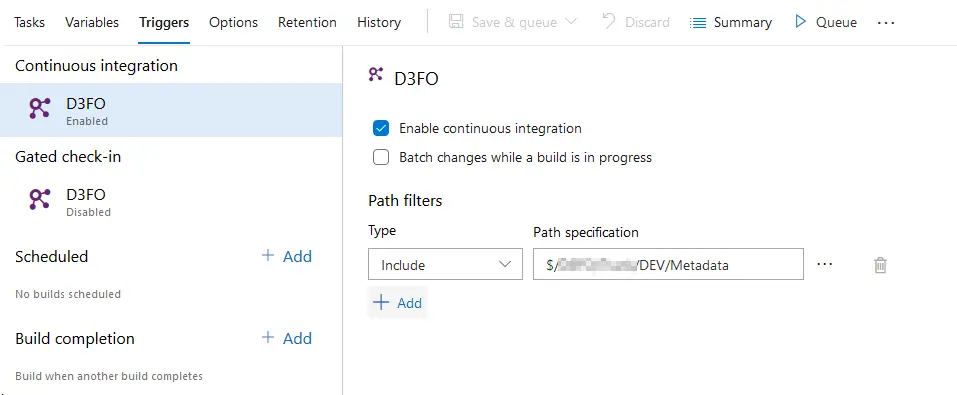
It may look a bit useless until you enable the continuous integration option:

Right after every developer’s check-in a build will be queued, and the code compiled. In case there’s a compilation error we’ll be notified about it. Of course, we all build the solutions before checking them in. Right?

And because we all know that “Slow and steady wins the race” but at some point during a project, that’s not possible this kind of build definition can help us out. Especially when merging code conflicts from a dev branch to Main. This will allow us to be 100% sure when creating a DP for release to production that it’ll work. I can tell you that having to do a release to prod in a hurry and seeing the Main build failing is not nice.
Somebody with far more experience and knowledge than me can think, wait but this can also be done with…
Gated check-ins
What we accomplish with a gated check-in is that the build agent will launch an automated compilation BEFORE checking-in the code. If it fails, the changeset is not made until the errors are fixed and checked-in again.
This option might seem perfect for the merge check-ins to the Main branch. I’ve found some issues trying to use it, for example:
- If multiple merge & check-ins from the same development are done and the first fails but the second doesn’t, you’ll still have pending merges to be done.
- Issues with error notifications and pending code on dev VMs.
- If many check-ins are made you’ll end up with lots of queued builds (and we only have one available agent per DevOps project).
I’m sure this probably has a solution, but I haven’t found it. And I think the CI option is working perfectly to us to validate code. As I’ve already said, all of this is product of trial-error, we’ve learnt to use this while working with it.
Conclusions
I guess the biggest conclusion is that with MSDyn365FO we must use DevOps. It’s mandatory, there’s no other option. If there’s anyone out there not doing it, do it. Now. Review how you work and let’s forget and don’t look back at how we used to work with AX, technically speaking MSDyn365FO is a different product.
Truth is that MSDyn365FO has taken developers to a more classic approach of software projects, like .NET or Java. But we’re still special. An ERP project has a lot of peculiarities, and not having to create a product from scratch, having a base that makes us follow a path, limits us in some aspects, and the usage of certain techniques or methodologies.
I hope these two posts about Azure DevOps can help somebody. And if anyone with more experience or better ideas wants to recommend anything, comments are open!


4 Comments
super helpful posts for a noob to the D365Finops world after departing and returning (perhaps a mistake?!) to the ERP world since the AX days thank you do keep it up! really appreciate
Thanks, I’m glad it helps!