
The end of Tier-1 Microsoft-managed build VMs is near, and this will leave us without the capacity to synchronize the DB or run tests in a pipeline, unless we deploy a new build VM in our, or our customer’s, Azure subscription. Of course, there might be a cost concern with it, and there’s where Azure DevTest Labs can help us!
This post has been written thanks to Joris de Gruyter’s session in the past DynamicsCon: Azure Devops Automation for Finance and Operations Like You’ve Never Seen! And there’s also been some investigation and (a lot of) trial-and-error from my side until everything has been working.

If you want to know more about builds, releases, and the Dev ALM of Dynamics 365 you can read my full guide on MSDyn365 & Azure DevOps ALM.
But first…
What I’m showing in this post is not a perfect blueprint. There’s a high probability that if you try exactly the same as I do here, you won’t get the same result. But it’s a good guide to get started and do some investigation on your own and learn.
Azure DevTest Labs
Azure DevTest Labs is an Azure tool/service that allows us to deploy virtual machines and integrate them with Azure DevOps pipelines, and many other things, but what I’m going to explain is just the VM and pipeline part.
What will I show in this post? How to prepare a Dynamics 365 Finance and Operations VHD image to be used as the base to create a build virtual machine from an Azure DevOps pipeline, build our codebase, synchronize the DB, run tests, even deploy the reports, generate the deployable package and delete the VM.
Getting and preparing the VHD
This is by far the most tedious part of all the process because you need to download 11 ZIP files from LCS’ Shared Asset Library, and we all know how fast things download from LCS.

And to speed it up we can create a blob storage account on Azure and once more turn to Mötz Jensen’s d365fo.tools and use the Invoke-D365AzCopyTransfer cmdlet. Just go to LCS, click on the “Generate SAS link” button for each file, use it as the source parameter in the command and your blob SAS URL as the destination one. Once you have all the files in your blob you can download them to your local PC at a good speed.
Once you’ve unzipped the VHD you need to change it from Dynamic to Fixed using this PowerShell command:
Convert-VHD –Path VHDLOCATION.vhd –DestinationPath NEWVHD.vhd –VHDType FixedThe reason is you can’t create an Azure VM from a dynamically-sized VHD. And it took me several attempts to notice this 🙂
Create a DevTest Labs account
To do this part you need an Azure account. If you don’t have one you can sign up for a free Azure account with a credit of 180 Euros (200 US Dollars) to be spent during 30 days, plus many other free services during 12 months.
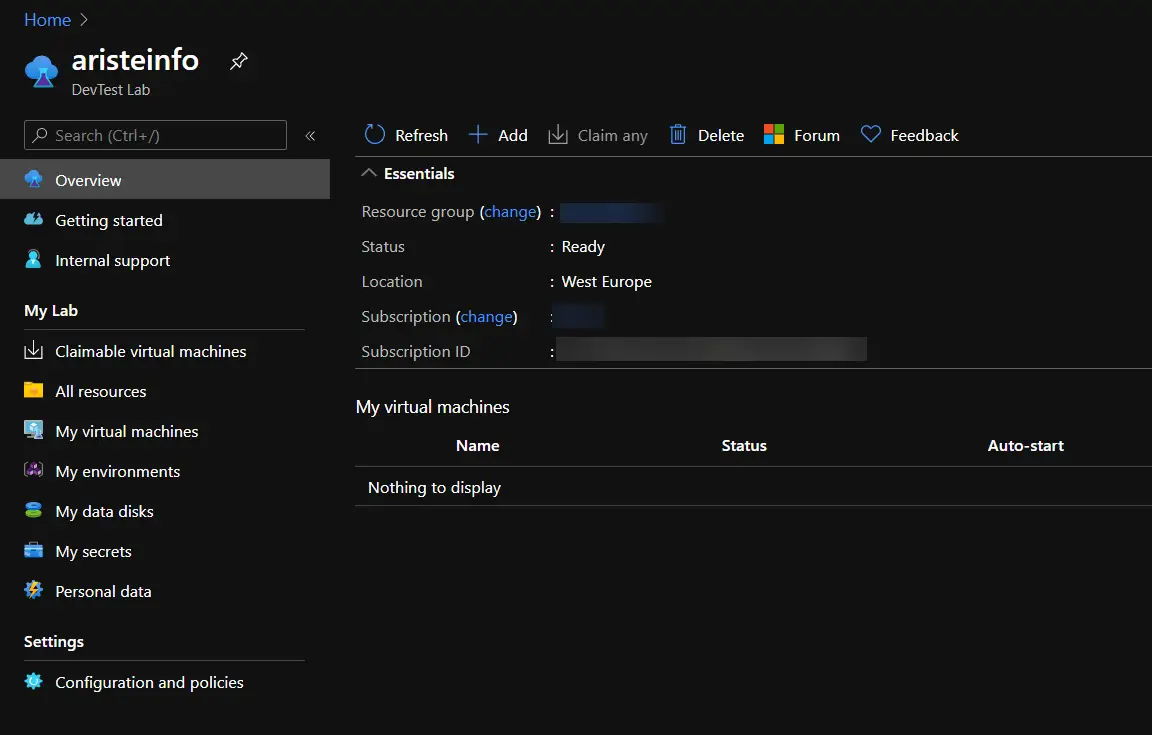
Search for DevTest Labs in the top bar and create a new DevTest Lab. Once it’s created open the details and you should see something like this:
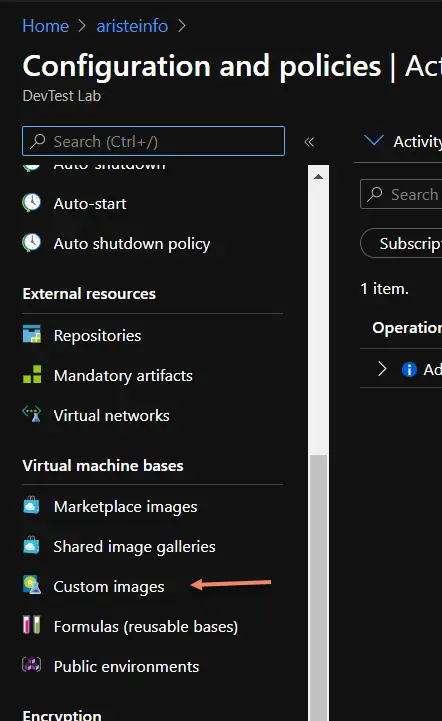
Click on the “Configuration and policies” menu item at the bottom of the list and scroll down in the menu until you see the “Virtual machine bases” section:
And now comes the second funniest part of the process: we need to upload the 130GB VHD image to a blob storage account! So, click the “Add” button on top and in the new dialog that will open click the “Upload a VHD using PowerShell”. This will generate a PowerShell script to upload the VHD to the DevTest Labs blob. For example:
<#
Generated script to upload a local VHD to Azure.
WARNING: The destination will be publicly available for 24 hours, after which it will expire.
          Ensure you complete your upload by then.
Run the following command in a Azure PowerShell console after entering
the LocalFilePath to your VHD.
#>
Add-AzureRmVhd -Destination "https://YOURBLOB.blob.core.windows.net/uploads/tempImage.vhd?sv=2019-07-07&st=2020-12-27T09%3A08%3A26Z&se=2020-12-28T09%3A23%3A26Z&sr=b&sp=rcw&sig=YTeXpxpVEJdSM7KZle71w8NVw9oznNizSnYj8Q3hngI%3D" -LocalFilePath "<Enter VHD location here>"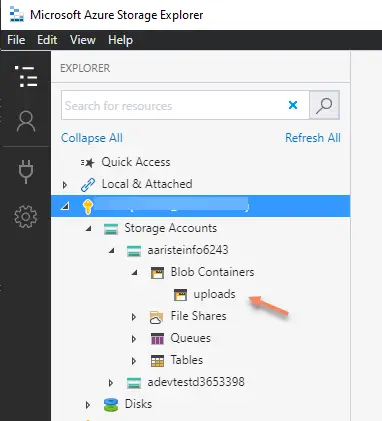
An alternative to this is using the Azure Storage Explorer as you can see in the image on the left.
You should upload the VHD to the uploads blob.
Any of these methods is good to upload the VHD and I don’t really know which one is faster.
Once the VHD is uploaded open the “Custom images” option again and you should see the VHD in the drop-down:

Give the image a name and click OK.
What we have now is the base for a Dynamics 365 Finance and Operations dev VM which we need to prepare to use it as a build VM.
Creating the VM
We’ve got the essential, a VHD ready to be used as a base to create a virtual machine in Azure. Our next step is finding a way to make the deployment of this VM predictable and automated. We will attain this thanks to Azure ARM templates.
Go back to your DevTest Labs overview page and click the “Add” button, on the “Choose base” page select the base you’ve just created, and on the next screen click on the “Add or Remove Artifacts” link:

Search for WinRM, select “Configure WinRM”, and on the next screen enter “Shared IP address” as the hostname box and click “Add”.
Note: if when the VM runs the artifacts can’t be installed check whether the Azure VM Agent is installed on the base VHD. Thanks to Joris for pointing this out!
Configure Azure DevOps Agent Service
Option A: use an artifact
Update: thanks to Florian Hopfner for reminding me this because I forgot… If you choose Option A to install the agent service you need to do some things first!
The first thing we need to do is running some PowerShell scripts that create registry entries and environment variables in the VM, go to C:\DynamicsSDK and run these:
Import-Module $(Join-Path -Path "C:\DynamicsSDK" -ChildPath "DynamicsSDKCommon.psm1") -Function "Write-Message", "Set-AX7SdkRegistryValues", "Set-AX7SdkEnvironmentVariables"
Set-AX7SdkEnvironmentVariables -DynamicsSDK "C:\DynamicsSDK"
Set-AX7SdkRegistryValues -DynamicsSDK "c:\DynamicsSDK" -TeamFoundationServerUrl "https://dev.azure.com/YOUR_ORG" -AosWebsiteName $AosWebsiteName "AosService"
The first one will load the functions and make them available in the command-line and the other two create the registry entries and environment variables.
Now we need to add an artifact for the Azure DevOps agent service. This will configure the agent service on the VM each time the VM is deployed. Search for “Azure Pipelines Agent” and click it. You will see this:

We need to fill some information:
On “Azure DevOps Organization Name” you need to provide the name of your organization. For example if your AZDO URL is https://dev.azure.com/blackbeltcorp you need to use blackbeltcorp.
On “AZDO Personal Access Token” you need to provide a token generated from AZDO.
On “Agent Name” give your agent a name, like DevTestAgent. And on “Agent Pool” a name for your pool, a new like DevTestPool or an existing one as Default.
On “Account Name” use the same user that we’ll use in our pipeline later. Remember this. And on “Account Password” its password. Using secrets with a KeyVault is better, but I won’t explain this here.
And, finally, set “Replace Agent” to true.
Option B: Configure Azure DevOps Agent in the VM
To do this you have to create a VM from the base image you created before and then go to C:\DynamicsSDK and run the SetupBuildAgent script with the needed parameters:
SetupBuildAgent.ps1 -VSO_ProjectCollection "https://dev.azure.com/YOUR_ORG" -ServiceAccountName "myUser" -ServiceAccountPassword "mYPassword" -AgentName "DevTestAgent" -AgentPoolName "DevTestPool" -VSOAccessToken "YOUR_VSTS_TOKEN"WARNING: If you choose option B you must create a new base image from the VM where you’ve run the script. Then repeat the WinRM steps to generate the new ARM template which we’ll see next.
ARM template
Then go to the “Advanced Settings” tab and click the “View ARM template” button:

This will display the ARM template to create the VM from our pipeline. It’s something like this:
{
  "$schema": "https://schema.management.azure.com/schemas/2015-01-01/deploymentTemplate.json",
  "contentVersion": "1.0.0.0",
  "parameters": {
    "newVMName": {
      "type": "string",
      "defaultValue": "aariste001"
    },
    "labName": {
      "type": "string",
      "defaultValue": "aristeinfo"
    },
    "size": {
      "type": "string",
      "defaultValue": "Standard_B4ms"
    },
    "userName": {
      "type": "string",
      "defaultValue": "myUser"
    },
    "password": {
      "type": "securestring",
      "defaultValue": "[[[VmPassword]]"
    },
    "Configure_WinRM_hostName": {
      "type": "string",
      "defaultValue": "Public IP address"
    },
    "Azure_Pipelines_Agent_vstsAccount": {
      "type": "string",
      "defaultValue": "ariste"
    },
    "Azure_Pipelines_Agent_vstsPassword": {
      "type": "securestring"
    },
    "Azure_Pipelines_Agent_agentName": {
      "type": "string",
      "defaultValue": "DevTestAgent"
    },
    "Azure_Pipelines_Agent_agentNameSuffix": {
      "type": "string",
      "defaultValue": ""
    },
    "Azure_Pipelines_Agent_poolName": {
      "type": "string",
      "defaultValue": "DevTestPool"
    },
    "Azure_Pipelines_Agent_RunAsAutoLogon": {
      "type": "bool",
      "defaultValue": false
    },
    "Azure_Pipelines_Agent_windowsLogonAccount": {
      "type": "string",
      "defaultValue": "aariste"
    },
    "Azure_Pipelines_Agent_windowsLogonPassword": {
      "type": "securestring"
    },
    "Azure_Pipelines_Agent_driveLetter": {
      "type": "string",
      "defaultValue": "C"
    },
    "Azure_Pipelines_Agent_workDirectory": {
      "type": "string",
      "defaultValue": "DevTestAgent"
    },
    "Azure_Pipelines_Agent_replaceAgent": {
      "type": "bool",
      "defaultValue": true
    }
  },
  "variables": {
    "labSubnetName": "[concat(variables('labVirtualNetworkName'), 'Subnet')]",
    "labVirtualNetworkId": "[resourceId('Microsoft.DevTestLab/labs/virtualnetworks', parameters('labName'), variables('labVirtualNetworkName'))]",
    "labVirtualNetworkName": "[concat('Dtl', parameters('labName'))]",
    "vmId": "[resourceId ('Microsoft.DevTestLab/labs/virtualmachines', parameters('labName'), parameters('newVMName'))]",
    "vmName": "[concat(parameters('labName'), '/', parameters('newVMName'))]"
  },
  "resources": [
    {
      "apiVersion": "2018-10-15-preview",
      "type": "Microsoft.DevTestLab/labs/virtualmachines",
      "name": "[variables('vmName')]",
      "location": "[resourceGroup().location]",
      "properties": {
        "labVirtualNetworkId": "[variables('labVirtualNetworkId')]",
        "notes": "Dynamics365FnO10013AgentLessV2",
        "customImageId": "/subscriptions/6715778f-c852-453d-b6bb-907ac34f280f/resourcegroups/devtestlabs365/providers/microsoft.devtestlab/labs/devtestd365/customimages/dynamics365fno10013agentlessv2",
        "size": "[parameters('size')]",
        "userName": "[parameters('userName')]",
        "password": "[parameters('password')]",
        "isAuthenticationWithSshKey": false,
        "artifacts": [
          {
            "artifactId": "[resourceId('Microsoft.DevTestLab/labs/artifactSources/artifacts', parameters('labName'), 'public repo', 'windows-winrm')]",
            "parameters": [
              {
                "name": "hostName",
                "value": "[parameters('Configure_WinRM_hostName')]"
              }
            ]
          },
          {
            "artifactId": "[resourceId('Microsoft.DevTestLab/labs/artifactSources/artifacts', parameters('labName'), 'public repo', 'windows-vsts-build-agent')]",
            "parameters": [
              {
                "name": "vstsAccount",
                "value": "[parameters('Azure_Pipelines_Agent_vstsAccount')]"
              },
              {
                "name": "vstsPassword",
                "value": "[parameters('Azure_Pipelines_Agent_vstsPassword')]"
              },
              {
                "name": "agentName",
                "value": "[parameters('Azure_Pipelines_Agent_agentName')]"
              },
              {
                "name": "agentNameSuffix",
                "value": "[parameters('Azure_Pipelines_Agent_agentNameSuffix')]"
              },
              {
                "name": "poolName",
                "value": "[parameters('Azure_Pipelines_Agent_poolName')]"
              },
              {
                "name": "RunAsAutoLogon",
                "value": "[parameters('Azure_Pipelines_Agent_RunAsAutoLogon')]"
              },
              {
                "name": "windowsLogonAccount",
                "value": "[parameters('Azure_Pipelines_Agent_windowsLogonAccount')]"
              },
              {
                "name": "windowsLogonPassword",
                "value": "[parameters('Azure_Pipelines_Agent_windowsLogonPassword')]"
              },
              {
                "name": "driveLetter",
                "value": "[parameters('Azure_Pipelines_Agent_driveLetter')]"
              },
              {
                "name": "workDirectory",
                "value": "[parameters('Azure_Pipelines_Agent_workDirectory')]"
              },
              {
                "name": "replaceAgent",
                "value": "[parameters('Azure_Pipelines_Agent_replaceAgent')]"
              }
            ]
          }
        ],
        "labSubnetName": "[variables('labSubnetName')]",
        "disallowPublicIpAddress": true,
        "storageType": "Premium",
        "allowClaim": false,
        "networkInterface": {
          "sharedPublicIpAddressConfiguration": {
            "inboundNatRules": [
              {
                "transportProtocol": "tcp",
                "backendPort": 3389
              }
            ]
          }
        }
      }
    }
  ],
  "outputs": {
    "labVMId": {
      "type": "string",
      "value": "[variables('vmId')]"
    }
  }
}NOTE: if you’re using option B you won’t have the artifact node for the VSTS agent.
This JSON file will be used as the base to create our VMs from the Azure DevOps pipeline. This is known as Infrastructure as Code (IaC) and it’s a way of defining our infrastructure in a file as it were code. It’s another part of the DevOps practice that should solve the “it works on my machine” issue.
If we take a look to the JSON’s parameters node there’s the following information:
- newVMName and labName will be the name of the VM and the DevTest Labs lab we’re using. The VM name is not really important because we’ll set the name later in the pipeline.
- size is the VM size, a D3 V2 in the example above, but we can change it and will do it later.
- userName & passWord will be the credentials to access the VM and must be the same we’ve used to configure the Azure DevOps agent.
- Configure_WinRM_hostName is the artifact we added to the VM template that will allow the pipelines to run in this machine.
To do it faster and for demo purposes I’m using a plain text password in the ARM template, changing the password node to something like this:
"password": {
      "type": "string",
      "defaultValue": "yourPassword"
    },
I will do the same with all the secureString nodes, but you shouldn’t and should instead use an Azure KeyVault which comes with the DevTest Labs account.
Of course you would never upload this template to Azure DevOps with a password in plain text. There’s plenty of resources online that teach how to use parameters, Azure KeyVault, etc. to accomplish this, for example this one: 6 Ways Passing Secrets to ARM Templates.
OK, now grab that file and save it to your Azure DevOps repo. I’ve created a folder in my repo’s root called ARM where I’m saving all the ARM templates:

Preparing the VM
The VHD image you download can be used as a developer VM with no additional work, just run Visual Studio, connect it to your AZDO project and done. But if you want to use it as a build box you need to do several things first.
Remember that the default user and password for these VHDs are Administrator and Pass@word1.
Disable services
First of all we will stop and disable services like the Batch, Management Reporter, SSAS, SSIS, etc. Anything you see that’s not needed to run a build.
Create a new SQL user
Open SSMS (as an Administrator) and create a new SQL user as a copy of the axdbadmin one. Then open the web.config file and update the DB user and password to use the one you’ve just created.
Prepare SSRS (optional)
If you want to deploy reports as part of your build pipeline you need to go to SSMS again (and as an Admin again), and open a new query in the reporting DB to execute the following query:
exec DeleteEncryptedContentPowerShell Scripts
The default build definition that runs on a build VM uses several PowerShell scripts to run some tasks. I’m adding an additional script called PrepareForAgent.
The scripts can be found in the C:\DynamicsSDK folder of the VM.
PrepareForBuild
This script comes with the VM and we need to modify it to avoid one thing: the PackagesLocalDirectory backup which is usually done in the first build. We need to get rid of this or we’ll waste around an hour per run until the files are copied.
We don’t need this because our VM will be new each time we run the pipeline!
So open the script, go to line 696 and look for this piece of code:
# Create packages backup (if it does not exist).
$NewBackupCreated = Backup-AX7Packages -BackupPath $PackagesBackupPath -DeploymentPackagesPath $DeploymentPackagesPath -LogLocation $LogLocation
# Restore packages backup (unless a new backup was just created).
if (!$NewBackupCreated)
{
    Restore-AX7Packages -BackupPath $PackagesBackupPath -DeploymentPackagesPath $DeploymentPackagesPath -LogLocation $LogLocation -RestoreAllFiles:$RestorePackagesAllFiles
}

if (!$DatabaseBackupToRestore)
{
    $DatabaseBackupPath = Get-BackupPath -Purpose "Databases"
    Backup-AX7Database -BackupPath $DatabaseBackupPath
}
else
{
    # Restore a database backup (if specified).
    Restore-AX7Database -DatabaseBackupToRestore $DatabaseBackupToRestore
}
We need to modify it until we end up with this:
if ($DatabaseBackupToRestore)
{
    Restore-AX7Database -DatabaseBackupToRestore $DatabaseBackupToRestore
}
We just need the DB restore part and skip the backup, otherwise we’ll be losing 45 minutes in each run for something we don’t need because the VM will be deleted when the build is completed.
Optional (but recommended): install d365fo.tools
Just run this:
Install-Module -Name d365fo.toolsWe can use the tools to do a module sync, partial sync or deploy just our reports instead of all.
Create a new image
Once we’ve done all these prepare steps we can log out of this VM and stop it. Do not delete it yet! Go to “Create custom image”, give the new image a name, select “I have not generalized this virtual machine” and click the “OK” button.
This will generate a new image that you can use as a base image with all the changes you’ve done to the original VHD.
Azure DevOps Pipelines
We’re ready to setup our new build pipeline in Azure DevOps. This pipeline will consist of three steps: create a new VM, run all the build steps, and delete the VM:

First of all check that your pipeline runs on Azure pipelines (aka Azure-hosted):

The create and delete steps will run on the Azure Pipelines pool. The build step will run on our DevTestLabs pool, or the name you gave it when configuring the artifact on DevTest Labs or the script on the VM.
Create Azure DevTest Labs VM
Create a new pipeline and choose the “Use the classic editor” option. Make sure you’ve selected TFVC as your source and click “Continue” and “Empty job”. Add a new task to the pipeline, look for “Azure DevTest Labs Create VM”. We just need to fill in the missing parameters with our subscription, lab, etc.

Remember this step must run on the Azure-hosted pipeline.
Build
This is an easy one. Just export a working pipeline and import it. And this step needs to run on your self-hosted pool:

Optional: use SelectiveSync (not recommended, see next option)
You can replace the Database Sync task for a PowerShell script that will only sync the tables in your models:

Thanks Joris for the tip!
Optional: use d365fo.tools to sync your packages/models
This is a better option than the SelectiveSync above. You can synchronize your packages or models only to gain some time. This cmdlet uses sync.exe like Visual Studio does and should be better than SelectiveSync.
Add a new PowerShell task, select Inline Script and this is the command:
Invoke-D365DbSyncModule -Module "Module1", "Module2" -ShowOriginalProgress -VerboseOptional: use d365fo.tools to deploy SSRS reports
If you really want to add the report deployment step to your pipeline you can save some more extra time using d365fo.tools and just deploy the reports in your models like we’ve done with the DB sync.
Run this in a new PowerShell task to do it:
Publish-D365SsrsReport -Module YOUR_MODULE -ReportName *Delete Azure DevTest Labs VM
It’s almost the same as the create step, complete the subscription, lab and VM fields and done:

And this step, like the create one, will run on the Azure-hosted agent.
Dependencies and conditions
When all three steps are configured we need to add dependencies and conditions to some of them. For example, to make sure that the delete VM step runs when the build step fails, but it doesn’t when the create VM step fails.
Build
The build step depends on the create VM step, and will only run if the previous step succeeds:

Delete VM
The delete step depends on all previous steps and must run when the create VM step succeeds. If the create step fails there’s no VM and we don’t need to delete it:

This is the custom condition we’ll use:
and(always(), eq(dependencies.Job_1.status, 'Succeeded'))If you need to know your first step’s job name just export the pipeline to YAML and you’ll find it there:


If this step fails when the pipeline is run, wait to delete the VM manually, first change the VM name in the delete step, save your pipeline and then use the dropdown to show the VMs in the selected subscription, and save the pipeline.
Run the build
And, I think, we’re done and ready to run our Azure DevTest Labs pipeline for Dynamics 365 Finance and Operations… click “Run pipeline” and wait…

Times
The pipeline from the image above is one with real code from a customer but I can’t compare the times with the Azure-hosted builds because there’s no sync, or tests there. Regarding the build time the Azure-hosted takes one minute less, but it needs to install the nugets first.
But for example this is a comparison I did:

It takes around 1 hour to create the VM, build, do a full DB synch, deploy reports, run tests, generate a Deployable Package and, finally, delete the VM:

If you skip deploying the SSRS reports your build will run in 15 minutes less, that’s around 45 minutes.
If you use the partial sync process instead of a full DB sync it’ll be 5-7 minutes less.
This would leave us with a 35-40 minutes build.
Comparison 1

The image above shows a simple package being compiled, without any table, so the selective sync goes really fast. The build times improve with VM size.
Comparison 2

This one is compiling the same codebase but is doing a full DB sync. The sync time improves in the B4ms VM compared to the B2ms but it’s almost the same in the B8ms. Build times are better for larger VM sizes.
Comparison 3
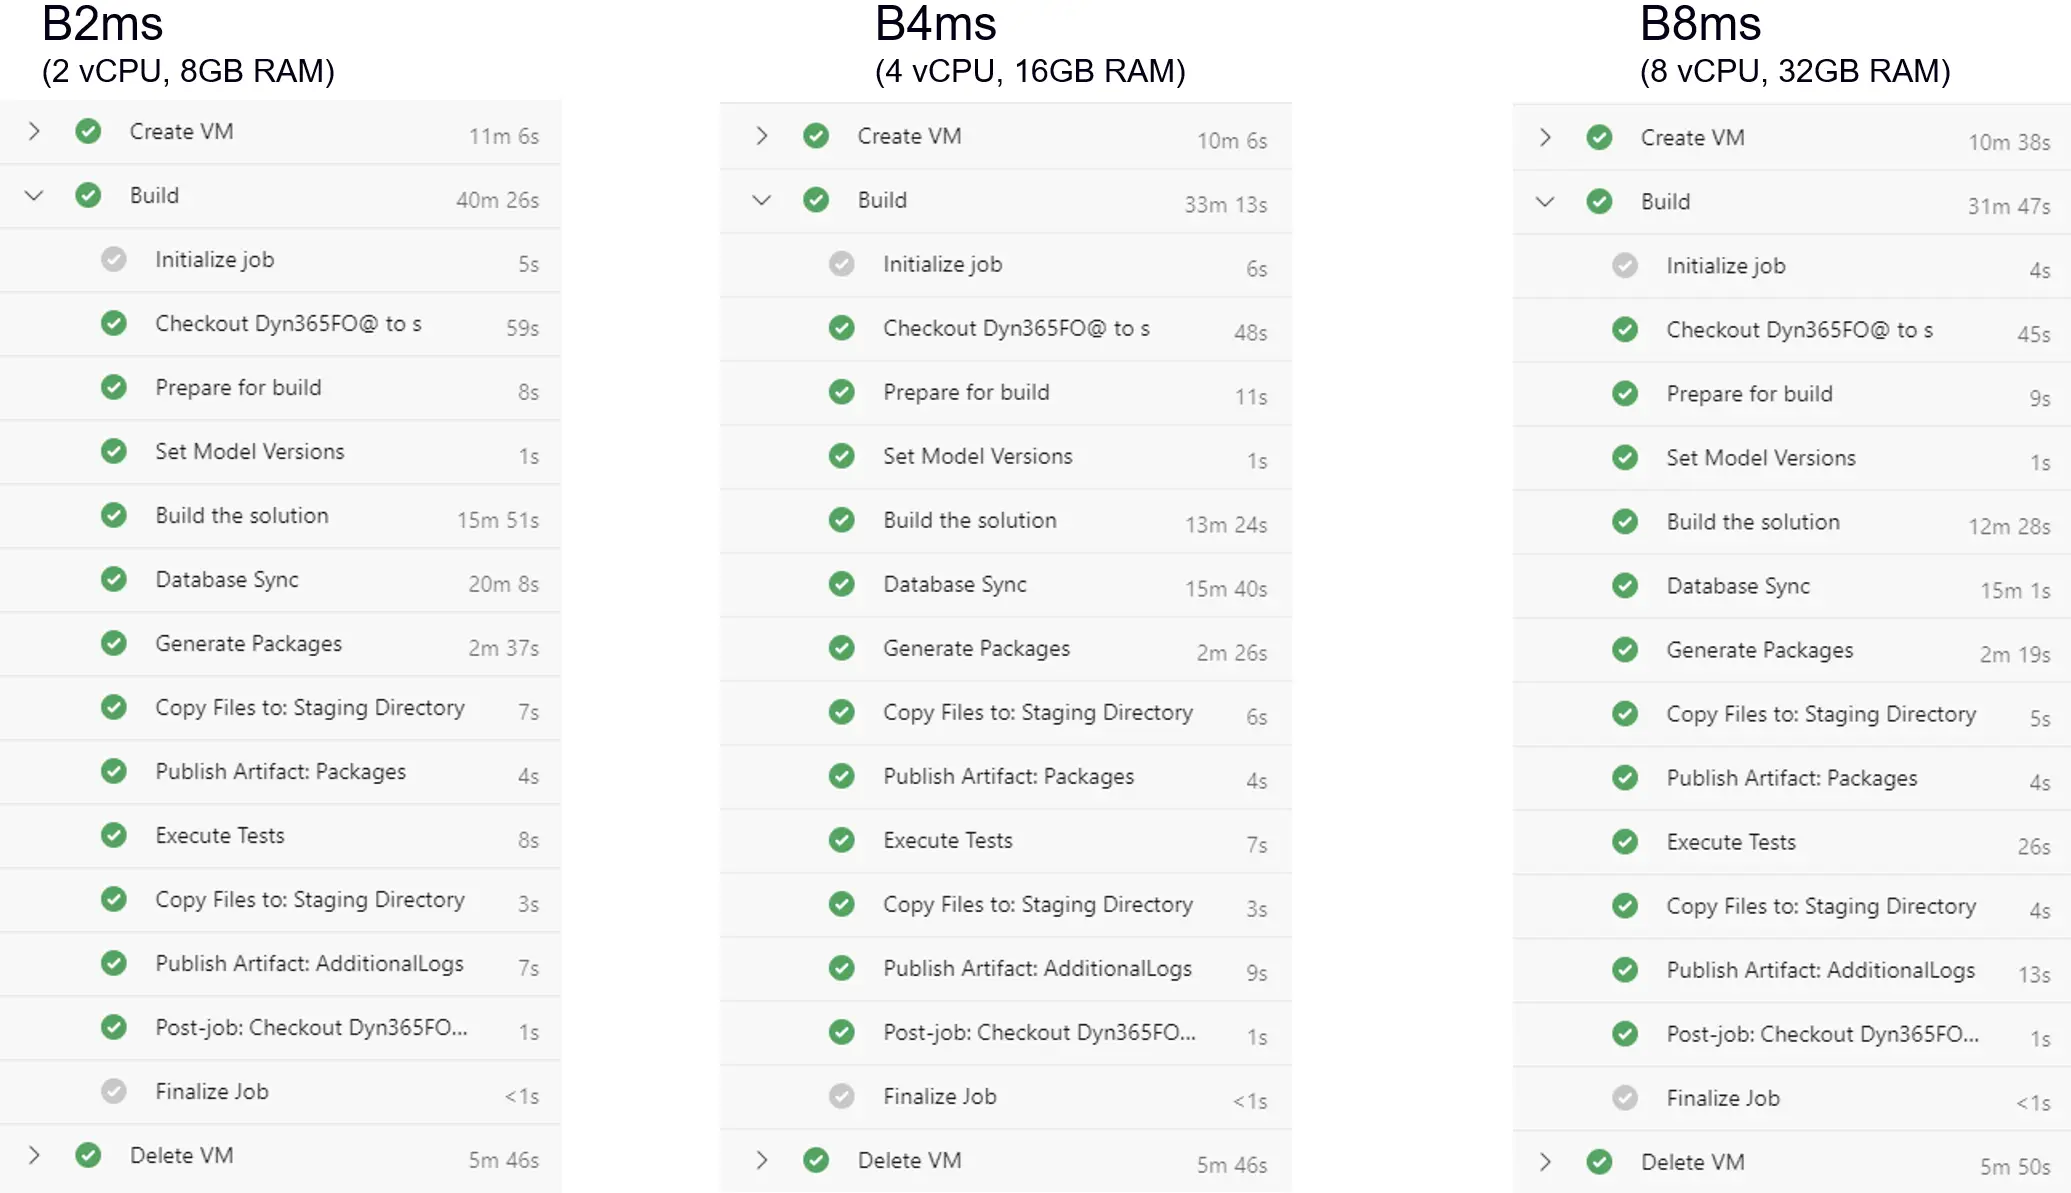
And in the image above we see a more realistic build. The codebase is larger and we’re doing a full DB sync.
Similar as the comparison before there a good enhancement between a B2ms and a B4ms, but not between a B4ms and B8ms.
Show me the money!
I think this is the interesting comparison. How did a Tier-1 MS-hosted build VM cost? Around 400€? How does it compare to using the Azure DevTest Labs alternative?
There’s only one fix cost when using Azure DevTest Labs: the blob storage where the VHD is uploaded. The VHD’s size is around 130GB and this should have a cost of, more or less, 5 euros/month. Keep in mind that you need to clean up your custom images when yours is prepared, the new ones are created as snapshots and also take space in the storage account.
Then we have the variable costs that come with the deployment of a VM each build but it’s just absurd. Imagine we’re using a B4ms VM, with a 256GB Premium SSD disk, we would pay 0.18€/hour for the VM plus the proportional part of 35.26€/month of the SSD disk, which would be like 5 cents/hour?
But this can run on a B2ms VM too which is half the compute price of the VM, down to 9 cents per hour.
If we run this build once a day each month, 30 times, the cost of a B4ms would be like… 7€? Add the blob storage and we’ll be paying 12€ per month to run our builds with DB sync and tests.
Is it cheaper than deploying a cloud-hosted environment, and starting and stopping it using the new d365fo.tools Cmdlets each time we run the build? Yes it is! Because if we deploy a CHE we’ll be paying the price of the SSD disk for the whole month!
Some final remarks
- I have accomplished this mostly through trial-and-error. There’s lots of enhancements and best practices to be applied to all the process, specially using an Azure Key Vault to store all the secrets to be used in the Azure DevOps Agent artifact and the pipeline.
- This in another clear example that X++ developers need to step outside of X++ and Dynamics 365 FnO. We’re not X++ only developers anymore, we’re very lucky to be working on a product that is using Azure.
- I’m sure there’s scenarios where using DevTest Labs to create a build VM is useful. Maybe not for an implementation partner, but maybe it is for an ISV partner. It’s just an additional option.
- The only bad thing to me is that we need to apply the version upgrades manually to the VHDs because they’re published only twice a year.
- As I said at the beginning of the post, it may have worked to me with all these steps, but if you try you maybe need to change some things. But it’s a good way to start.


7 Comments
Nice work, hope I get the chance to try this myself.
Couple of questions:
1) For the agent, you describe 2 options, but only option B sets the agent up with the SetupBuildAgent.ps1 script. I’m wondering why the agent also works with option A, because the script adds some registry values that are needed to run the build. Is this covered with the PrepareForAgent script that you mention later? Is there a chance you can share that script? I can see in one of the screenshot that it is executed before the Prepare for build step.
2) You mention an optional PowerShell script SelectiveSync that can be used to only sync the tables in specific models. Same question here, can you share that script? I imagine you could also use that in other build pipelines to cut down on build times.
Again, thanks, I imagine this must have taken quite some time to get all the details right.
Hi Florian!
1) You’re right and I just remembered how I managed to make Option A work! I did run the SetupBuildAgent script, then uninstalled the service. This creates the registry keys and allows the agent to be installed and work using the artifact. I need to edit the post xD
2) You can find SelectiveSync script in the DynamicsSDK folder. It comes with the VMs and, yes, you can use it to speed up syncs in your pipelines.
Thanks for reading!
And post updated! Thanks again!