
I bet that most of us have had to develop some .NET class library to solve something in Dynamics 365 Finance and Operations. You create a C# project, build it, and add the DLL as a reference in your FnO project. Don’t do that anymore! You can add the .NET project to source control, build it in your pipeline, and the DLL gets added to the deployable package!
I’ve been trying this during the last days after a conversation on Yammer, and while I’ve managed to build .NET and X++ code in the same pipeline, I’ve found some issues or limitations.
If you want to know more about builds, releases, and the Dev ALM of Dynamics 365 you can read my full guide on MSDyn365 & Azure DevOps ALM.
Build .NET in your pipeline
Note: what I show in this post is done using the Azure-hosted pipeline but it should also be possible to do it using a self-hosted agent (aka old build VM).
The build step of the pipeline invokes msbuild.exe which can build .NET code. If we check the logs of the build step we will see it:
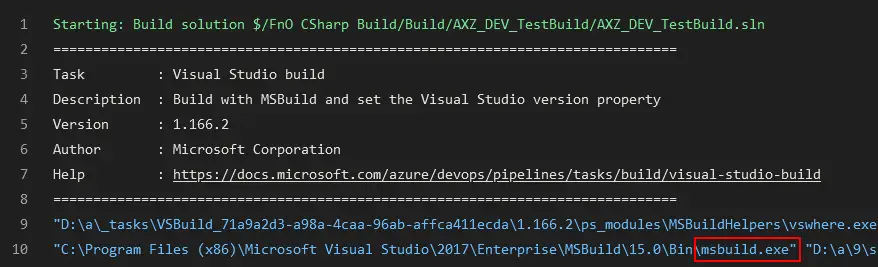
Remember that X++ is part of the .NET family after all… a second cousin or something like it.

If you’ve read the blog post about Azure-hosted builds you must’ve seen I’m putting the solution that references all my models in a folder called Build at the root of my source control tree (left image).
That’s just a personal preference that helps me keep the .config files and the solution I use to build all the models in a single, separate place.
By using a solution and pointing the build process to use it I also keep control of what’s being built in a single place.
Add a C# project to FnO
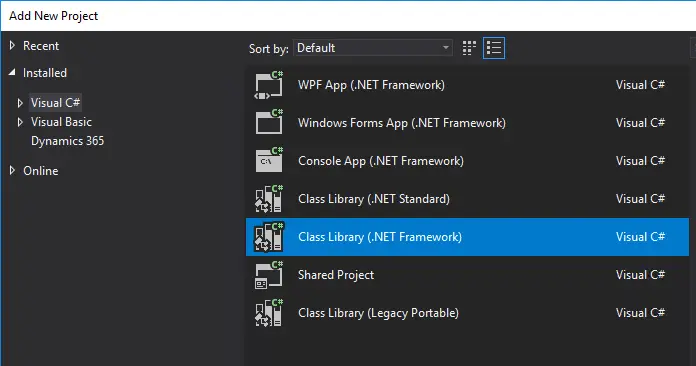
Our first step will usually be creating a Finance and Operations project. Once it’s created we right-click on the solution and select “Add new project”. Then we select a Visual C# Class Library project:

Now we should have a solution with a FnO Project and a C# project (right image).
To demo this I’ll create a class called Calculator with a single method that accepts two decimal values as parameters and returns it’s sum. An add method.
public class Calculator
{
    public decimal Add(decimal a, decimal b)
    {
        return a + b;
    }
}
Now compile the C# project alone, not the whole solution. This will create the DLL in the bin folder of the project. We have to do this before adding the C# project as a reference to the FnO project.
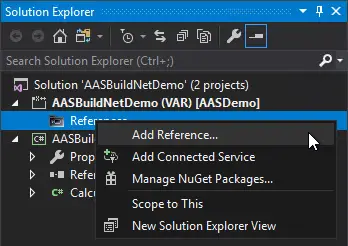
Right click on the References node of the FnO project and select “Add Reference…”:
A window will open and you should see the C# project in the “Projects” tab:
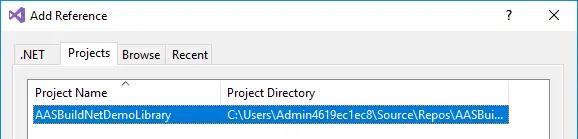
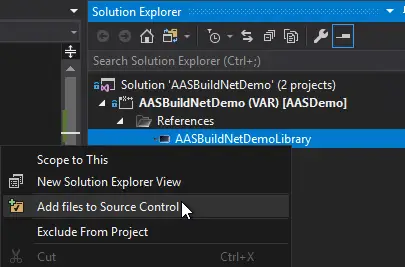
Select it and click the Ok button. That will add the C# project as a reference to our FnO project, but we still need to do something or this won’t compile in our pipeline. We have to manually add the reference to the project that has been created in the AOT. So, right-click on the reference and select “Add to source control”:
In the FnO project add a Runnable Class, we’ll call the C# library there:
using AASBuildNetDemoLibrary;
class AASBuildNetTest
{
    public static void main(Args _args)
    {
        var calc = new Calculator();
        calc.Add(4, 5);
    }
}
Add the solution to source control if you haven’t, make sure all the objects are also added and check it in.
Build pipeline
If I go to my Azure DevOps repo we’ll see the following:
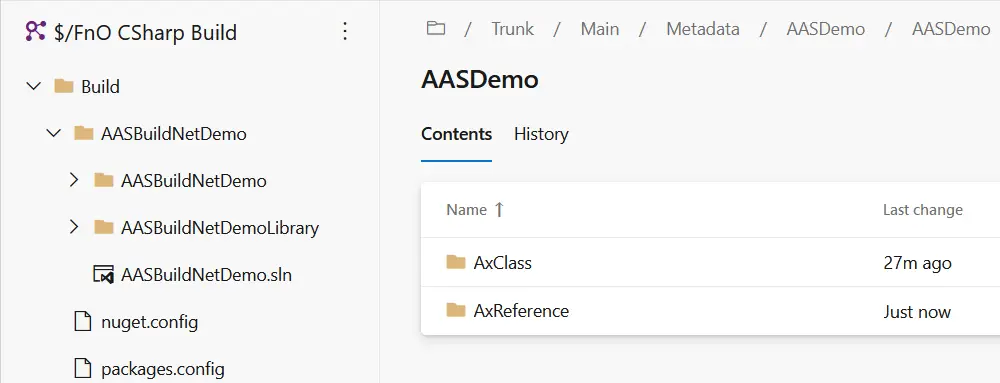
You can see I’ve checked-in the solution under the Build folder, as I said earlier this is my personal preference and I do that to keep the solutions I’ll use to build the code under control.
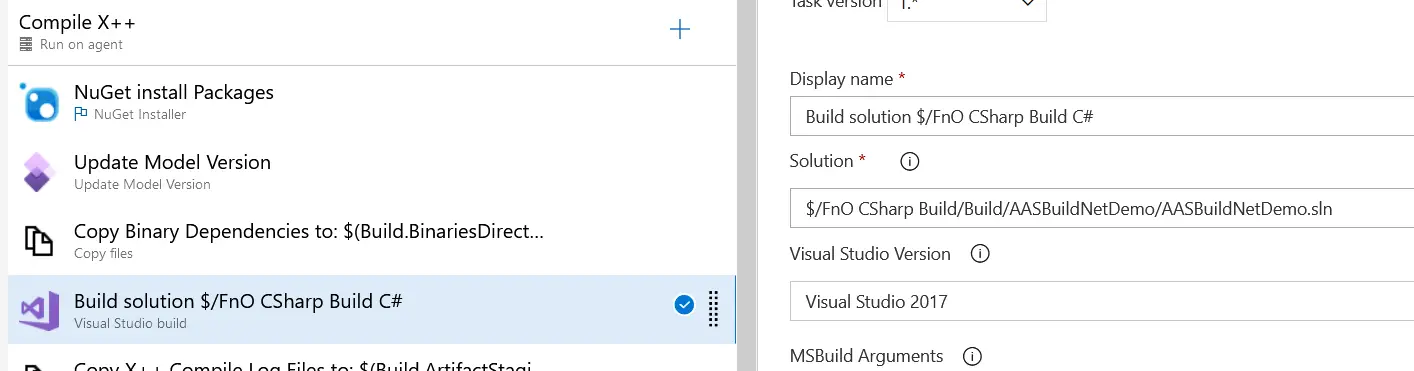
In my build pipeline I make sure I’m using this solution to build the code:
Run the pipeline and when it’s done you can check the build step and you’ll see a line that reads:
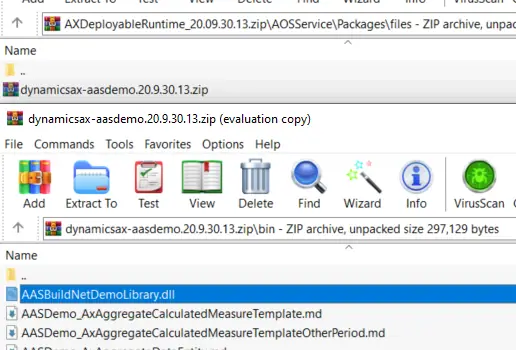
Copying file from "D:\a\9\s\Build\AASBuildNetDemo\AASBuildNetDemoLibrary\bin\Debug\AASBuildNetDemoLibrary.dll" to "D:\a\9\b\AASDemo\bin\AASBuildNetDemoLibrary.dll".And if you download the DP, unzip it, navigate to AOSService\Packages\files and unzip the file in there, then open the bin folder, you’ll see our library’s DLL there:
Work done!
Things I don’t like/understand/need to investigate
I’ve always done this with a single solution and only one C# project. I have some doubts about how this will work with many C# projects, models, solutions, etc.
For example, if a model has a dependency on the DLL but it’s built before the DLL the build will fail. I’m sure there’s a way to set an order to solve dependencies like there is for FnO projects within a solution.
Or maybe I could try building all the C#/.NET projects before, pack them in a nuget and use the DLLs later in the FnO build, something similar to what Paul Heisterkamp explained in his blog.
Anyway, it’s your choice how to manage your C# projects and what solution fits your workflow the best, but at least you’ve got an example here 🙂


3 Comments
Hi there,
Actually you can also use an Mechanismen based on an XML file set in the Variable DependencyXML. It is a Boot tricky to configure but is automatically picked up by the regular MSBuild step of the Build.
For example
https://community.dynamics.com/365/financeandoperations/b/newdynamicsax/posts/selecting-what-models-are-part-of-the-build-automation-process
Works quite well here in various situations.
Best regards
Torben
Thank you, Torben! I’ll check it and try, it looks like it could solve the issues I found with compiling many solutions.