Now that we have a running UDE environment with F&O running on Dataverse it’s time to start working!
Prerequisites #
To follow this section, you need:
- A Dataverse environment with the F&O development tools installed.
- Visual Studio 2022 with the Modelling SDK installed.
- LocalDB installed
- Admin rights on your local PC
The Modelling SDK and LocalDB can be installed from the Visual Studio installer, you don’t need to download them from anywhere.
Install the PPAC extension #
We need to install the Power Platform Tools for VS 2022 extension. Go to the Extensions menu, Manage extensions and look for Power Platform:

Click install and close Visual Studio to complete the extension installation.
Connect to the UDE #
When it’s done, open Visual Studio again, you should see some new items under the Tools menu:

Select the first one, Connect to Dataverse. This will display the login dialog:

Unselect the Sign as current user option and select the Display list of available organizations. If the user you’re using in Visual Studio is the same you’re using as an admin on PPAC you could leave the first option selected, but in my experience it’s usually a source of problems.
Click the Login button and an authentication window should open, enter your PPAC admin credentials and you will get a list of your PPAC environments:

Select the one that you deployed with the developer tools and click the Login button. Another dialog will open, asking you to select a solution, choose the one that’s not the Default one and click the Done button.
The environment selector will display all Dataverse environments, but it will only allow to connect to the ones that have the developer tools installed.
Once it’s connected it will ask you if you want to download metadata, the F&O extension for VS and other assets, click Yes.
The process is now mostly automated, and you can follow the progress in the Output window.
It will download the Metadata folder (PackagesLocalDirectory) in a ZIP file, a copy of the cross-references database and the Visual Studio F&O extension.
Then it will proceed to unzip the metadata, install the VS extension, and restore the X-ref database. There are usually no issues, but sometimes your local instance of LocalDB is not running and the DB restore fails.
You can start it with this command:
SqlLocalDB.exe startDuring the process, Visual Studio can close and reopen automatically. If it closes and doesn’t open again, do it manually.
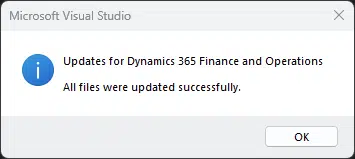
After opening VS, go to the extension menu, Visual Studio will freeze for a second and then you will see this message:

Checking the Metadata configuration #
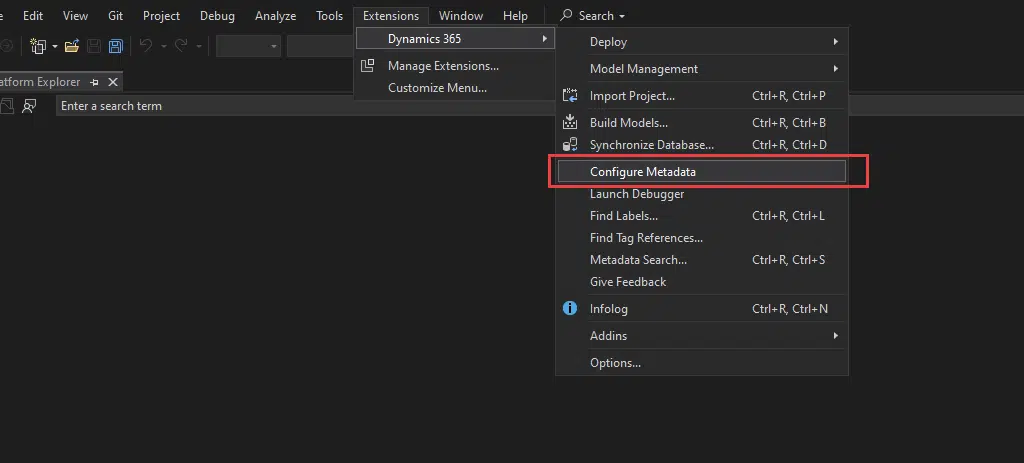
If you open the Extensions menu again, now you should see the Dynamics 365 menu. Open it and select the Configure metadata option:

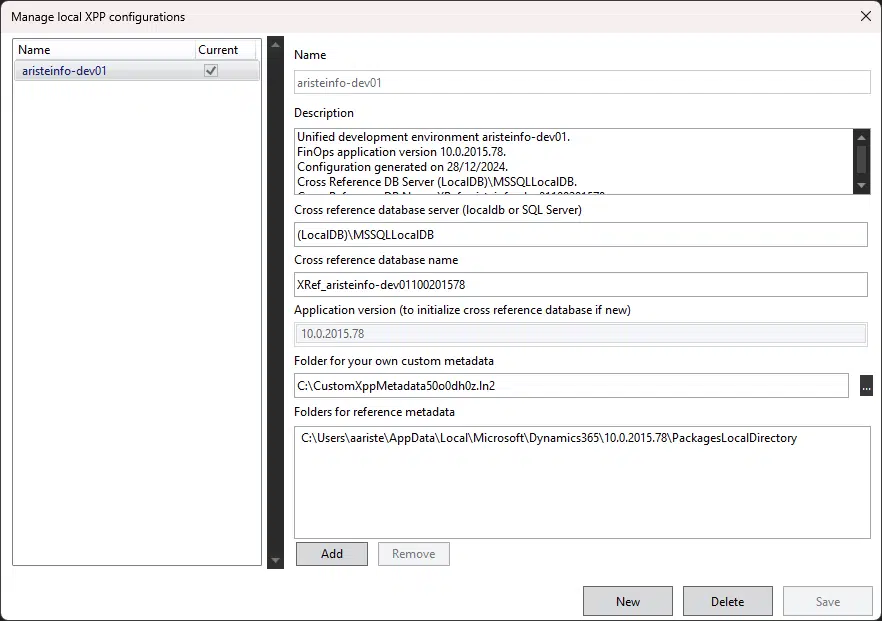
This will open the local XPP configurations window:

Here you can see your active configuration details. The name of the environment, version, which X-ref DB it’s using, and where your metadata and custom metadata are.
What do you mean custom metadata…? Oh well, this is one of the BEST things that the unified developer experience brings, in my opinion.
With UDE, we get the PackagesLocalDirectory installed in one location, usually in your user’s AppData folder. This is used only for the standard models and packages.
And your models and packages are in a separate folder that you can map wherever you want to. This also makes using Git A LOT easier.
Your custom metadata is then mapped to the PackagesLocalDirectory folder using symlinks automagically.
And what’s even better? Well, you could have several configurations, with several custom metadata folders in different locations, and you can change between them by just setting the current one in the config screen!
Now you’re ready to start coding!


12 Comments
Gran post Adrià!
Love the “automagically” part of this.
If I understand well, it Is possible to have also several PackagesLocalDirectory folders with different versions (10.0.41, 10.0.42, …) and with several custom metadata, isn’t it?
Have you tested the performance-side of UDE? What hardware stack do you recommend?
Saludos!
Muchas gracias Daniel!
Yes, that’s correct. If you connect to different UDE environments with different versions, it will ask you to download the assets, and it’ll configure a new metadata setup for each. And then you can switch between them.
Regarding hardware, I guess that as long as you have an SSD it’ll be fine.
Hello Adrià,
Thanks for the guide and post they are really helpful.
I have two questions that I would appreciate your insight on:
1. Why is it important to *not* select the Default solution?
2. Is there a different calendar for GA of updates for UDE environments that you know of?
Hi Ivan,
Not using the default solution/environment on Dataverse is a best practice. I don’t think it’d be a problem to use the Default solution for the F&O deployments, but it’s better to follow the best practice.
About the different calendar, yes, it’s different. Currently, it takes more or less a week for a new version to appear on PPAC.
Regards,
Adrià
Hi Adrià,
Thanks for the guide and post they are really helpful. But when i connect dataverse but it not ask me and not show dialog if you want to download metadata, the F&O extension for VS and other assets. Can you tell me what the cause is?
Hi Xuan,
how did you deploy the environment? You need to manually install the provisioning app and select the checkbox to install the developer tools.
Also when you connect to the environment from Visual Studio check the output window, see if you have any message. And also from the Tools menu you can trigger the Fin & Ops assets.
Thanks Adrià,
And I want to ask you a question about how to save the database of D365Fo. Previously it would be saved like ax under SQL. Now I search and see it is saved on dataverse. But the table on dataverse and D365fo are different. Do you know about this problem?
The database and tables are the same in Dataverse as they are in cloud-hosted environments. You can connect to the Azure SQL Server instance using the credentials found in Visual Studio:
Thanks Adrià,
I connected to the Azure SQL Server. But I have a question.
Firsty, when I connect to dataverse enviroment [UDE-01] and then configure metadata. I see 1 one configure with some infomation:
+ Name: ude-01 (not edit)
+ Description: Unified development environment ude-01.
FinOps application version 10.0.2177.120.
Configuration generated on 7/1/2025.
Cross Reference DB Server (LocalDB)\MSSQLLocalDB.
Cross Reference DB Name XRef_ude-011002177120.
+ Cross referance database name: XRef_ude_011002177120.
+ Application version: 10.0.2177.120
…
I know it will link to LocalDB and will generate a DB with version 10.0.2177.120.
But when I change to another dataverse, for example [UDE-02]. When I configure metadata, I don’t see any changes. Because these 2 environments both have version 10.0.2177.120. So I just need to change “Folder for your own custom metadata” link. Will the other information fields still be set up from the UDE-01 environment have any effect?
I tried to set up a new metadata configuration but when I selected the application version, there was nothing. Do you know about this problem?
Yes, when you connect to a different UDE environment, if it’s on the same version as an existing one, it will use the same metadata configuration. Then you need to update the custom metadata location if you have different metadata. I haven’t tried having two metatada configs for the same version honestly.
Thanks Adrià,
Can you help me. I create new DeployablePackage but has some error.
C:\Users\xuan.tran\AppData\Local\Temp\2\UDE01\dynamicsax-ude01.nuspec’
Copying script file from C:\Users\xuan.tran\AppData\Local\Microsoft\Dynamics365\10.0.2177.120\PackagesLocalDirectory\Bin\InstallPackage.ps1 to C:\Users\xuan.tran\AppData\Local\Temp\2\UDE01\tools\InstallPackage.ps1
Copying script file from C:\Users\xuan.tran\AppData\Local\Microsoft\Dynamics365\10.0.2177.120\PackagesLocalDirectory\Bin\UninstallPackage.ps1 to C:\Users\xuan.tran\AppData\Local\Temp\2\UDE01\tools\UninstallPackage.ps1
Copying script file from C:\Users\xuan.tran\AppData\Local\Microsoft\Dynamics365\10.0.2177.120\PackagesLocalDirectory\Bin\dynamicspackagemanagement.psm1 to C:\Users\xuan.tran\AppData\Local\Temp\2\UDE01\tools\dynamicspackagemanagement.psm1
Preparing package files C:\Users\xuan.tran\AppData\Local\Microsoft\Dynamics365\RuntimeSymLinks\ude-demo012\UDE01, UDE01, C:\Users\xuan.tran\Desktop\New folder (2)\ixugkcss.wwz, C:\DynamicsTools\7za.exe, dynamicsax-ude01
Finished prepare package files
Switching to directory ‘C:\Users\xuan.tran\AppData\Local\Temp\2\UDE01’
Calling:& nuget.exe -ArgumentList pack dynamicsax-ude01.nuspec -NoPackageAnalysis -NoNewWindow -Wait
Calling: nuget.exe dynamicsax-ude01.nuspec exit unexpected. Retry once more. This command cannot be run due to the error: The system cannot find the file specified..
Calling: nuget.exe dynamicsax-ude01.nuspec exit unexpected. Retry once more. This command cannot be run due to the error: The system cannot find the file specified..
Cleaning up directory C:\Users\xuan.tran\AppData\Local\Temp\2\UDE01
Package creation failed.
Remove-Item : Cannot remove the item at ‘C:\Users\xuan.tran\AppData\Local\Temp\2\UDE01’ because it is in use.
At
C:\Users\xuan.tran\AppData\Local\Microsoft\Dynamics365\10.0.2177.120\PackagesLocalDirectory\Bin\CreatePackage.psm1:294
char:13
+ Remove-Item $packageDirectory -Force -Recurse
+ ~~~~~~~~~~~~~~~~~~~~~~~~~~~~~~~~~~~~~~~~~~~~~
+ CategoryInfo : InvalidOperation: (:) [Remove-Item], PSInvalidOperationException
+ FullyQualifiedErrorId : InvalidOperation,Microsoft.PowerShell.Commands.RemoveItemCommand
Error occurred.
C:\Users\xuan.tran\AppData\Local\Microsoft\Dynamics365\10.0.2177.120\PackagesLocalDirectory\Bin\RunPackageCreationAll.p
s1 : Calling: nuget.exe dynamicsax-ude01.nuspec failed after retries. This command cannot be run due to the error: The
system cannot find the file specified..
At line:1 char:1
+ C:\Users\xuan.tran\AppData\Local\Microsoft\Dynamics365\10.0.2177.120\ …
+ ~~~~~~~~~~~~~~~~~~~~~~~~~~~~~~~~~~~~~~~~~~~~~~~~~~~~~~~~~~~~~~~~~~~~~
+ CategoryInfo : NotSpecified: (:) [Write-Error], WriteErrorException
+ FullyQualifiedErrorId : Microsoft.PowerShell.Commands.WriteErrorException,RunPackageCreationAll.ps1
Calling: nuget.exe dynamicsax-ude01.nuspec failed after retries. This command cannot be run due to the error: The
system cannot find the file specified..
At
C:\Users\xuan.tran\AppData\Local\Microsoft\Dynamics365\10.0.2177.120\PackagesLocalDirectory\Bin\CreatePackage.psm1:719
char:17
+ … throw “Calling: $nugetLocation $packageId.nuspec failed a …
+ ~~~~~~~~~~~~~~~~~~~~~~~~~~~~~~~~~~~~~~~~~~~~~~~~~~~~~~~~~
+ CategoryInfo : OperationStopped: (Calling: nuget….ile specified..:String) [], RuntimeException
+ FullyQualifiedErrorId : Calling: nuget.exe dynamicsax-ude01.nuspec failed after retries. This command cannot be
run due to the error: The system cannot find the file specified..
Package creation failed.
Error occurred.
Package creation failed.
Error occurred.
Package creation failed.
Error occurred.
Package creation failed.
Error occurred.
Package creation failed.
Error occurred.
Package creation failed.
Error occurred.
Package creation failed.
Error occurred.
Package creation failed.
Error occurred.
Package creation failed.
Error occurred.
Package creation failed.
Error occurred.
Package creation failed.
Error occurred.
Package creation failed.
Error occurred.
Package creation failed.
Error occurred.
Hi, Adrià
I checked again and found that the way to create a package is no longer compatible with UDE.
I want to ask about creating package for using UDE:
Previously I wanted to Create Deployable Package then I did as follows: Extension => Dynamic365 => Deploy => Create deployment package. But now the above method is no longer supported
Besides build pipeline, is there any other way? Can you help me?