Configure pipeline
Now we need to create a new pipeline, you can just import this template from the newly created X++ (Dynamics 365) Samples and Tools Github project. After importing the template we’ll modify it a bit. Initially, it will look like this:
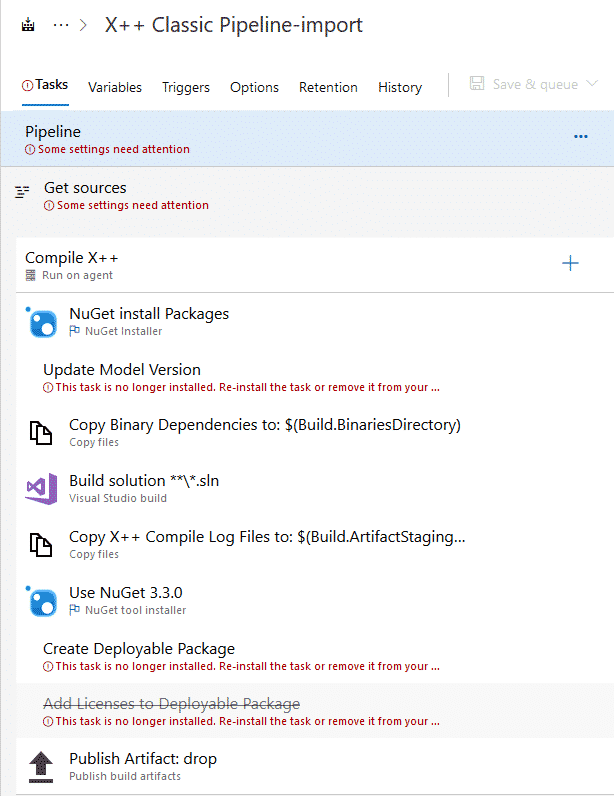
As you can see the pipeline has all the steps needed to generate the DP, but some of them, the ones contained in the Dynamics 365 tasks, won’t load correctly after the import. You just need to add those steps to your pipeline manually and complete its setup.
Pipeline rootLink to section: Pipeline root

You need to select the Hosted Azure Pipelines for the Agent pool, and vs2017-win2016 as Agent Specification.
Get sourcesLink to section: Get sources

I’ve mapped 2 things here: our codebase in the first mapping and the Build folder where I’ve added the solution and config files. If you’ve placed these files inside your Metadata folder you don’t need the extra mapping.
NuGet install PackagesLink to section: NuGet install Packages
This step gets the nugets from our artifacts feeds and the installs to be used in each pipeline execution.

The command uses the config files we have uploaded to the Build folder, and as you can see it’s fetching the files from the $(build.sourcesDirectory)\Build directory we’ve configured in the Get sources step. If you’ve placed those files in a diferent place you need to change the paths as needed.
Update Model VersionLink to section: Update Model Version
This is one of the steps that are displaying issues even though I got the Dynamics 365 tools installed from the Azure DevOps marketplace. If you got it right you probably don’t need to change anything. If you have the same issue as me, just add a new step and select the “Update Model Version” task and change the fields so it looks like this:

Build solutionLink to section: Build solution
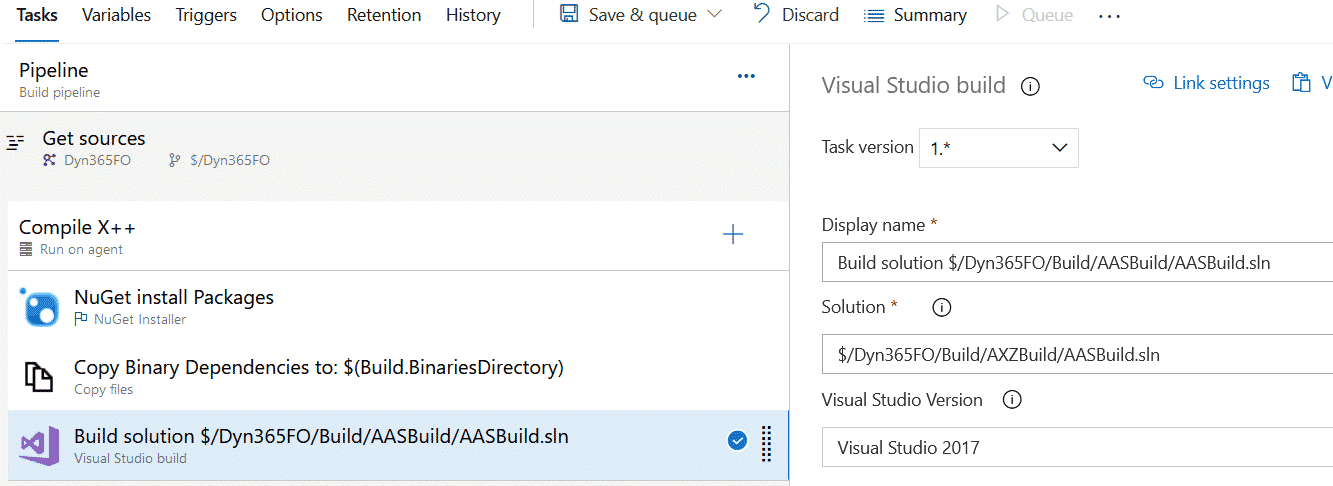
In the build solution step, you have a wildcard in the solution field: **\\*.sln. If you leave this wildcard it will build all the projects you have in the repo and, depending on the number of projects you have, the build could time out.
I solve this by selecting a solution, that contains all the models I have, that I have placed in the Build folder in my repo, and update that solution if you add or remove any model.
Thanks to Ievgen Miroshnikov for pointing this out!
There could be an additional issue with the rnrproj files as Josh Williams points out in a comment. If your project was created pre-PU27 try creating a new solution to avoid problems.
Create Deployable PackageLink to section: Create Deployable Package
This is another one of the steps that are not loading correctly for me. Again, add it and change as needed:

Add Licenses to Deployable PackageLink to section: Add Licenses to Deployable Package
Another step with issues. Do the same as with the others:

And that’s all. You can queue the build to test if it’s working. For the first runs you can disable the steps after the “Build solution” one to see if the nugets are downloaded correctly and your code built. After that try generating the DP and publishing the artifact.
You’ve configured your Azure hosted build, now it’s your turn to decide in which cases will you use the self-hosted or the azure hosted build.
5 comments
Hi Adrià,
Recently I saw a warning in pipeline results NuGet Install Packages will be deprecated soon. I understand we should used the task version 2.0 with restore type installation. Do you already try this solution ? Any feedback ?
Thanks in advance.
Best regards,
Rabih
Hi Rabih,
I hadn’t noticed that. I’ll check it, and also see if I can find the exact deprecation date and get back to you.
Regards,
Adrià
Hi Rabih,
I’ve been doing some tests with the version 2 of the nuget install task and the only possible way to use it is using a custom command in it:
install -NonInteractive $(build.sourcesDirectory)\Build\packages.config -ConfigFile $(build.sourcesDirectory)\Build\nuget.config -ExcludeVersion -OutputDirectory $(NugetsPath) -Verbosity DetailedOf course, the $(build.sourcesDirectory)\Build path will depend on your configuration. This should work, it’s working for me.
The problem with the restore command is that it’s not possible to use the -ExcludeVersion parameter and when the nugets are restored the folders include the version numbers and then in the build step, it is looking for the folder names without the version numbers. Of course we could change this, but for every nuget update we should change several things, and I think it’s easier to just use the custom command.
Maybe I should write a post with this…
Hi,
As mentioned by you in starting of this post, we have to import the pipeline from sample project. While doing so we are getting error in powershell as
‘{“$id”:”1″,”innerException”:null,”message”:”TF400898: An Internal Error Occurred. Activity Id: 55d316a7-1208-4ffd-8ea8-06fdd3ccd39c.”,”typeName”:”Newtonsoft.Json.JsonReaderException, Newtonsoft.Json”,”typeKey”:”JsonReaderException”,”errorCode”:0,”eventId”:0}”
I have place the json file in the same folder where ps file is present checked the json file and its format is also correct. Pls help.
Have you tried importing the JSON file in DevOps instead of using the PowerShell script?
Comments are closed.