ariste.info
  • MSDyn365 & Azure DevOps ALM
  • Get my book!
  • Services
  • About me
    • About me
    • Events
    • Subscribe
    • Contact
  • Logo
  • LinkedIn

Unified experience ALM

  • Welcome to the new ALM guide
    • Introduction
    • Prerequisites
  • Create and prepare Azure DevOps organization and project
    • Create an Azure DevOps organization
    • Create an Azure DevOps project
    • Enable TFVC projects in Azure DevOps
    • Add CI/CD agents with an Azure subscription
  • Unified development environment
    • What are unified developer environments?
    • Transition to a capacity-based model
    • Deploying a unified developer environment using PowerShell
    • Deploy an UDE environment from PPAC
    • Upgrade version in a Unified Development Environment
    • Useful links
  • Using Visual Studio
    • Connect Visual Studio to your UDE
    • Deploy code to a Unified Development Environment
  • Git basics for the unified experience
    • Add X++ code to a new Git repo
    • Configure your Git repository
  • Pipelines
    • What’s new in the pipelines?
    • YAML Pipelines
    • YAML Structure
    • Understanding YAML triggers
    • Create a YAML build pipeline
    • Create a classic release pipeline
    • Create a YAML Build and Release Pipeline With Stages

Legacy Guide

  • Welcome
    • Welcome!
  • Dynamics 365 for Finance & Operations & Azure DevOps
    • Intro
    • Package and model planning
    • Azure DevOps
    • First steps
    • The build server
    • Visual Studio
    • Some advice
    • Branching strategies
  • Azure Pipelines
    • Builds
    • Continuous integration
    • Gated check-ins
    • Set up the new Azure DevOps tasks for Packaging and Model Versioning
  • Azure hosted build for Dynamics 365 Finance & SCM
    • Intro
    • Azure agents
    • How does it work?
    • What do I need?
    • Azure DevOps artifacts
    • Prepare Azure DevOps
    • Configure pipeline
    • Update for version 10.0.18 and greater
  • Azure DevTest Labs powered builds
    • Intro
    • Azure DevTest Labs
    • Getting and preparing the VHD
    • Create a DevTest Labs account
    • Creating the VM
    • Preparing the VM
    • Create a new image
    • Azure DevOps pipelines
    • Run the build
    • Times
    • Show me the money
    • Some final remarks
  • Add and build .NET projects
    • Intro
    • Build .NET in your pipeline
    • Add a C# project to FnO
    • Build pipelinebui
    • Things I don’t like/understand/need to investigate
  • Release Pipelines
    • Intro
    • Setting up Release Pipeline in Azure DevOps for Dynamics 365 for Finance and Operations
    • AAD app creation
    • Create the release pipeline in DevOps
    • Creating the LCS connection
    • New Azure DevOps release tasks: MSAL authentication and ADAL deprecation
  • Automation
    • Update VMs using pipelines and d365fo.tools
    • Builds
    • Releases
    • But I like to add some human touch to it
    • Extra bonus
    • Update a variable in a release
  • LCS DB API
    • Call the LCS Database Movement API from your Azure DevOps Pipelines
    • Automating Prod to Dev DB copies
    • Restore a data package with Azure DevOps Pipelines
  • Secure your Azure Pipelines with Azure Key Vault
    • Azure Key Vault
    • Securing your Azure DevOps Pipelines
View Categories
  • ariste.info
  • Dynamics 365 F&O Dev ALM guide
  • Unified experience ALM
  • Pipelines
  • Create a classic release pipeline

Create a classic release pipeline

If you want to create a classic release pipeline, it’s still possible to do it.

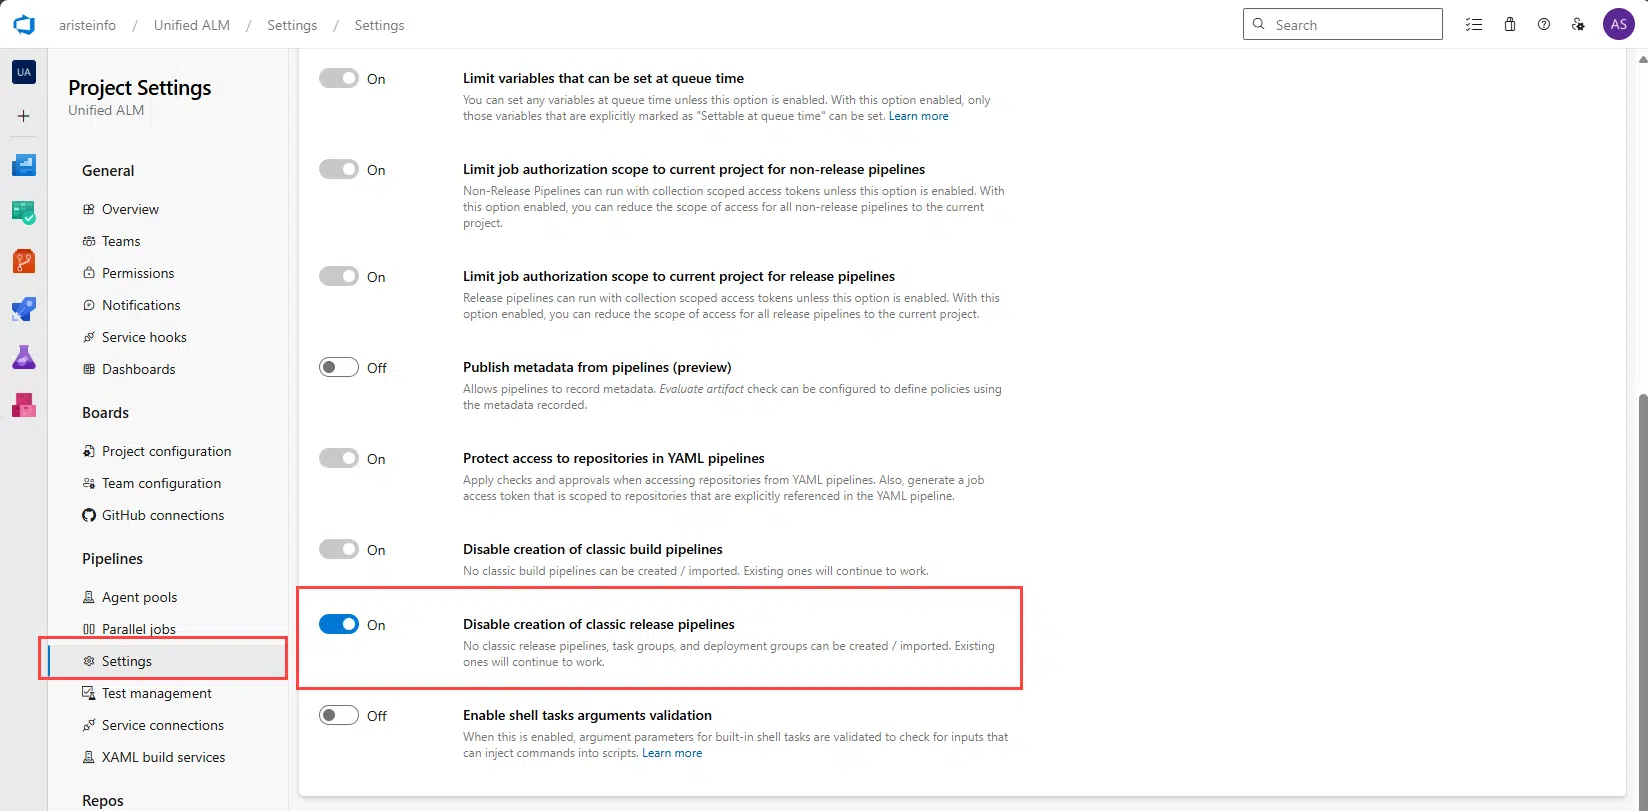
However, if you’ve created a new organization, they might be disabled for new projects. You can enable them in project settings > Pipelines > Settings:

Enable creation of classic release pipelines

Once that’s done, just go to Releases and create a new one.

Create the pipeline #

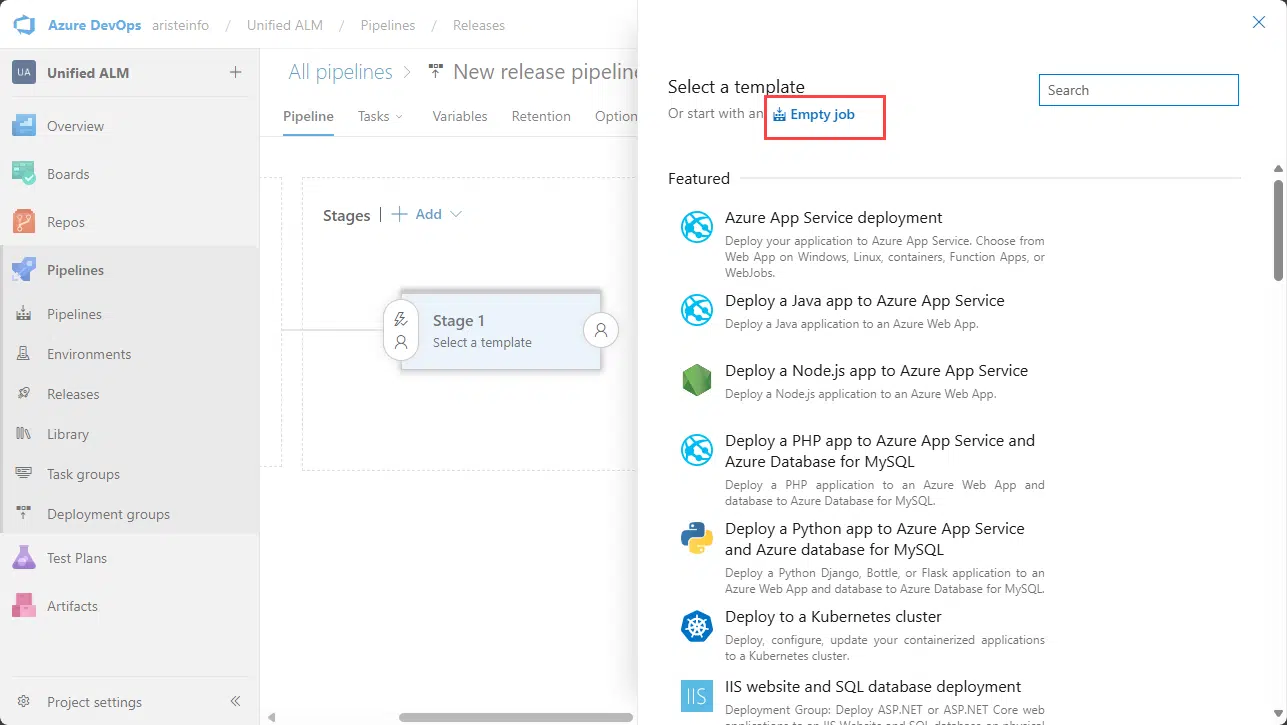
Select an Empty job to start:

Select Empty job
Select Empty job

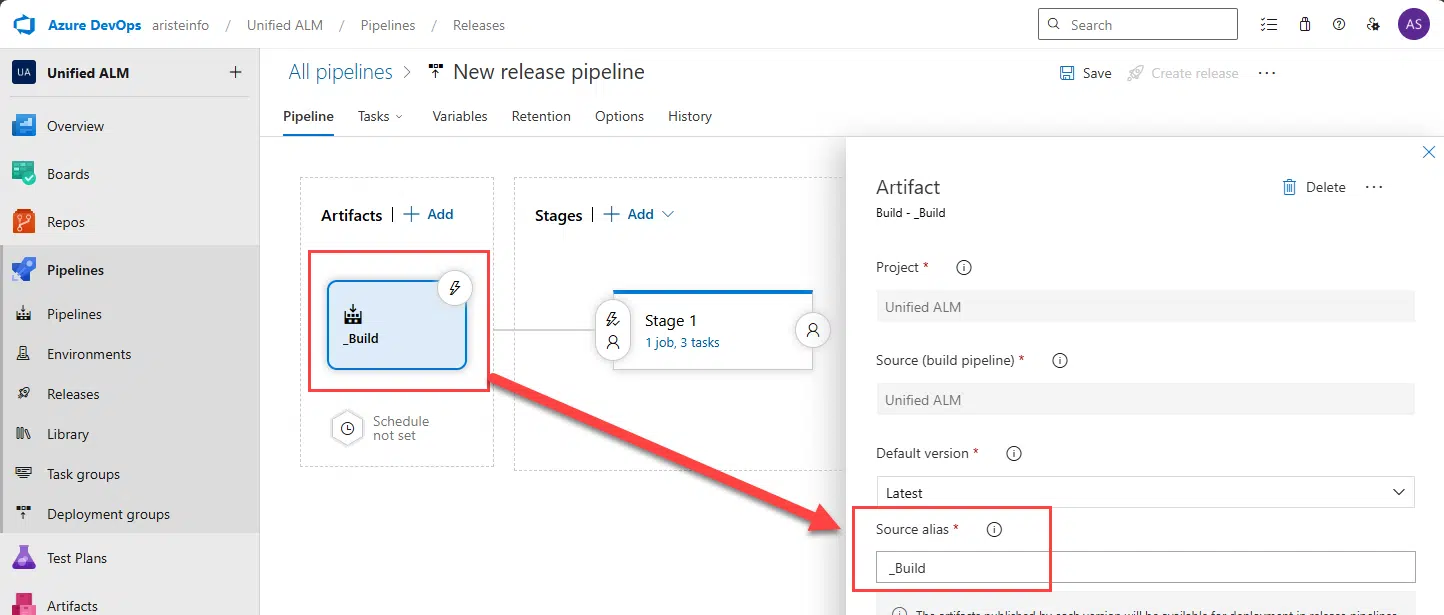
Now select an artifact by clicking the Add an artifact box:

Add an artifact
Add an artifact

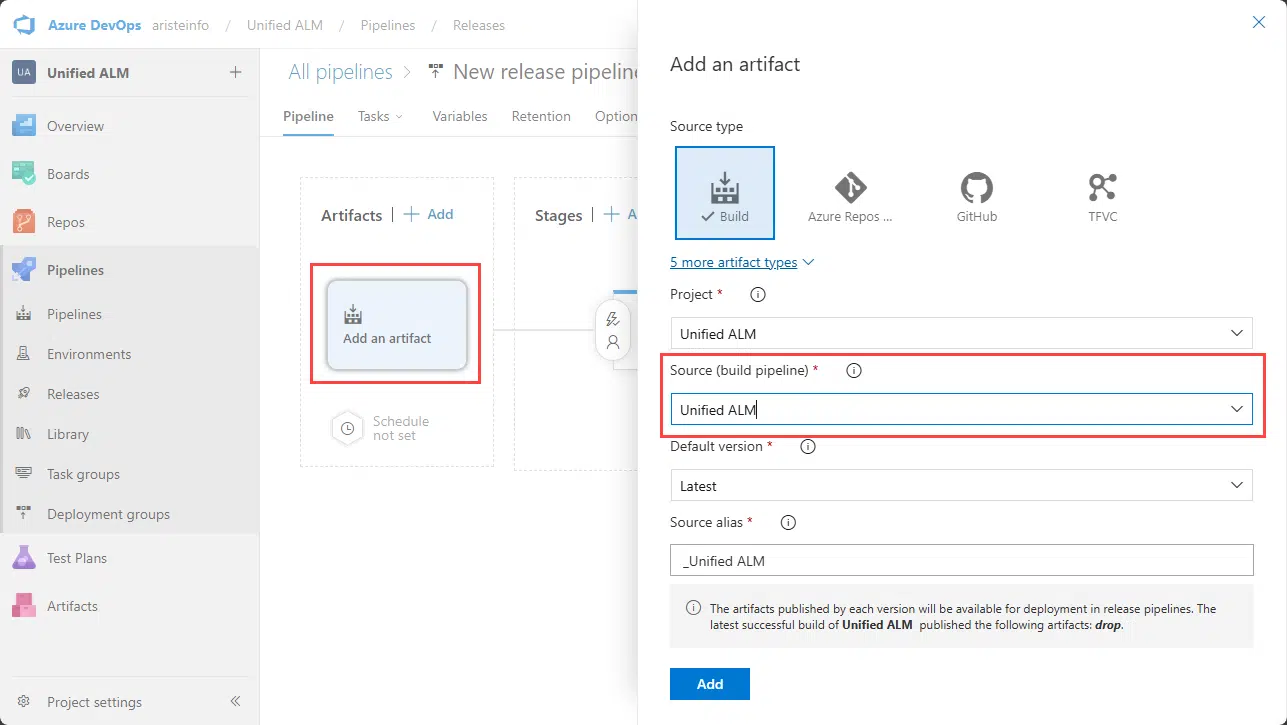
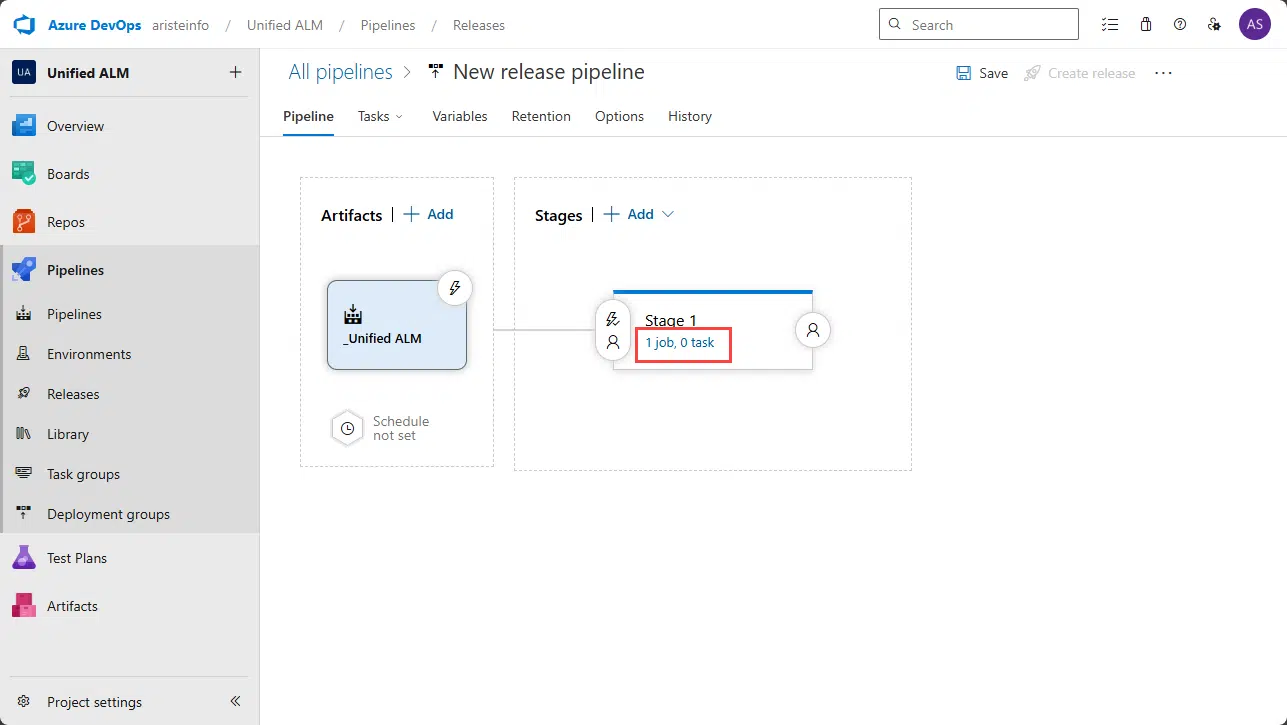
Select your build pipeline and click Add. Now we need to edit the tasks in the stage. Click the 1 job, 0 task link under stages.

Add new tasks
Add new tasks

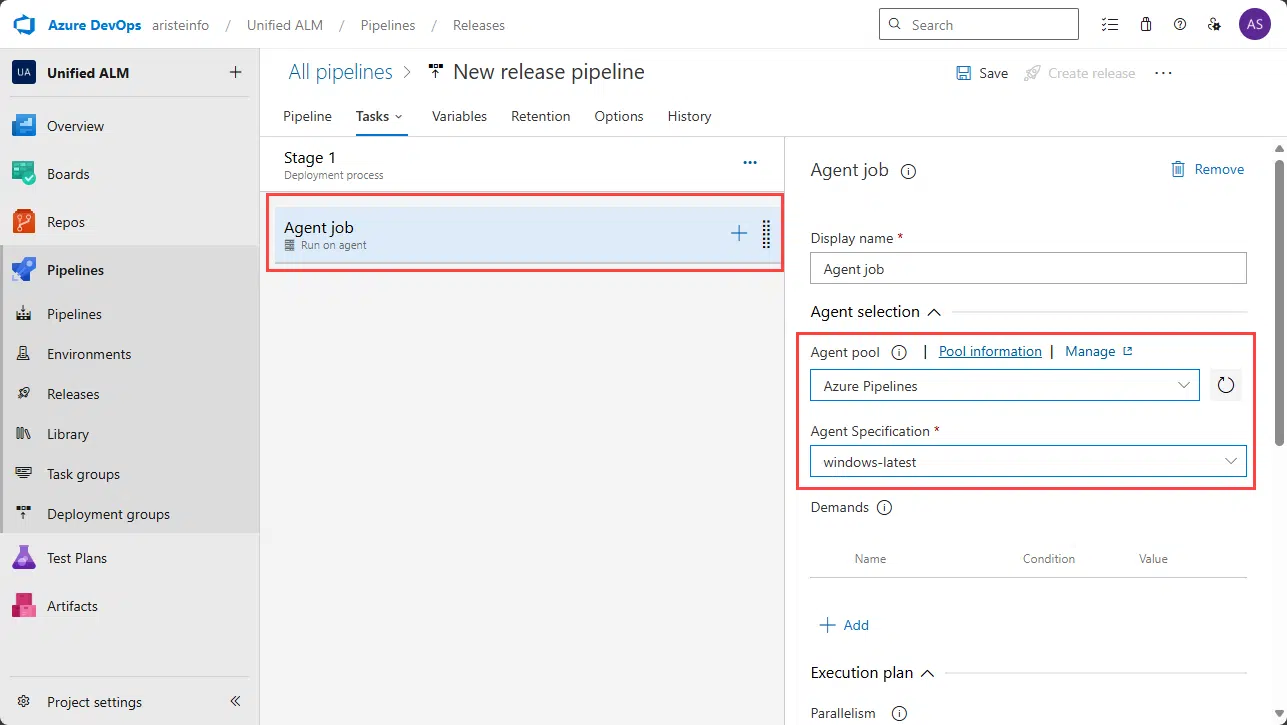
On the Agent job section, make sure to select Azure Pipelines as Agent pool and windows-latest as the Agent Specification:

Check the agent
Check the agent

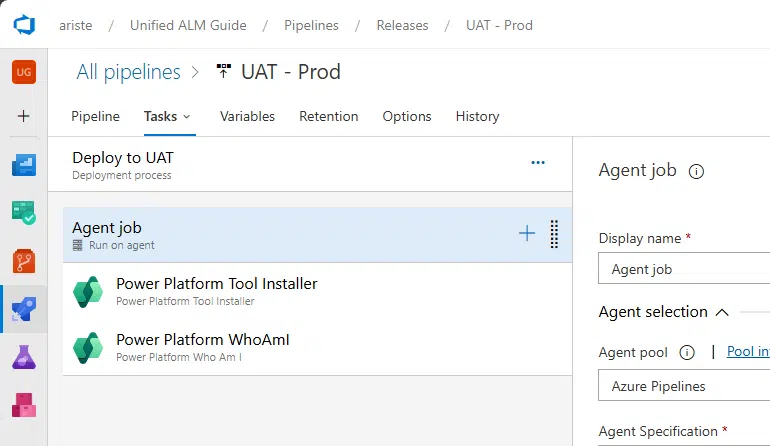
Now it’s time to add the tasks. F&O tasks? No! And this is the biggest difference: we’ll be adding Power Platform tasks!

First add the Power Platform Tool Installer task and then the Power Platform Who Am I task:

Add Power Platform tasks

Leave the installer task as it is, and select the WhoAmI task. Here we need to create a service connection, and I think I’m going to make us all happy with what’s coming.

Tired of arguing with IT because for the F&O release tools you needed a MFA-less user to create the service connection to LCS? Well, look at this beauty:

Use the service principal

No, you’re seeing it right; with the Power Platform tools, we can use a service principal, and that’s what we’re going to do!

Create the service connection #

Create an Entra ID app registration with a secret on your tenant.

In Azure DevOps, click the New button next to the Service connection field. In the Authentication method, select Application Id and client secret.

Application Id and secret

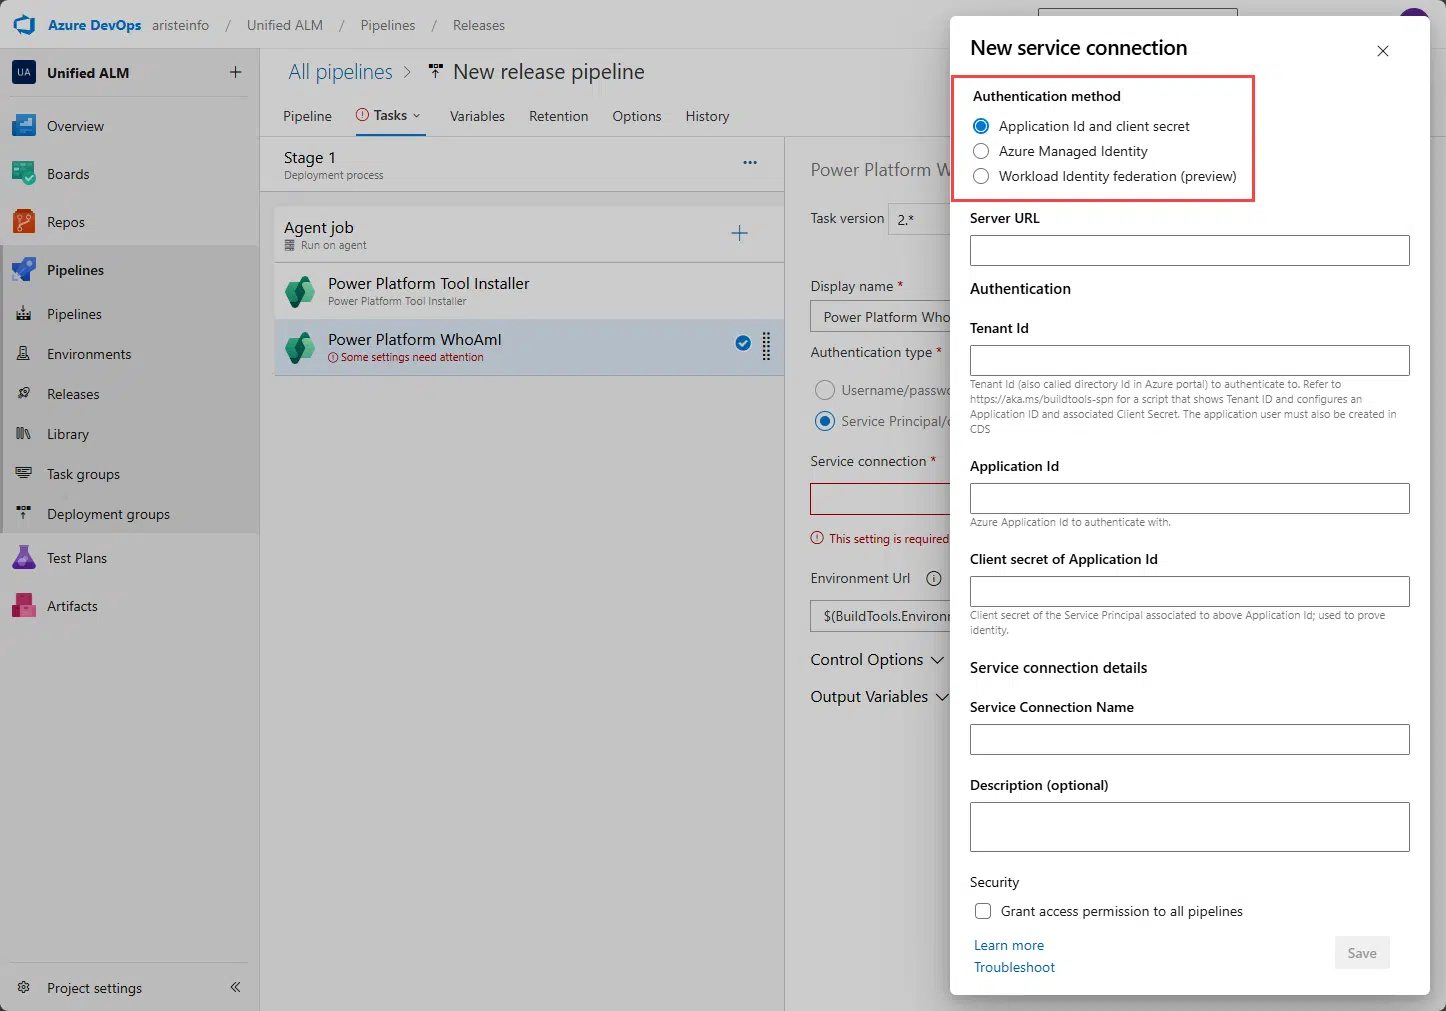
In the Server URL, enter the URL of the Dataverse environment, not the F&O one! It should end in .crmX.dynamics.com.

In Tenant ID, enter what appears on your Entra ID. And use the Application Id and secret you just created.

Finally, give it a name for the environment and click Save.

Add Service Principal to Dataverse #

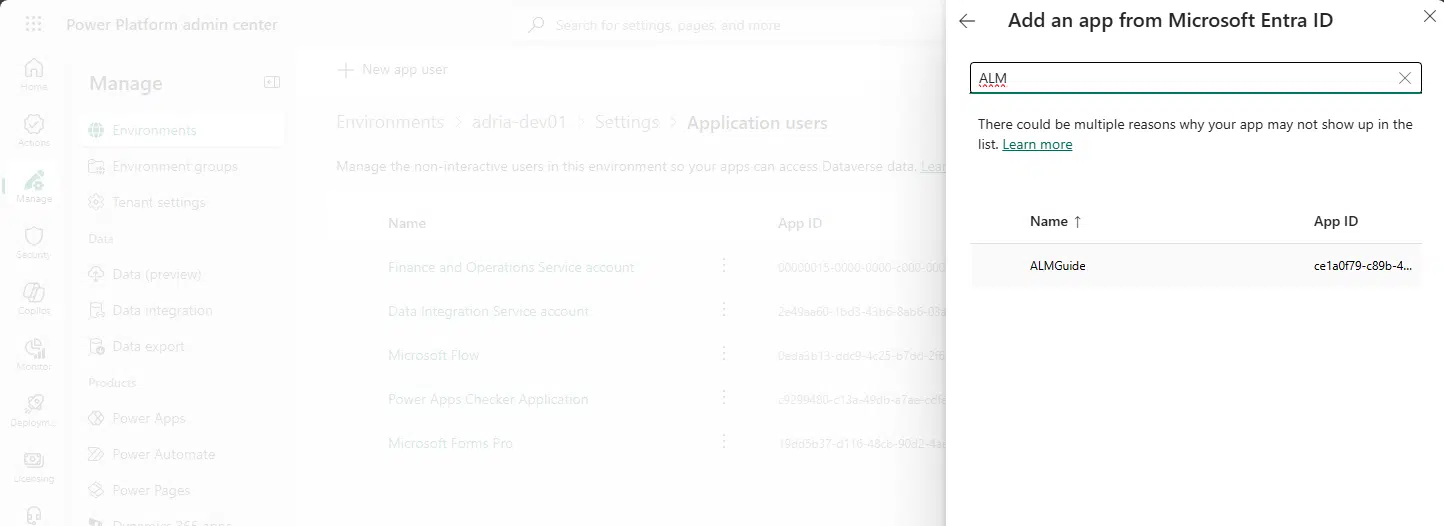
Before being able to deploy the pipeline, we need to add the Service principal as an Application User in Dataverse. Go to PPAC, open your environment details, and select S2S apps:

Access Application users

Click the New app user button and select an app; you can search by name or AppId:

Select your AppID
Select your AppID

In the Business unit field start typing your environment name and select that.

Click the edit button in Security roles and select the System Administrator role. Click Save and Create.

Your Service principal is ready to rock!

Deploy task #

Now add the Power Platform Deploy Package task to the pipeline and select the service connection we just created.

In the Package File field, you need to enter the following:

$(System.DefaultWorkingDirectory)/_Build/drop/CloudDeployablePackage/TemplatePackage.dll

Where the _Build part is the Source alias of your Artifact:

Create a classic release pipeline

Now save the release, and you can test it with the Create release button.

Subscribe! #

Receive an email when a new post is published
What are your Feelings

Share This Article :

  • Facebook
  • X
  • LinkedIn
  • Pinterest
Still stuck? How can I help?

How can I help?

Create a YAML build pipelineCreate a YAML Build and Release Pipeline With Stages

Write A Comment Cancel Reply

This site uses Akismet to reduce spam. Learn how your comment data is processed.

Table of Contents
  • Create the pipeline
  • Create the service connection
  • Add Service Principal to Dataverse
  • Deploy task
  • Dynamics 365 Community
  • Subscribe!
  • Microsoft MVP
  • LinkedIn
  • Privacy Policy
  • Contact
  • About me

© 2024 ariste.info. Designed by CazaPelusas.

Top

    Type above and press Enter to search. Press Esc to cancel.