We’ve got the essential, a VHD ready to be used as a base to create a virtual machine in Azure. Our next step is finding a way to make the deployment of this VM predictable and automated. We will attain this thanks to Azure ARM templates.
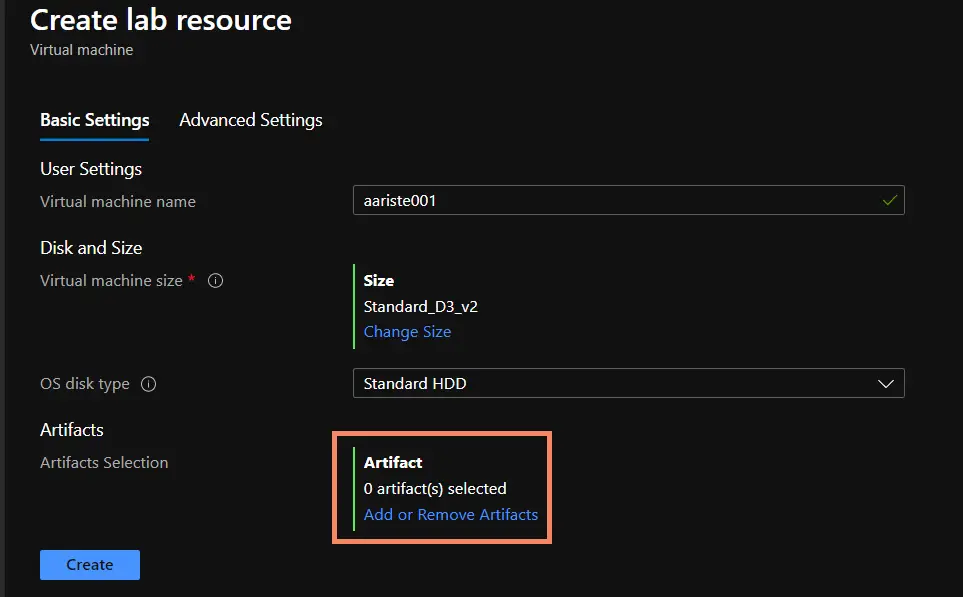
Go back to your DevTest Labs overview page and click the “Add” button, on the “Choose base” page select the base you’ve just created, and on the next screen click on the “Add or Remove Artifacts” link:

Search for WinRM, select “Configure WinRM”, and on the next screen enter “Shared IP address” as the hostname box and click “Add”.
Note:if when the VM runs the artifacts can’t be installed check whether the Azure VM Agent is installed on the base VHD. Thanks to Joris for pointing this out!
Configure Azure DevOps Agent Service #
Option A: use an artifact #
Update: thanks to Florian Hopfner for reminding me this because I forgot… If you choose Option A to install the agent service you need to do some things first!
The first thing we need to do is running some PowerShell scripts that create registry entries and environment variables in the VM, go to C:\DynamicsSDK and run these:
Import-Module $(Join-Path -Path "C:\DynamicsSDK" -ChildPath "DynamicsSDKCommon.psm1") -Function "Write-Message", "Set-AX7SdkRegistryValues", "Set-AX7SdkEnvironmentVariables" Set-AX7SdkEnvironmentVariables -DynamicsSDK "C:\DynamicsSDK" Set-AX7SdkRegistryValues -DynamicsSDK "c:\DynamicsSDK" -TeamFoundationServerUrl "https://dev.azure.com/YOUR_ORG" -AosWebsiteName $AosWebsiteName "AosService"The first one will load the functions and make them available in the command-line and the other two create the registry entries and environment variables.
Now we need to add an artifact for the Azure DevOps agent service. This will configure the agent service on the VM each time the VM is deployed. Search for “Azure Pipelines Agent” and click it. You will see this:

We need to fill some information:
On “Azure DevOps Organization Name” you need to provide the name of your organization. For example if your AZDO URL is https://dev.azure.com/blackbeltcorp you need to use blackbeltcorp.
On “AZDO Personal Access Token” you need to provide a token generated from AZDO.
On “Agent Name” give your agent a name, like DevTestAgent. And on “Agent Pool” a name for your pool, a new like DevTestPool or an existing one as Default.
On “Account Name” use the same user that we’ll use in our pipeline later. Remember this. And on “Account Password” its password. Using secrets with a KeyVault is better, but I won’t explain this here.
And, finally, set “Replace Agent” to true.
Option B: Configure Azure DevOps Agent in the VM #
To do this you have to create a VM from the base image you created before and then go to C:\DynamicsSDK and run the SetupBuildAgent script with the needed parameters:
SetupBuildAgent.ps1 -VSO_ProjectCollection "https://dev.azure.com/YOUR_ORG" -ServiceAccountName "myUser" -ServiceAccountPassword "mYPassword" -AgentName "DevTestAgent" -AgentPoolName "DevTestPool" -VSOAccessToken "YOUR_VSTS_TOKEN"WARNING: If you choose option B you must create a new base image from the VM where you’ve run the script. Then repeat the WinRM steps to generate the new ARM template which we’ll see next.
ARM template #
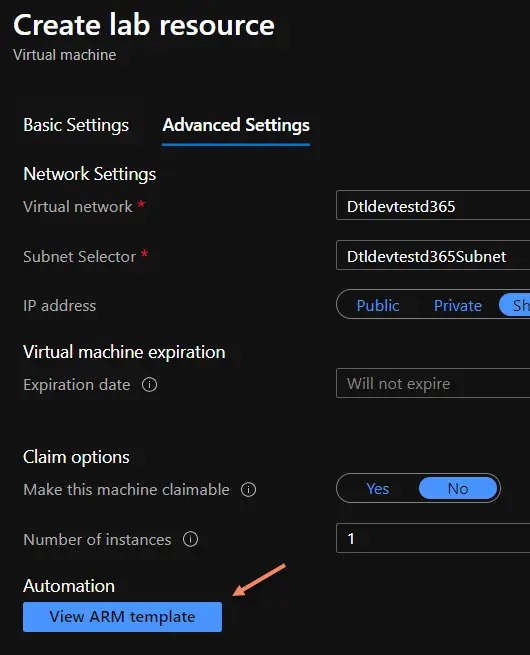
Then go to the “Advanced Settings” tab and click the “View ARM template” button:

This will display the ARM template to create the VM from our pipeline. It’s something like this:
{ "$schema": "https://schema.management.azure.com/schemas/2015-01-01/deploymentTemplate.json", "contentVersion": "1.0.0.0", "parameters": { "newVMName": { "type": "string", "defaultValue": "aariste001" }, "labName": { "type": "string", "defaultValue": "aristeinfo" }, "size": { "type": "string", "defaultValue": "Standard_B4ms" }, "userName": { "type": "string", "defaultValue": "myUser" }, "password": { "type": "securestring", "defaultValue": "[[[VmPassword]]" }, "Configure_WinRM_hostName": { "type": "string", "defaultValue": "Public IP address" }, "Azure_Pipelines_Agent_vstsAccount": { "type": "string", "defaultValue": "ariste" }, "Azure_Pipelines_Agent_vstsPassword": { "type": "securestring" }, "Azure_Pipelines_Agent_agentName": { "type": "string", "defaultValue": "DevTestAgent" }, "Azure_Pipelines_Agent_agentNameSuffix": { "type": "string", "defaultValue": "" }, "Azure_Pipelines_Agent_poolName": { "type": "string", "defaultValue": "DevTestPool" }, "Azure_Pipelines_Agent_RunAsAutoLogon": { "type": "bool", "defaultValue": false }, "Azure_Pipelines_Agent_windowsLogonAccount": { "type": "string", "defaultValue": "aariste" }, "Azure_Pipelines_Agent_windowsLogonPassword": { "type": "securestring" }, "Azure_Pipelines_Agent_driveLetter": { "type": "string", "defaultValue": "C" }, "Azure_Pipelines_Agent_workDirectory": { "type": "string", "defaultValue": "DevTestAgent" }, "Azure_Pipelines_Agent_replaceAgent": { "type": "bool", "defaultValue": true } }, "variables": { "labSubnetName": "[concat(variables('labVirtualNetworkName'), 'Subnet')]", "labVirtualNetworkId": "[resourceId('Microsoft.DevTestLab/labs/virtualnetworks', parameters('labName'), variables('labVirtualNetworkName'))]", "labVirtualNetworkName": "[concat('Dtl', parameters('labName'))]", "vmId": "[resourceId ('Microsoft.DevTestLab/labs/virtualmachines', parameters('labName'), parameters('newVMName'))]", "vmName": "[concat(parameters('labName'), '/', parameters('newVMName'))]" }, "resources": [ { "apiVersion": "2018-10-15-preview", "type": "Microsoft.DevTestLab/labs/virtualmachines", "name": "[variables('vmName')]", "location": "[resourceGroup().location]", "properties": { "labVirtualNetworkId": "[variables('labVirtualNetworkId')]", "notes": "Dynamics365FnO10013AgentLessV2", "customImageId": "/subscriptions/6715778f-c852-453d-b6bb-907ac34f280f/resourcegroups/devtestlabs365/providers/microsoft.devtestlab/labs/devtestd365/customimages/dynamics365fno10013agentlessv2", "size": "[parameters('size')]", "userName": "[parameters('userName')]", "password": "[parameters('password')]", "isAuthenticationWithSshKey": false, "artifacts": [ { "artifactId": "[resourceId('Microsoft.DevTestLab/labs/artifactSources/artifacts', parameters('labName'), 'public repo', 'windows-winrm')]", "parameters": [ { "name": "hostName", "value": "[parameters('Configure_WinRM_hostName')]" } ] }, { "artifactId": "[resourceId('Microsoft.DevTestLab/labs/artifactSources/artifacts', parameters('labName'), 'public repo', 'windows-vsts-build-agent')]", "parameters": [ { "name": "vstsAccount", "value": "[parameters('Azure_Pipelines_Agent_vstsAccount')]" }, { "name": "vstsPassword", "value": "[parameters('Azure_Pipelines_Agent_vstsPassword')]" }, { "name": "agentName", "value": "[parameters('Azure_Pipelines_Agent_agentName')]" }, { "name": "agentNameSuffix", "value": "[parameters('Azure_Pipelines_Agent_agentNameSuffix')]" }, { "name": "poolName", "value": "[parameters('Azure_Pipelines_Agent_poolName')]" }, { "name": "RunAsAutoLogon", "value": "[parameters('Azure_Pipelines_Agent_RunAsAutoLogon')]" }, { "name": "windowsLogonAccount", "value": "[parameters('Azure_Pipelines_Agent_windowsLogonAccount')]" }, { "name": "windowsLogonPassword", "value": "[parameters('Azure_Pipelines_Agent_windowsLogonPassword')]" }, { "name": "driveLetter", "value": "[parameters('Azure_Pipelines_Agent_driveLetter')]" }, { "name": "workDirectory", "value": "[parameters('Azure_Pipelines_Agent_workDirectory')]" }, { "name": "replaceAgent", "value": "[parameters('Azure_Pipelines_Agent_replaceAgent')]" } ] } ], "labSubnetName": "[variables('labSubnetName')]", "disallowPublicIpAddress": true, "storageType": "Premium", "allowClaim": false, "networkInterface": { "sharedPublicIpAddressConfiguration": { "inboundNatRules": [ { "transportProtocol": "tcp", "backendPort": 3389 } ] } } } } ], "outputs": { "labVMId": { "type": "string", "value": "[variables('vmId')]" } }}NOTE: if you’re using option B you won’t have the artifact node for the VSTS agent.
This JSON file will be used as the base to create our VMs from the Azure DevOps pipeline. This is known as Infrastructure as Code (IaC) and it’s a way of defining our infrastructure in a file as it were code. It’s another part of the DevOps practice that should solve the “it works on my machine” issue.
If we take a look to the JSON’s parameters node there’s the following information:
- newVMName and labName will be the name of the VM and the DevTest Labs lab we’re using. The VM name is not really important because we’ll set the name later in the pipeline.
- size is the VM size, a D3 V2 in the example above, but we can change it and will do it later.
- userName & passWord will be the credentials to access the VM and must be the same we’ve used to configure the Azure DevOps agent.
- Configure_WinRM_hostName is the artifact we added to the VM template that will allow the pipelines to run in this machine.
To do it faster and for demo purposes I’m using a plain text password in the ARM template, changing the password node to something like this:
"password": { "type": "string", "defaultValue": "yourPassword" },I will do the same with all the secureString nodes, but you shouldn’t and should instead use an Azure KeyVault which comes with the DevTest Labs account.
Of course you would never upload this template to Azure DevOps with a password in plain text. There’s plenty of resources online that teach how to use parameters, Azure KeyVault, etc. to accomplish this, for example this one: 6 Ways Passing Secrets to ARM Templates.
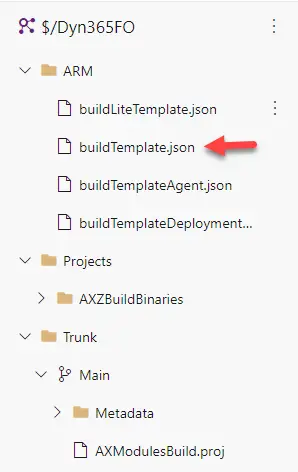
OK, now grab that file and save it to your Azure DevOps repo. I’ve created a folder in my repo’s root called ARM where I’m saving all the ARM templates:


