To me this is one of the biggest improvements we get from using Git in our repos.
While we can still use different classic build and classic release pipelines, with the YAML pipelines we can have pipelines with different stages that will first build and then release.
What are Stages? #
Imagine you’re running a mini factory for your code. Each stage is like a station on the assembly line where something specific happens before your code is ready to be deployed.
For example:
- You might start with a Build stage, where your code is compiled and a package is created.
- Then comes a Deploy UAT stage, where you deploy the code to the UAT environment.
- After that, you could have a Deploy Production stage that pushes your changes to production. Yes, production!
Each Azure DevOps stage can have multiple jobs and tasks, and you can decide when and how each stage runs, like “only deploy to production if someone approves it”.
Template pipeline #
To speed things up a little bit, I’ve created a template pipeline with a build stage, a UAT release stage, and a Prod release stage.
You can download it here: https://raw.githubusercontent.com/aariste/Unified-Experience-ALM/refs/heads/main/build-release.yml
Now let’s go through it and learn something. I will use line numbers as a reference, but I will also post pieces of the file.
From lines 1 to 26 we have this:
# Sample YML pipeline for X++ builds (multi-stage)
# https://docs.microsoft.com/en-us/dynamics365/fin-ops-core/dev-itpro/dev-tools/hosted-build-automation

name: $(Date:yy.MM.dd)$(Rev:.r)

trigger:
  - none

schedules:
  - cron: "0 6 * * *"           # 8:00 every day
    displayName: Daily Build at 08:00
    branches:
      include:
        - main
    always: false

# Global variables stay as-is
variables:
  App1Package: 'Microsoft.Dynamics.AX.Application1.DevALM.BuildXpp'
  App2Package: 'Microsoft.Dynamics.AX.Application2.DevALM.BuildXpp'
  AppSuitePackage: 'Microsoft.Dynamics.AX.ApplicationSuite.DevALM.BuildXpp'
  PlatPackage: 'Microsoft.Dynamics.AX.Platform.DevALM.BuildXpp'
  ToolsPackage: 'Microsoft.Dynamics.AX.Platform.CompilerPackage'
  MetadataPath: '$(Build.SourcesDirectory)\Metadata'
  NugetConfigsPath: '$(Build.SourcesDirectory)\Tools\Build'
  NugetsPath: '$(Pipeline.Workspace)\NuGets'
You can see it has no CI trigger, but it has a schedule. In this case it will run at 8am (CET) every day, only for the main branch (include), and only if there have been any changes to the codebase (always: false).
Build stage #
Next we have the first stage, which builds the code:
stages:
# ---------- Stage 1: Build ----------
- stage: Build
  displayName: X++ Build & Package
  jobs:
  - job: BuildXpp
    pool:
      vmImage: 'windows-latest'
      demands:
        - msbuild
        - visualstudio
    displayName: Build solution and create deployable package

    steps:
      # Install NuGet and use -ExcludeVersion option
      - task: NuGetCommand@2
        displayName: 'NuGet custom install Packages'
        inputs:
          command: custom
          arguments: 'install -Noninteractive $(NugetConfigsPath)\packages.config -ConfigFile $(NugetConfigsPath)\nuget.config -Verbosity Detailed -ExcludeVersion -OutputDirectory "$(NugetsPath)"'
This is marked by the stages keyword to signal that the pipeline has stages, and the -stage keyword for each stage.
Then, for every stage, we still have jobs. This is exactly the same as pipelines with no stages.
For each job, we have a pool with the VM image definition, and also steps and -tasks. Each of these tasks is a single operation inside the stage.
Deploy UAT stage #
After building, we’ve got the package ready to be applied.
# ---------- Stage 2: Deploy UAT ----------
- stage: DeployUAT
  displayName: Deploy to UAT
  dependsOn: Build
  condition: succeeded()
  jobs:
  - deployment: DeployToUAT
    timeoutInMinutes: 360
    pool:
      vmImage: 'windows-latest'
    displayName: Deploy package to UAT
    environment: 'D365-UAT'   # create this Environment in Azure DevOps and add approvals/checks as needed
    strategy:
      runOnce:
        deploy:
          steps:
            - task: PowerPlatformToolInstaller@2
              displayName: 'Power Platform Tool Installer '

            - task: PowerPlatformWhoAmi@2
              displayName: 'Power Platform WhoAmI '
              inputs:
                authenticationType: PowerPlatformSPN
                PowerPlatformSPN: 'CSNA-UAT'

            - task: PowerPlatformDeployPackage@2
              displayName: 'Power Platform Deploy Package '
              inputs:
                authenticationType: PowerPlatformSPN
                PowerPlatformSPN: 'CSNA-UAT'
                PackageFile: '$(Pipeline.Workspace)/drop/CloudDeployablePackage/TemplatePackage.dll'
Again, the stage has a jobs part and steps that run. These steps are the same as the ones used in the classic release pipeline.
What I want you to remember from this is the environment in the deployment.
jobs:
  - deployment: DeployToUAT
    timeoutInMinutes: 360
    pool:
      vmImage: 'windows-latest'
    displayName: Deploy package to UAT
    environment: 'D365-UAT'   # create this Environment in Azure DevOps and add approvals/checks as needed
For the UAT stage, it’s called D365-UAT. We’ll talk about the environment in a minute.
Before that I want to remark on the dependsOn and condition on the stage:
- stage: DeployUAT
  displayName: Deploy to UAT
  dependsOn: Build
  condition: succeeded()
What does that mean? First, the dependsOn item tells us that running the DeployUAT stage depends on the Build stage. It was clear without an explanation.
Then the condition expected is succeeded(). This means that if the Build stage fails, the DeployUAT won’t run.
Deploy Prod stage #
And, finally, the deploy to prod stage, which essentially is the same as the UAT but for another environment.
Regarding the PowerPlatformSPN value, this is the service connection. In the YAML pipeline case, you need to create the service connection beforehand. There’s no new button here.
About Deploying to Production #
Yes, there are no guardrails here. We can deploy code directly to prod; no need to go through a sandbox environment first.
Does that mean that we should do it? Hell no! Even if Microsoft allows us to deploy code to production, we’re the owners and final responsible parties for our custom code.
We still need to adhere to best practices, code with quality in mind, and do proper testing, both technical and functional, before deploying anything to prod.
Environments #
So what are environments? In Azure DevOps, environments are the places your code gets deployed to, like UAT or Prod.
When you add an environment to a YAML file, it gets automatically created on DevOps:
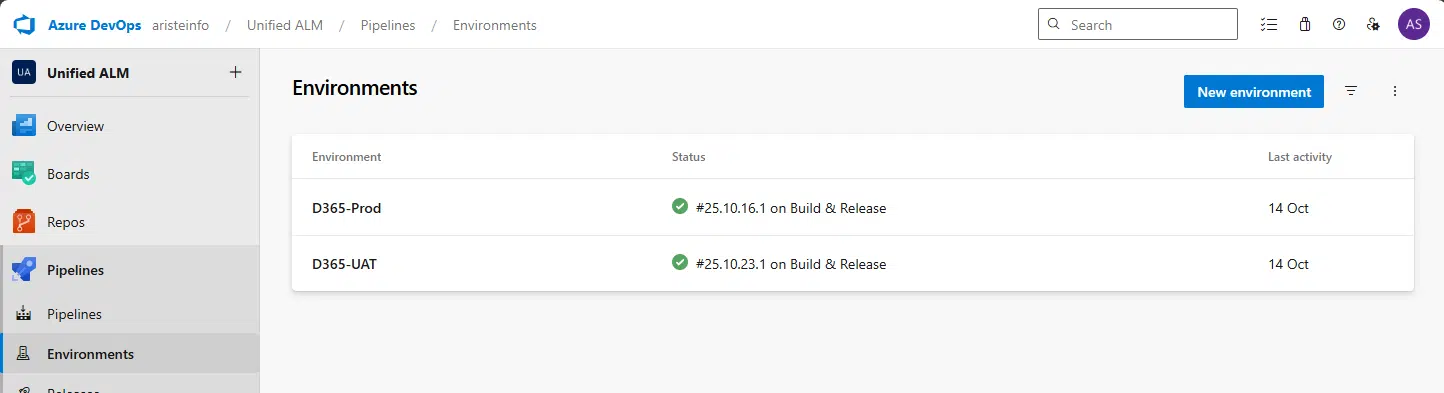
Each environment can have its own approvals, checks, and permissions, so you can control who and what gets deployed where.
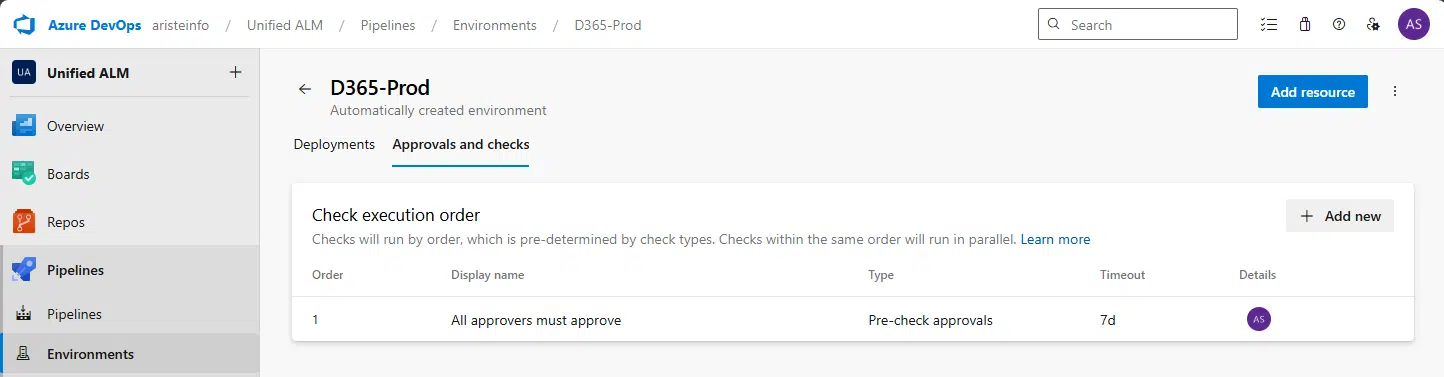
And it’s here where you MUST add approvals for your environments, especially the production one!
You don’t want to start servicing the production environment in the middle of the workday, right? There’s the business hours approval for that!

Please, use this new superpower with care.
And to end this, here’s how the pipeline run with stages looks like:

Timeouts #
And of course, we have a limitation! One that we can overcome easily and that you might’ve noticed already.
In the deploy stages, I have set a manual timeout:
timeoutInMinutes: 360The Azure-hosted pipelines’ jobs can run for up to 60 minutes, and deploying using the Power Platform tools is taking a bit over an hour.
To avoid hitting the timeout, we need to purchase an additional agent job and set the timeoutInMinutes value in the stage.


